

Personal data handling
The Contentsquare tag masks Personal Data before it leaves the browser and offers configurable commands, HTML attributes, and encrypted-collection modes to control what is sent and stored.
At a glance
Section titled At a glancePersonal Data handling on the Contentsquare tag relies on three layers:
- Automatic Personal Data Redaction — the tag detects common patterns (emails, JWTs, OAuth tokens, credit card numbers) and redacts them before any data leaves the browser. See Automatic Personal Data Redaction.
- Masking features you configure — commands and HTML attributes to mask or strip Personal Data from URLs, API error URLs, DOM content, and clicked element text. See Masking features.
- Controlled Exposure — collect and encrypt selected values client-side so Contentsquare cannot see them, and decrypt only with your private key when reviewing replays. See Controlled Exposure.
Some data is sent as-is and is not automatically masked — most notably identity strings (identify), user properties, event names, event/pageview properties, and ecommerce item data. You are responsible for ensuring these do not contain Personal Data. See Data sent as-is.
Automatic Personal Data Redaction
Section titled Automatic Personal Data RedactionThe Contentsquare tag automatically detects and replaces certain types of personal data before any information leaves the browser. This happens without any configuration.
The types of personal data that are detected depend on the data channel.
What is detected
Section titled What is detected| Personal data type | Replacement token | How it is detected |
|---|---|---|
| Email addresses | CS_ANONYMIZED_EMAIL | Pattern matching of email addresses, including URL-encoded forms (%40, %2540) |
| JWT tokens | CS_ANONYMIZED_JWT | Structural match on the standard JWT format (eyXxx.eyXxx.Xxx — three base64-encoded segments) |
| OAuth token values | CS_ANONYMIZED_TOKEN | Query parameters named id_token, access_token, refresh_token, or auth_token, regardless of the token format |
| Credit card numbers | CS_ANONYMIZED_PII | 16-digit Visa/Mastercard number patterns, validated with a Luhn checksum |
Where each type is masked
Section titled Where each type is maskedNot every detection applies everywhere. The table below shows exactly which personal data types are masked in each data channel.
| Data channel | Emails | JWT tokens | OAuth tokens | Credit cards |
|---|---|---|---|---|
| URLs (page URL, referrer) | ✅ | ✅ | ✅ | — |
| HTML / DOM content (Session Replay) | ✅ | — | — | ✅ |
| JavaScript error messages | ✅ | — | — | — |
| JavaScript error filenames | ✅ | ✅ | ✅ | — |
| API error URLs | ✅ | ✅ | ✅ | — |
| Custom error messages | ✅ | — | — | — |
| Custom error messages (embedded URLs) | ✅ | ✅ | ✅ | — |
| Custom Variables (name and value) | ✅ | — | — | — |
| Dynamic Variables (name and string value) | ✅ | — | — | — |
| Ecommerce transactions (transaction id) | ✅ | — | — | — |
Also, the following data-specific protections are always applied:
- JavaScript errors: form field values (patterns like
value="...") are redacted in error messages. - Custom errors: phone numbers and name patterns (for example
firstName=,lastName=,userName:"...") are also redacted in error messages. - API errors: the query string is stripped entirely from the collected URL, in addition to the masking listed above.
- Clicked element text: if the text of a clicked button or link contains an email address or a credit card number, the entire text is dropped and not collected.
Data sent as-is (not automatically masked)
Section titled Data sent as-is (not automatically masked)The following data is transmitted without any Automatic Personal Data Redaction. If these channels may contain personal data, you are responsible for ensuring it is removed before sending it to Contentsquare.
| Data channel | Details |
|---|---|
identify identity string | The identity string is sent as-is. Use the { hash: true } option to hash it client-side before sending. |
User properties (addUserProperties) | Keys and values are sent as-is (only truncated to 255 characters) |
Visit properties (customProperties:visit:add) | Keys and values are sent as-is |
Pageview properties (customProperties:page:add) | Keys and values are sent as-is |
Page events (trackPageEvent) | The event name string is sent verbatim |
Custom events (trackEvent) | The event name string is sent verbatim |
| External events | The event name string is sent verbatim |
Custom errors — name and attributes (trackError) | Only the error message is filtered; the error name and attributes are sent as-is |
Ecommerce item data (ec:transaction:items:add) | Item names, SKUs, categories, and other attributes are sent as-is |
| Dynamic Variable integer values | Integer values are not processed for anonymization |
| Non-email Personal Data in Custom/Dynamic Variable strings | Credit card numbers, phone numbers, JWT tokens, and other sensitive data (other than emails) are not detected in Custom or Dynamic Variable values |
Masking features
Section titled Masking featuresBeyond Automatic Personal Data Redaction, Contentsquare provides several commands and HTML attributes to mask or strip Personal Data from specific channels. This section lists every available feature and explains how and where to use them.
Command cheatsheet
Section titled Command cheatsheetThe following commands and attributes are available to control Personal Data collection. Each is detailed in the corresponding section below or in the Command Reference.
| Scope | Command / attribute | Purpose |
|---|---|---|
| URL path | setPath | Rewrite the URL path before it is collected |
| URL query string | setQuery | Rewrite the URL query string before it is collected |
| Referrer | referrer:maskUrl | Mask Personal Data in the referrer path |
| Referrer | referrer:removeQueryString | Drop the referrer query string |
| API error URLs | networkRequest:maskUrls | Mask Personal Data in collected API error URLs |
| Session Replay (DOM) | setPIISelectors | Mask DOM elements matching CSS selectors |
| Session Replay (DOM) | data-cs-mask attribute | Mask the content of a specific HTML element |
| Session Replay (DOM, Page Masking on) | setCapturedElementsSelector | Expose specific elements on a masked page via CSS selectors |
| Session Replay (DOM, Page Masking on) | data-cs-capture attribute | Expose a specific element on a masked page |
| Session Replay (page-level) | excludeURLforReplay | Disable Session Replay collection for matching pages |
| Controlled Exposure | setEncryptionSelectors | Collect the content of matching elements in encrypted form |
| Controlled Exposure | data-cs-encrypt attribute | Collect the content of a specific element in encrypted form |
| Identity | identify with { hash: true } | Hash the identity string client-side before sending it |
| Identity | resetIdentity | Clear the identity string (for example, on logout) |
In identity and user attributes
Section titled In identity and user attributesThe tag exposes several commands to attach identity or attributes to a user. None of these values are automatically masked — what you pass is what is sent and stored.
identify: associates an identity string with the current user. The value is sent as-is unless you use the{ hash: true }option, which hashes it client-side. Prefer non-directly-identifying values (UUIDs, account numbers) over emails or phone numbers. See Track Users → Best practices for the trade-offs of client-side hashing.resetIdentity: clears the identity associated with the current user. Use it on logout so a subsequent user on the same device does not inherit the previous identity.addUserProperties,customProperties:visit:add,customProperties:page:add: attach custom properties to the user, visit, or pageview. Keys and values are sent verbatim — do not pass Personal Data in either.
For the full API, see Track Users.
Personal Data handling in the HTML (in Session Replay)
Section titled Personal Data handling in the HTML (in Session Replay)Sessions will be collected for Session Replay if:
- The
Session Replayfeature has been enabled for your account - The threshold set by the
Session Replay Collection Rateis not exceeded
For the HTML content to be sent, all these conditions must be true:
- The user hasn't opted out
- The session is being tracked
- The browser is compatible
- The session has been flagged as "Collected for Session Replay", using the
_cs_scookie
Session Replay data collection options
Section titled Session Replay data collection optionsIf Session Replay is turned on and data collection is active for the session, the HTML content of the page is sent after every pageview (both natural and artificial) and every DOM change (only the updated elements are sent).
The Page Masking setting controls how much of the page content is collected.
With Page Masking off
Section titled With Page Masking offThe following protections apply regardless of Page Masking state: Contentsquare never collects the actual text typed into any <input> or <textarea> field.
- The content of
<input>elements with typetext,email,password,search,tel,urlor<input>elements without atypeattribute are replaced with bullets before the HTML is sent - Every figure of
<input>elements with typenumberare replaced by 0 - The
valueattribute is stripped from every<input>element, regardless of its type (includingcheckbox,radio,hidden,range, and others) - The content
<textarea>elements is replaced with bullets before the HTML is sent - The content inside any element with a defined
contenteditableproperty is replaced with bullets before the HTML is sent - The content of
<script>elements is emptied - Except for the items listed previously, all the HTML content is sent, including
<head> - The content of every element marked with the data attribute
data-cs-maskis removed (see the Tagging DOM elements section)
With Page Masking on
Section titled With Page Masking onThe following protections apply regardless of Page Masking state: Contentsquare never collects the actual text typed into any <input> or <textarea> field.
- The content of
<input>elements with typetext,email,password,search,tel,urlor<input>elements without a type are replaced with bullets before the HTML is sent - Every figure of
<input>elements with typenumberare replaced by 0 - The
valueattribute is stripped from every<input>element, regardless of its type (includingcheckbox,radio,hidden,range, and others) - The content
<textarea>elements is replaced with bullets before the HTML is sent - The content inside any element with a defined
contenteditableproperty is replaced with bullets before the HTML is sent - The content of
<script>elements is emptied - The content of every element marked with the data attribute
data-cs-maskis removed (see the Tagging DOM elements section) - The content of every element marked with the data attribute
data-cs-captureis collected and shown unless it falls under the excluded elements listed above (<input>,<textarea>) - Every character of the text content included in the elements sent is replaced by "A"
- Attributes unrelated to layout are removed. Only
id,class,style,src,srcset,href,rel, andtypeare kept
Selectively mask pages by URL
Section titled Selectively mask pages by URLIn case your site displays Personal Data only on a specific set of pages, you can decide to run the Page Masking process only on a pre-defined set of pages, so that you won't have to apply the masking across the whole site. These can only be configured by your dedicated Success Manager.
There are two available options:
- Mask all pages except: All pages will be masked except the ones defined by a Regex Pattern agreed with your Success Manager.
- Unmask all pages except: All pages will be collected with clear content except from the ones defined by a Regex pattern agreed with your Success Manager
Block data collection for specific pages (Session Replay)
Section titled Block data collection for specific pages (Session Replay)Use the excludeURLforReplay command to block data collection on pages based on their URL. Use cases include:
- Personal data has been exposed
- Exclude whole parts of your website from being collected for Session Replay
- Some page replays for Session Replay cause performance issues (when the page contains many images or videos, for instance) — you can block these pages until the problem is fixed
window._uxa = window._uxa || [];window._uxa.push(["excludeURLforReplay", "URL_REGEX"]);This command is scoped to the current pageview and must be rerun every time the tag loads.
Using this command does not block pageviews for the given pages — it only blocks data collection for Session Replay.
Remove content/Personal Data from the collected HTML
Section titled Remove content/Personal Data from the collected HTMLThere are two methods to remove content from the collected HTML:
- Using the Contentsquare Personal Data Selector
- Tagging DOM Elements
Personal Data Selector
Section titled Personal Data SelectorEach DOM element to be masked is identified by its CSS selector, and those selectors are pushed to the API via a JavaScript object. The content of the identified element is removed from the replay.
Push the following object containing CSS selectors for text and attributes to the API, before firing the main tag:
window._uxa = window._uxa || [];window._uxa.push(['setPIISelectors', PIIObject]);The structure of the PII Object is as follows:
-
PIISelectors: Comma-separated list of CSS selectors which allow the matching DOM elements to be masked by the tag. -
Attributes: Using this key, you can remove the defined attributes of the DOM elements from the elements matching the CSS selectors. You can use an array of attribute names as shown in the example above.
Keep in mind that using both PII Selectors and Attributes is optional, meaning you can use either full element selectors, specific attribute selectors or both in the same object:
{ PIISelectors: [".css-selector, selector"], // DOM elements to be masked Attributes: [ { selector: "select#month option, select#year option", // CSS selector(s) attrName: 'id' // Attribute name you want to mask }, { selector: ".link-page-7", // CSS selector(s) attrName: ['href','name'] // Array attribute names you want to mask } ]};Tagging DOM elements
Section titled Tagging DOM elementsTo exclude content from being collected, use the data-cs-mask attribute on selected elements:
Content before<p data-cs-mask>emailaddress@sentitivedata.com</p>Content afterTheir content is removed in the browser before it is sent to Contentsquare:
Content before<p data-cs-mask>emailaddress@sentitivedata.com</p>Content afterYou can also add the data-cs-mask attribute with JavaScript provided you do it before any pageview is sent.
Events on removed HTML — Events (click, hover, etc.) will still be collected and sent to our servers even if they are targeting removed HTML elements. They will be visible in the application using Live Resources (as named in the platform).
Display content in a fully masked HTML page
Section titled Display content in a fully masked HTML pageThere are two methods to display content in a masked HTML page:
- Using the Contentsquare Personal Data Selector
- Tagging DOM Elements
Personal Data Selector
Section titled Personal Data SelectorEach DOM element to be displayed is identified by its CSS selector, and those selectors are pushed to the API via a JavaScript object. The content of the identified element is displayed in Session Replay.
The string which contains comma-separated CSS selectors for text and for attributes must be pushed to the Contentsquare API, before firing the main tag, as follows:
window._uxa = window._uxa || [];window._uxa.push(["setCapturedElementsSelector", "#capture-me, .show-me"]);Tagging DOM elements
Section titled Tagging DOM elementsTo display an HTML element in a masked page, add the data-cs-capture attribute to the HTML elements:
Sensitive Content before<p data-cs-capture>some piece of text that is not sensitive</p>Sensitive Content afterContent that is part of the tagged element is captured as is:
AAAA AAAA AA<p data-cs-capture>some piece of text that is not sensitive</p>AAA AAA AAIt can also be added with JavaScript, but attributes must be added before any pageview is sent.
Session Replay Testing
Section titled Session Replay TestingPrerequisites
Section titled Prerequisites- Have Google Chrome installed
- Download the Contentsquare Tracking Setup Assistant ↗ Chrome Extension
- Mask elements from the replay using CSS selectors or the
data-cs-maskattribute —<input>elements are not captured by default, except dropdowns which still need masking - Activate full session masking
- If you have already provided us with a list of your internal/office IPs for us to add to our exclusion list, inform your Contentsquare Success Manager to temporarily pause that exclusion list. Otherwise, sessions run from such an IP will not be collected by Contentsquare
Testing
Section titled Testing-
Start a journey on your website, featuring the elements to be masked.
-
In the Contentsquare Tracking Setup Assistant extension, select
Turn off automaskingto prevent 'AAA' masking from affecting your local session.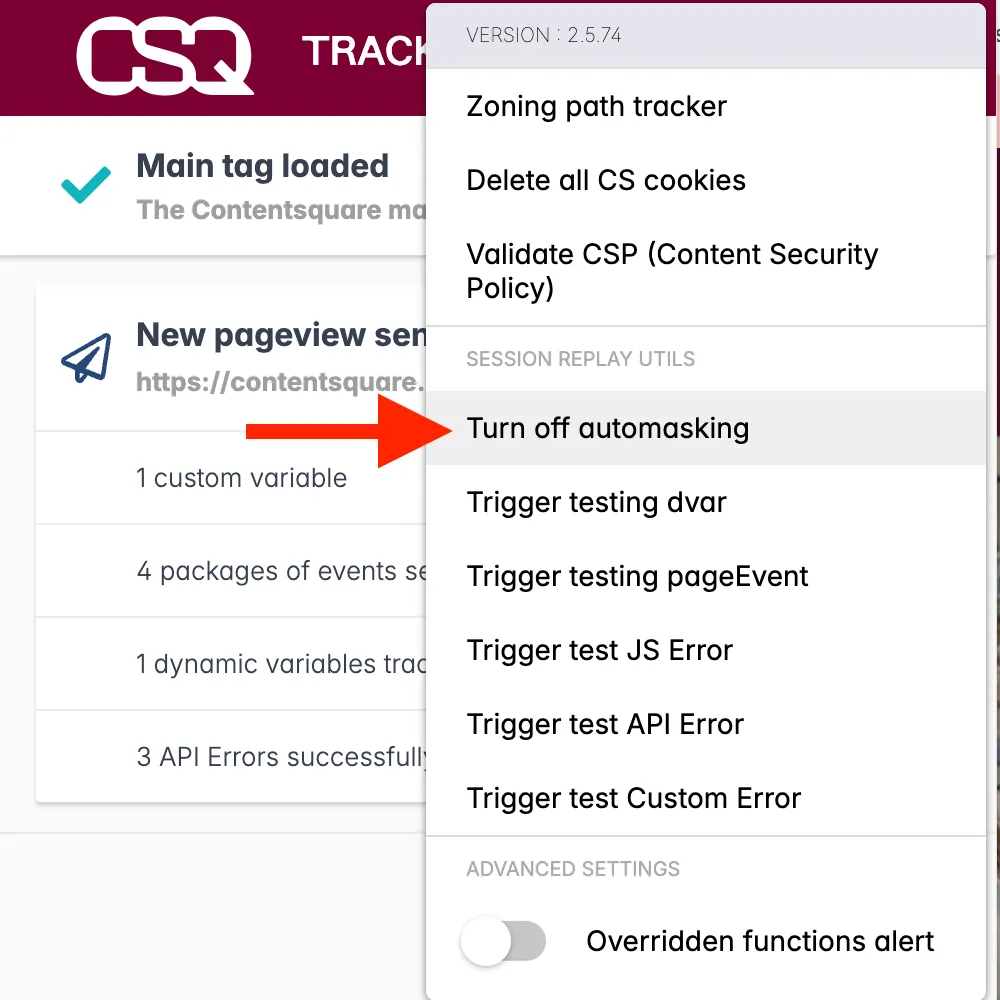
-
Select
Collected for Session Replayto enable Session Replay data collection for your session.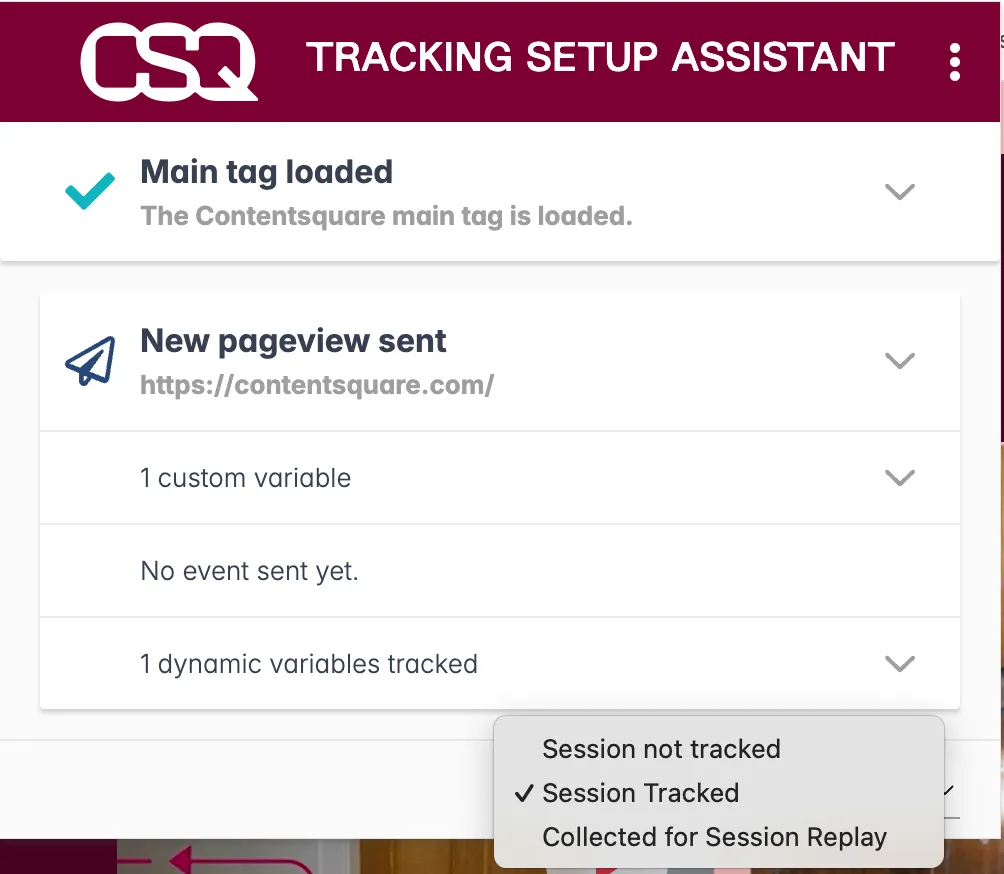
-
Select
Trigger testing pageEventto create theSR Testingpage event which identifies your current session.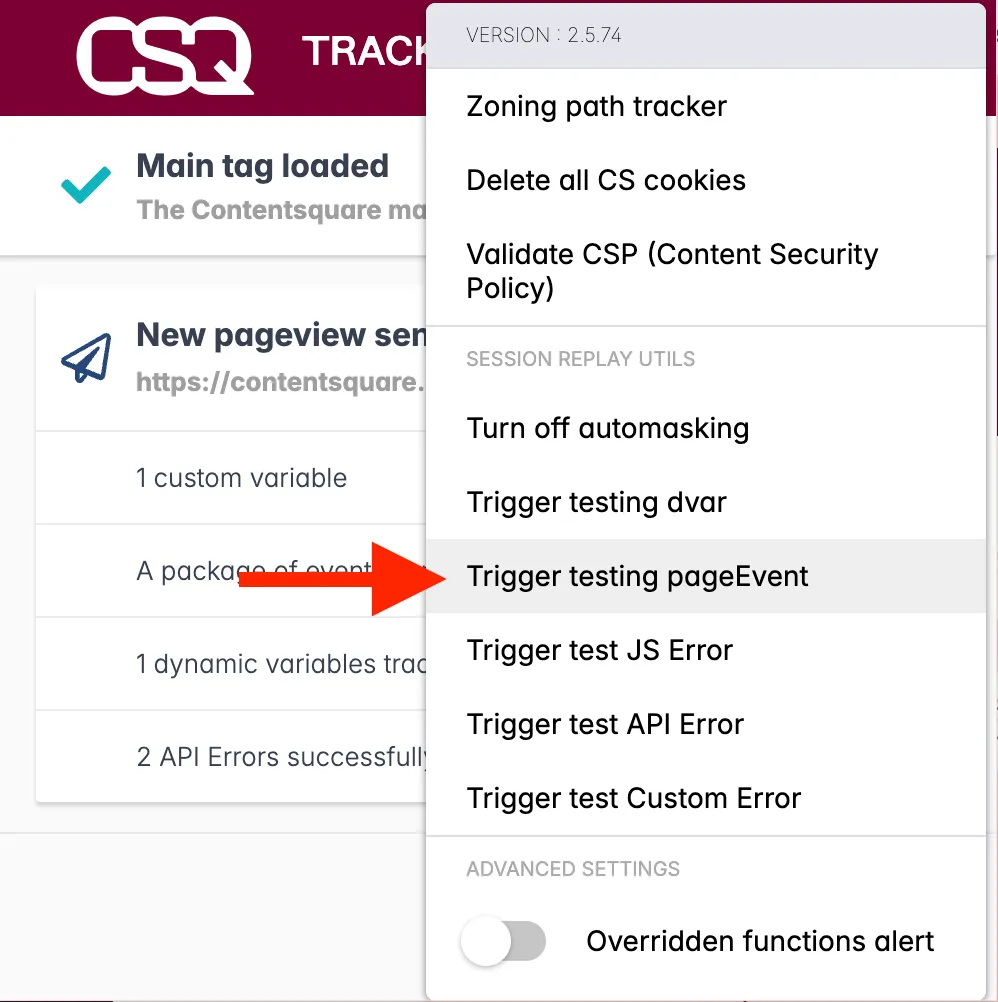
-
Make sure that the elements to be masked are visible as you progress along your testing journey. If required, fill out any test personal information. You will be able to check this information has been masked in the resulting replay.
-
Once you are done testing, close your session by either closing the session's tab or deleting your cookies.
-
Watch the replay and look for all the areas where Personal Data could appear:
- ❌ If Personal Data is visible, update your masking and test again.
- ✅ If there were no Personal Data, you are covered in terms of Privacy compliance.
What's next?
Section titled What's next?If you are in the initial implementation phase of your project, inform your Success Manager about the results so they can double-check and then turn Page Masking off for you to use full Session Replay.
If you are not in implementation and your tests are successful, you can update the Page Masking rules directly from the Console in Contentsquare if you are an Admin, by going to the Page Masking tab.
For instructions, see the Help Center article ↗.
Following Session Replay requests
Section titled Following Session Replay requestsHTML content is sent via requests to one of the endpoints listed below, based on where data is stored for your project:
https://k.aeu1.contentsquare.net/{apiVersion}/recordinghttps://k.aus1.contentsquare.net/{apiVersion}/recordinghttps://k.eu1.az.contentsquare.net/{apiVersion}/recordinghttps://k.us1.az.contentsquare.net/{apiVersion}/recordinghttps://k.ba.contentsquare.net/{apiVersion}/recordinghttps://k.bf.contentsquare.net/{apiVersion}/recordinghttps://k.aa.contentsquare.net/{apiVersion}/recordinghttps://k.af.contentsquare.net/{apiVersion}/recording
The request is sent when the 2nd value of the _cs_s cookie (Session Replay data collection state) is 3 (collected) or 5 (collected after a specific trigger) or when ETR is enabled on the project.
The request contains all the DOM.
Blocking Personal Data in URLs
Section titled Blocking Personal Data in URLsPersonal data appears in more places than just the HTML content.
For a given page, you also need to mask Personal Data found in:
- The path of the current page
- The query string parameters of the current page
- The referrer of the next visited page
Unmasked data could be exposed in the Error Analysis module.
Masking Personal Data in the URL path
Section titled Masking Personal Data in the URL pathTo remove Personal Data in the URL of the current page, rewrite the URL of the pageview before the tag collects it, using the setPath command.
The setPath command takes as a parameter the exact new path to collect as a URL.
window._uxa = window._uxa || [];window._uxa.push([ 'setPath', <NEW_PATH_TO_COLLECT>]);Call this command on every page where the URL contains Personal Data, before the main Tracking tag is loaded. Only the path is to be configured, not the whole URL.
Example
Section titled Examplewindow._uxa = window._uxa || [];window._uxa.push(["setPath", "/users/CS_ANONYMIZED_USER_ID"]);| URL before masking | URL after masking |
|---|---|
https://www.contentsquare.com/users/jon.snow | https://www.contentsquare.com/users/CS_ANONYMIZED_USER_ID |
https://www.contentsquare.com/cartpage/users/jon.snow | https://www.contentsquare.com/users/CS_ANONYMIZED_USER_ID |
Masking Personal Data in URL query string parameters
Section titled Masking Personal Data in URL query string parametersWhen Personal Data can be found in the query parameters of an URL, use the setQuery command to replace the query string within the URL with a new masked one.
window._uxa = window._uxa || [];window._uxa.push([ 'setQuery', <ANONIMYZED_QUERY_STRING>]);The setQuery command takes as a parameter the exact new query string to display within the URL. This command instructs the tag to replace the part of the URL after the ? with masked values.
Call this command on all pages where the URL contains Personal Data, and before the main tag is loaded. Only the query string is to be configured, not the whole URL.
Example
Section titled Examplewindow._uxa = window._uxa || [];window._uxa.push(["setQuery", "?user_id=CS_ANONYMIZED_USER_NAME&address=CS_ANONYMIZED_ADDRESS"]);| URL before masking | URL after masking |
|---|---|
https://www.mysite.com/us/makeup/valentines-day/?user_id=jon.snow&address=castle.black | https://www.mysite.com/us/makeup/valentines-day/?user_id=CS_ANONYMIZED_USER_NAME&address=CS_ANONYMIZED_ADDRESS |
https://www.mysite.com/us/makeup/valentines-day/?campaign=valentinesday_feb_2021&user_id=jon.snow&address=castle.black | https://www.mysite.com/us/makeup/valentines-day/?user_id=CS_ANONYMIZED_USER_NAME&address=CS_ANONYMIZED_ADDRESS |
Customize the masked term according to the type of the parameter to replace, so that the result is explicit:
CS_ANONYMIZED_USER_IDCS_ANONYMIZED_EMAILCS_ANONYMIZED_ADDRESS
...and more.
Masking Personal Data in the referrer
Section titled Masking Personal Data in the referrerEven when you have masked Personal Data in URLs and query parameters on a page, they propagate to the next visited page through the referrer ↗. To handle this use case, use the referrer: commands below.
In the URL
Section titled In the URLConsider this journey:
- Users navigate from
https://www.example.com/users/123456/products/ABCDEFtohttps://www.example.com/. - A pageview is sent on
https://www.example.com/. - The referrer value in both the browser and in the pageview request is
https://www.example.com/users/123456/products/ABCDEF.
To mask Personal data in the URL within the referrer, use the referrer:maskUrl command:
var referrers = [ "https://www.example.com/users/:USER_ID/products/:PRODUCT_ID", "https://www.example.com/account/cancelOrder/:ORDER_ID", "https://www.example.com/order/:ORDER_ID/merge/:ORDER_ID",];window._uxa = window._uxa || [];for (var i = 0; i < referrers.length; i++) { window._uxa.push(["referrer:maskUrl", referrers[i]]);}The referrer value in the pageview request for https://www.example.com/ will be:
https://www.example.com/users/CS_ANONYMIZED_USER_ID/products/CS_ANONYMIZED_PRODUCT_IDhttps://www.example.com/account/cancelOrder/CS_ANONYMIZED_ORDER_IDhttps://www.example.com/order/CS_ANONYMIZED_ORDER_ID/merge/CS_ANONYMIZED_ORDER_ID
Within query parameters
Section titled Within query parametersConsider this journey:
- Users navigate from
https://www.example.com/confirmation?firstname=jon&lastname=snowtohttps://www.example.com/. - A pageview is sent on
https://www.example.com/. - The referrer value in both the browser and in the pageview request is
https://www.example.com/confirmation?firstname=jon&lastname=snow.
To mask Personal data in the query string part of the referrer, use the referrer:removeQueryString command:
window._uxa = window._uxa || [];window._uxa.push(["referrer:removeQueryString"]);The referrer value in the pageview request for https://www.example.com/ will be:
https://www.example.com/?
Removing Personal Data in API errors
Section titled Removing Personal Data in API errorsUse the networkRequest:maskUrls command to rewrite the URL before the tag collects the API error URL.
The command takes as parameter one or several masking patterns to apply to URLs containing Personal Data. Patterns can match the full URL of the page or only a part of it.
window._uxa = window._uxa || [];window._uxa.push([ 'networkRequest:maskUrls', <PATTERN>]);Patterns include the URL fragments to mask as variables prefixed by a colon.
Such variables are replaced by CS_ANONYMIZED_{FRAGMENT}:
:user_idbecomesCS_ANONYMIZED_USER_ID:addressbecomesCS_ANONYMIZED_ADDRESS:emailbecomesCS_ANONYMIZED_EMAIL
Call this command on all pages containing Personal Data which call the Contentsquare API, and before the main tag is loaded.
Example
Section titled Examplewindow._uxa.push([ "networkRequest:maskUrls", ["order/:order_id/merge/:order_id", "order/:order_id/item", "cancelOrder/:order_id"]]);| URL before masking | URL after masking |
|---|---|
https://api.net/order/:order_id/merge/:order_id | https://api.net/order/CS_ANONYMIZED_ORDER_ID/merge/CS_ANONYMIZED_ORDER_ID |
https://api.net/order/:order_id/item | https://api.net/order/CS_ANONYMIZED_ORDER_ID/item |
https://www.api.nl/nl/ajax/nfs/account/cancelOrder/:order_id | https://www.api.nl/nl/ajax/nfs/account/cancelOrder/CS_ANONYMIZED_ORDER_ID |
Removing Personal Data in Clicked Element
Section titled Removing Personal Data in Clicked ElementWhen clicked element collection is turned on and data collection is active for the session, the tag collects the text payload of the buttons and links being clicked as part of other analytics payloads (see /events request).
With Page Masking off
Section titled With Page Masking offThe clicked element will be collected except if it is masked by data-cs-mask.
With Page Masking on
Section titled With Page Masking onThe clicked element will not be collected except if data-cs-capture is present on the clicked button or link.
You can also mask specific elements on the webpage. This masking takes priority over Page Masking configuration. For more information, see personal data selector section.
Controlled Exposure
Section titled Controlled ExposureThe Contentsquare Tracking Tag does not collect any text typed into input or textarea fields.
If you need to display the personal data of a user, such as shipping/delivery addresses, names, phone numbers, email addresses, or text inputs in a form field, use the collect and encrypt mode.
With the collect and encrypt mode, you can collect, store, and display text in input, textarea fields, or any other element within a page that is usually masked by the tag, before it is sent to Contentsquare's servers.
Collect and encrypt personal data from the collected HTML
Section titled Collect and encrypt personal data from the collected HTMLThere are two methods to collect and encrypt personal data from the collected HTML:
- Using the Contentsquare Encryption Selector
- Tagging DOM Elements
Encryption Selector
Section titled Encryption SelectorEach DOM element to be collected and encrypted is identified via its CSS selector. These selectors are pushed to the API via a JavaScript object. The content of the identified element is then encrypted and collected for Session Replays.
The following object that contains CSS selectors for text should be pushed to the API as follows, before firing the main tag:
window._uxa = window._uxa || [];window._uxa.push(["setEncryptionSelectors", "#cart, .total-items"]);Tagging DOM elements
Section titled Tagging DOM elementsThe data-cs-encrypt attribute can be added on an input field, textarea field, or any other element.
Instead of being masked, the text in the tagged element is encrypted, stored, and made available for exposing under specific conditions.
The encryption process happens on the innerText property of the tagged element. It does not apply on nested elements: the text of the nested element won't be masked nor encrypted. Make sure to add the data-cs-encrypt attribute on the most granular elements that must be collected.
<h2 class="welcoming"> Welcome back <span class="user_name" data-cs-encrypt>John Doe</span></h2>You can also add the data-cs-encrypt attribute with JavaScript provided you do it before any pageview is sent.
Data Encryption
Section titled Data EncryptionTo use Controlled Exposure, obtain a combination of encryption keys:
- Public key: used by the Tracking Tag to encrypt the data
- Private key: used by the app for decryption
How to generate the key pair
Section titled How to generate the key pairOption 1: With a Google chrome script
Section titled Option 1: With a Google chrome script-
Copy the following script:
function arrayBufferToString(buffer) {const byteArray = new Uint8Array(buffer);let byteString = "";for (let i = 0; i < byteArray.byteLength; i += 1) {byteString += String.fromCodePoint(byteArray[i]);}return byteString;}crypto.subtle.generateKey({name: "RSA-OAEP",hash: "SHA-256",modulusLength: 4096,publicExponent: new Uint8Array([1, 0, 1]),},true,["encrypt", "decrypt"],).then((keysObject) => {crypto.subtle.exportKey("pkcs8", keysObject.privateKey).then((result) => {const privateKey = btoa(arrayBufferToString(result));console.log(`Private key: `, privateKey);});crypto.subtle.exportKey("spki", keysObject.publicKey).then((result) => {const publicKey = btoa(arrayBufferToString(result));console.log(`Public key: `, publicKey);});}); -
Paste the script in the Chrome console.
-
Press enter on the keyboard.
Option 2: With OpenSSL or OpenSSH
Section titled Option 2: With OpenSSL or OpenSSHOn linux/Mac, you can use OpenSSL:
openssl genpkey -out mykey.pem -algorithm RSA -pkeyopt rsa_keygen_bits:4096openssl rsa -in mykey.pem -pubout > mykey.pubOn Windows you will need to install WSL ↗.
How to add a public key
Section titled How to add a public key- Go to the Contentsquare Console > Choose the account > Choose the project > "Encryption management" tab.
- Select "Store public key".
- Paste your preferred public key.
- Select "Store key".
Unmask on-screen text in Contentsquare
Section titled Unmask on-screen text in Contentsquare- Select the key icon and select Unmask on-screen text
- Enter in the private key and select decrypt (all replays will be exposed)
User identifier
Section titled User identifierWith the User Identifier feature, you can search for replays belonging to specific users using a unique identifier. You can search and access all sessions associated with a specific user, for example john@gmail.com, within the selected date range. Use this feature in the case of user feedback or complaints.
The user identifier can be any value which uniquely identifies a user such as a username, an account number, email address, phone number, CRM ID, or loyalty system ID. It is immediately hashed and encoded in a one-way format before it is sent to Contentsquare.
When filtering Session Replays with a user identifier in Contentsquare, the same hashing algorithm is used and both hashes are compared to match the user identifier with its associated replays.
User identifier implementation
Section titled User identifier implementation-
Choosing the right User Identifier: Opt for a unique identifier like the email address, username, or account number that is available on the front-end.
-
Collecting User Identifiers: To collect the user identifier, you need to send a page event using the
trackPageEventcommand, with the prefix@user-identifier@:window._uxa = window._uxa || [];window._uxa.push(["trackPageEvent", "@user-identifier@user_email"]);Or if you pull the identifier from the data layer:
window._uxa = window._uxa || [];window._uxa.push(["trackPageEvent", "@user-identifier@" + dataLayer.Name]);The user identifier value is limited to 100 characters.