

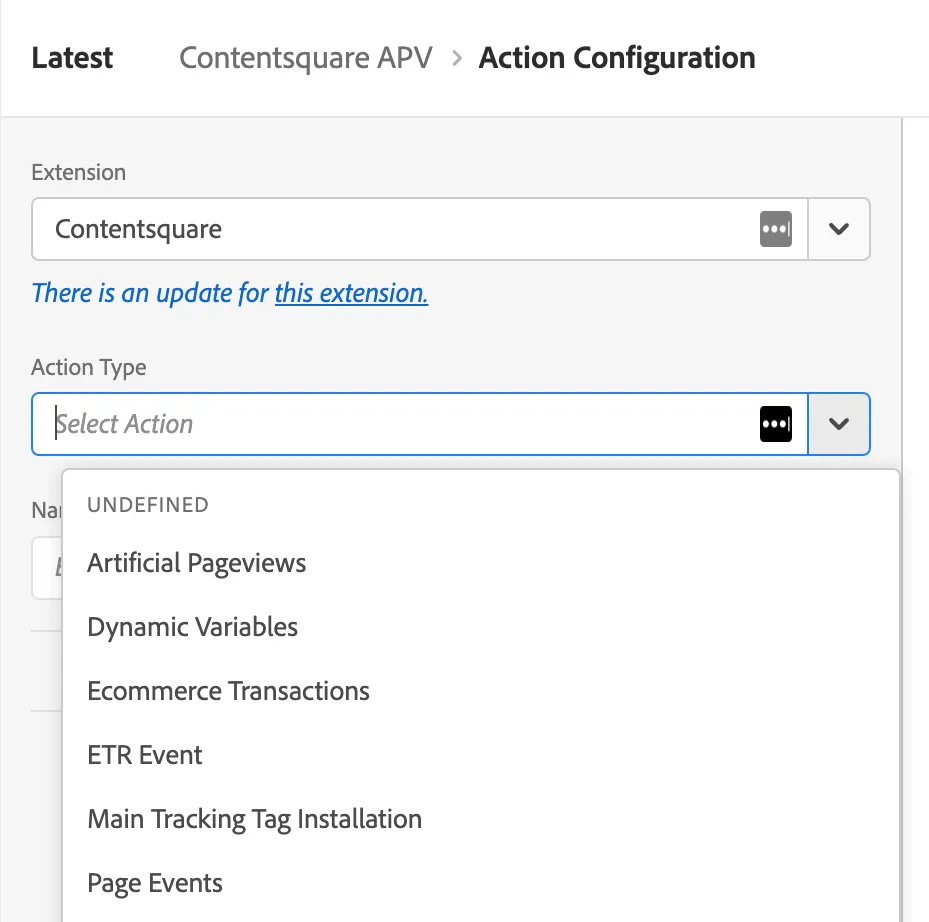
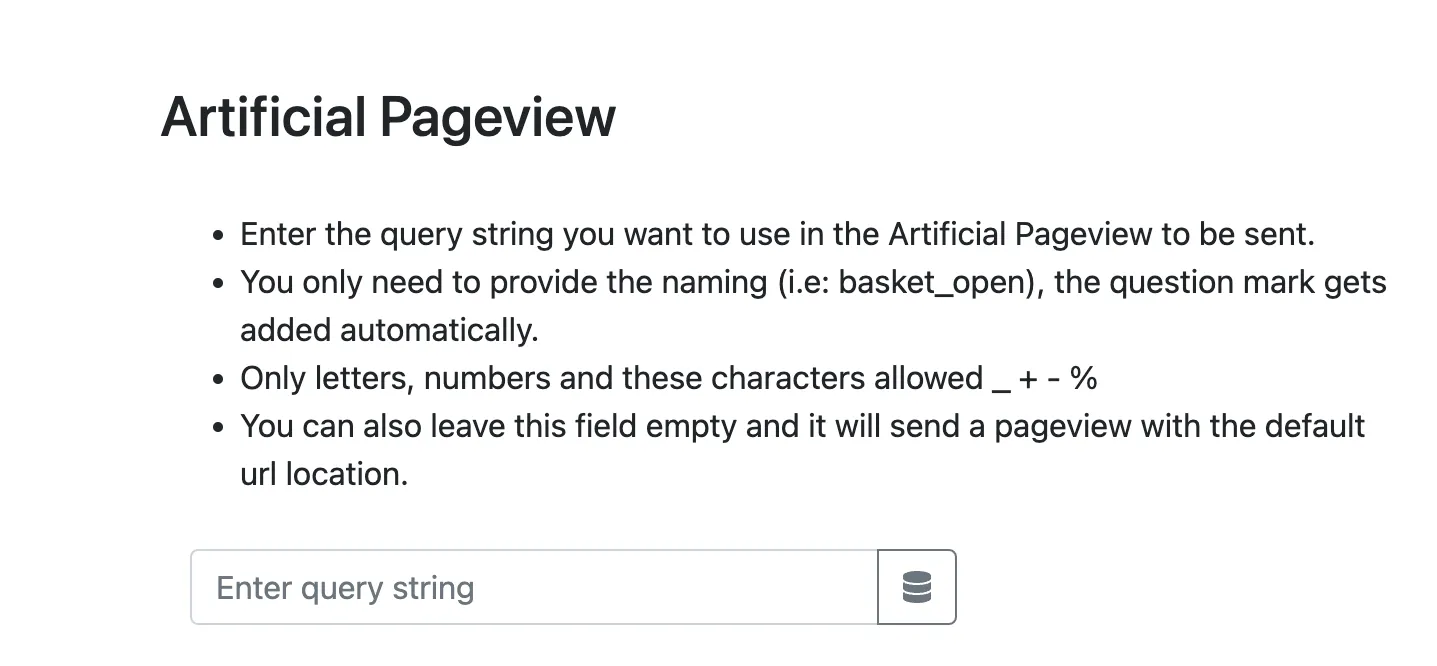
Artificial Pageviews
Use artificial pageviews when:
- An action completely changes the content displayed on the page without refreshing it and changing its URL (Ajax requests)
- The site is built with a Single Page Application (SPA) and any related frameworks (React, Angular)
- The user gets redirected to another step of a funnel without refreshing the page
- The site re-routes all the URL changes without refreshing the page
- The site is built as a Progressive Web App (PWA)
- Important modal windows (sometimes called popups or popins) are displayed
Modal tracking with artificial pageviews
To track a modal opening and closing while the user navigates your site, use artificial pageviews.
Send one artificial pageview when the modal is opened, and another one when the modal is closed. For example, this might be a click on the close button or a custom JavaScript event that fires when the modal is dismissed. For the close event, you can reuse the code snippet, updating the name or path parameter to indicate that this is a close event.
Stable URLs - Modal windows and artificial pageviews tracking
For tracking modal windows or events that don't change the URL structure, you'll need to use the Contentsquare Trackpageview functionality by following these methods and binding them to the correct action (button click/event trigger).
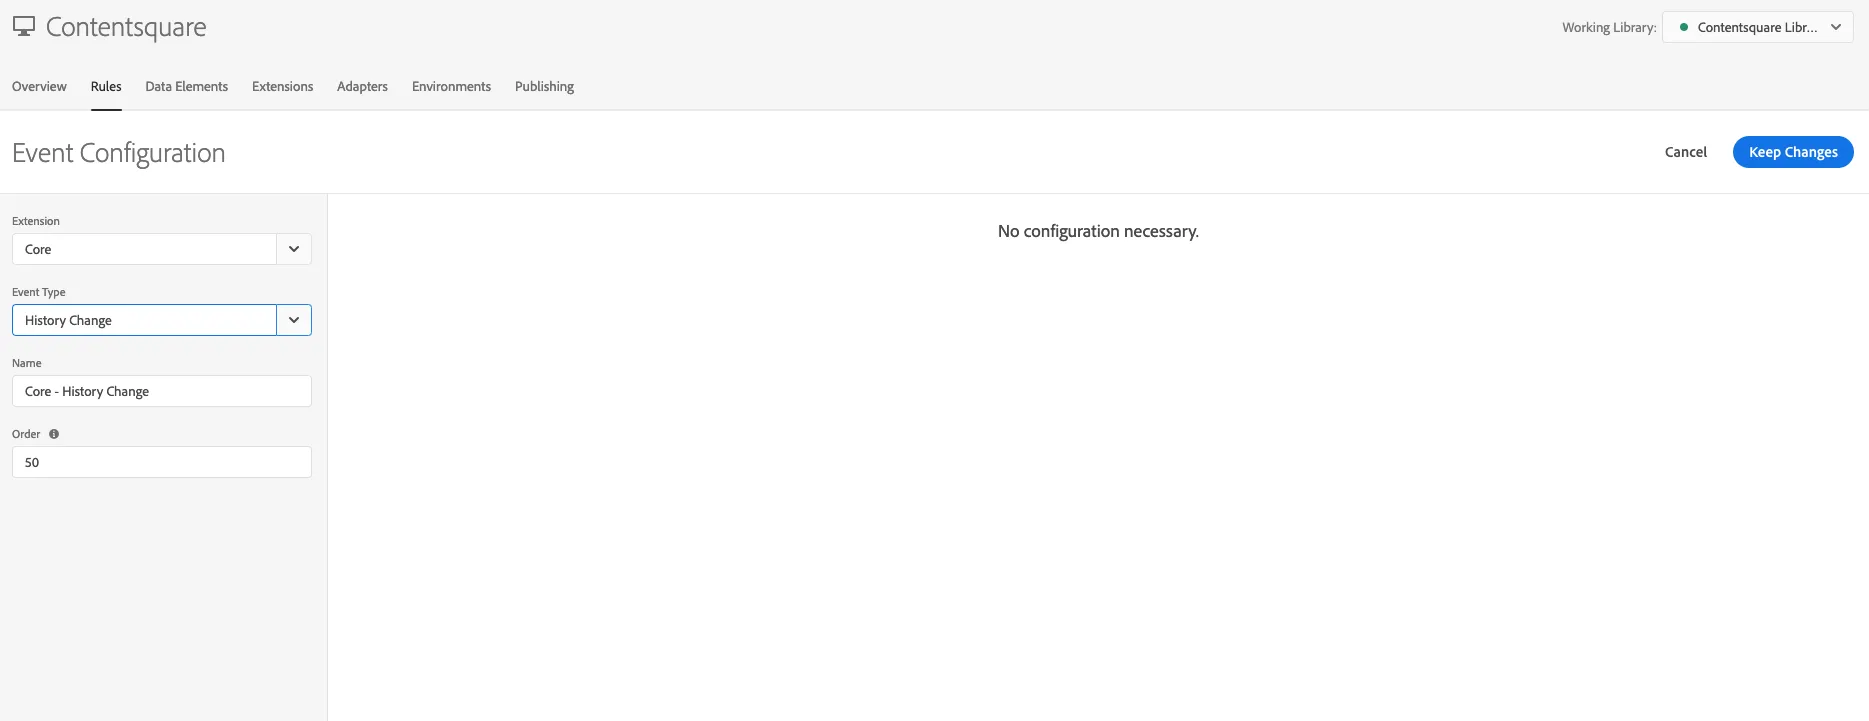
Dynamic URLs - Single Page Applications and History Change
In the event of the URL structure being changed on each view change, we can keep track of this by firing the Main Tag again: the tag will automatically detect that it was previously put in place on the site and fire a new pageview instead.
Contentsquare Tag Configurator (CSTC)
Section titled Contentsquare Tag Configurator (CSTC)Use the Contentsquare Tag Configurator ↗ to implement artificial pageviews through a visual interface.
Google Tag Manager (Template)
Section titled Google Tag Manager (Template)Stable URLs
Section titled Stable URLs-
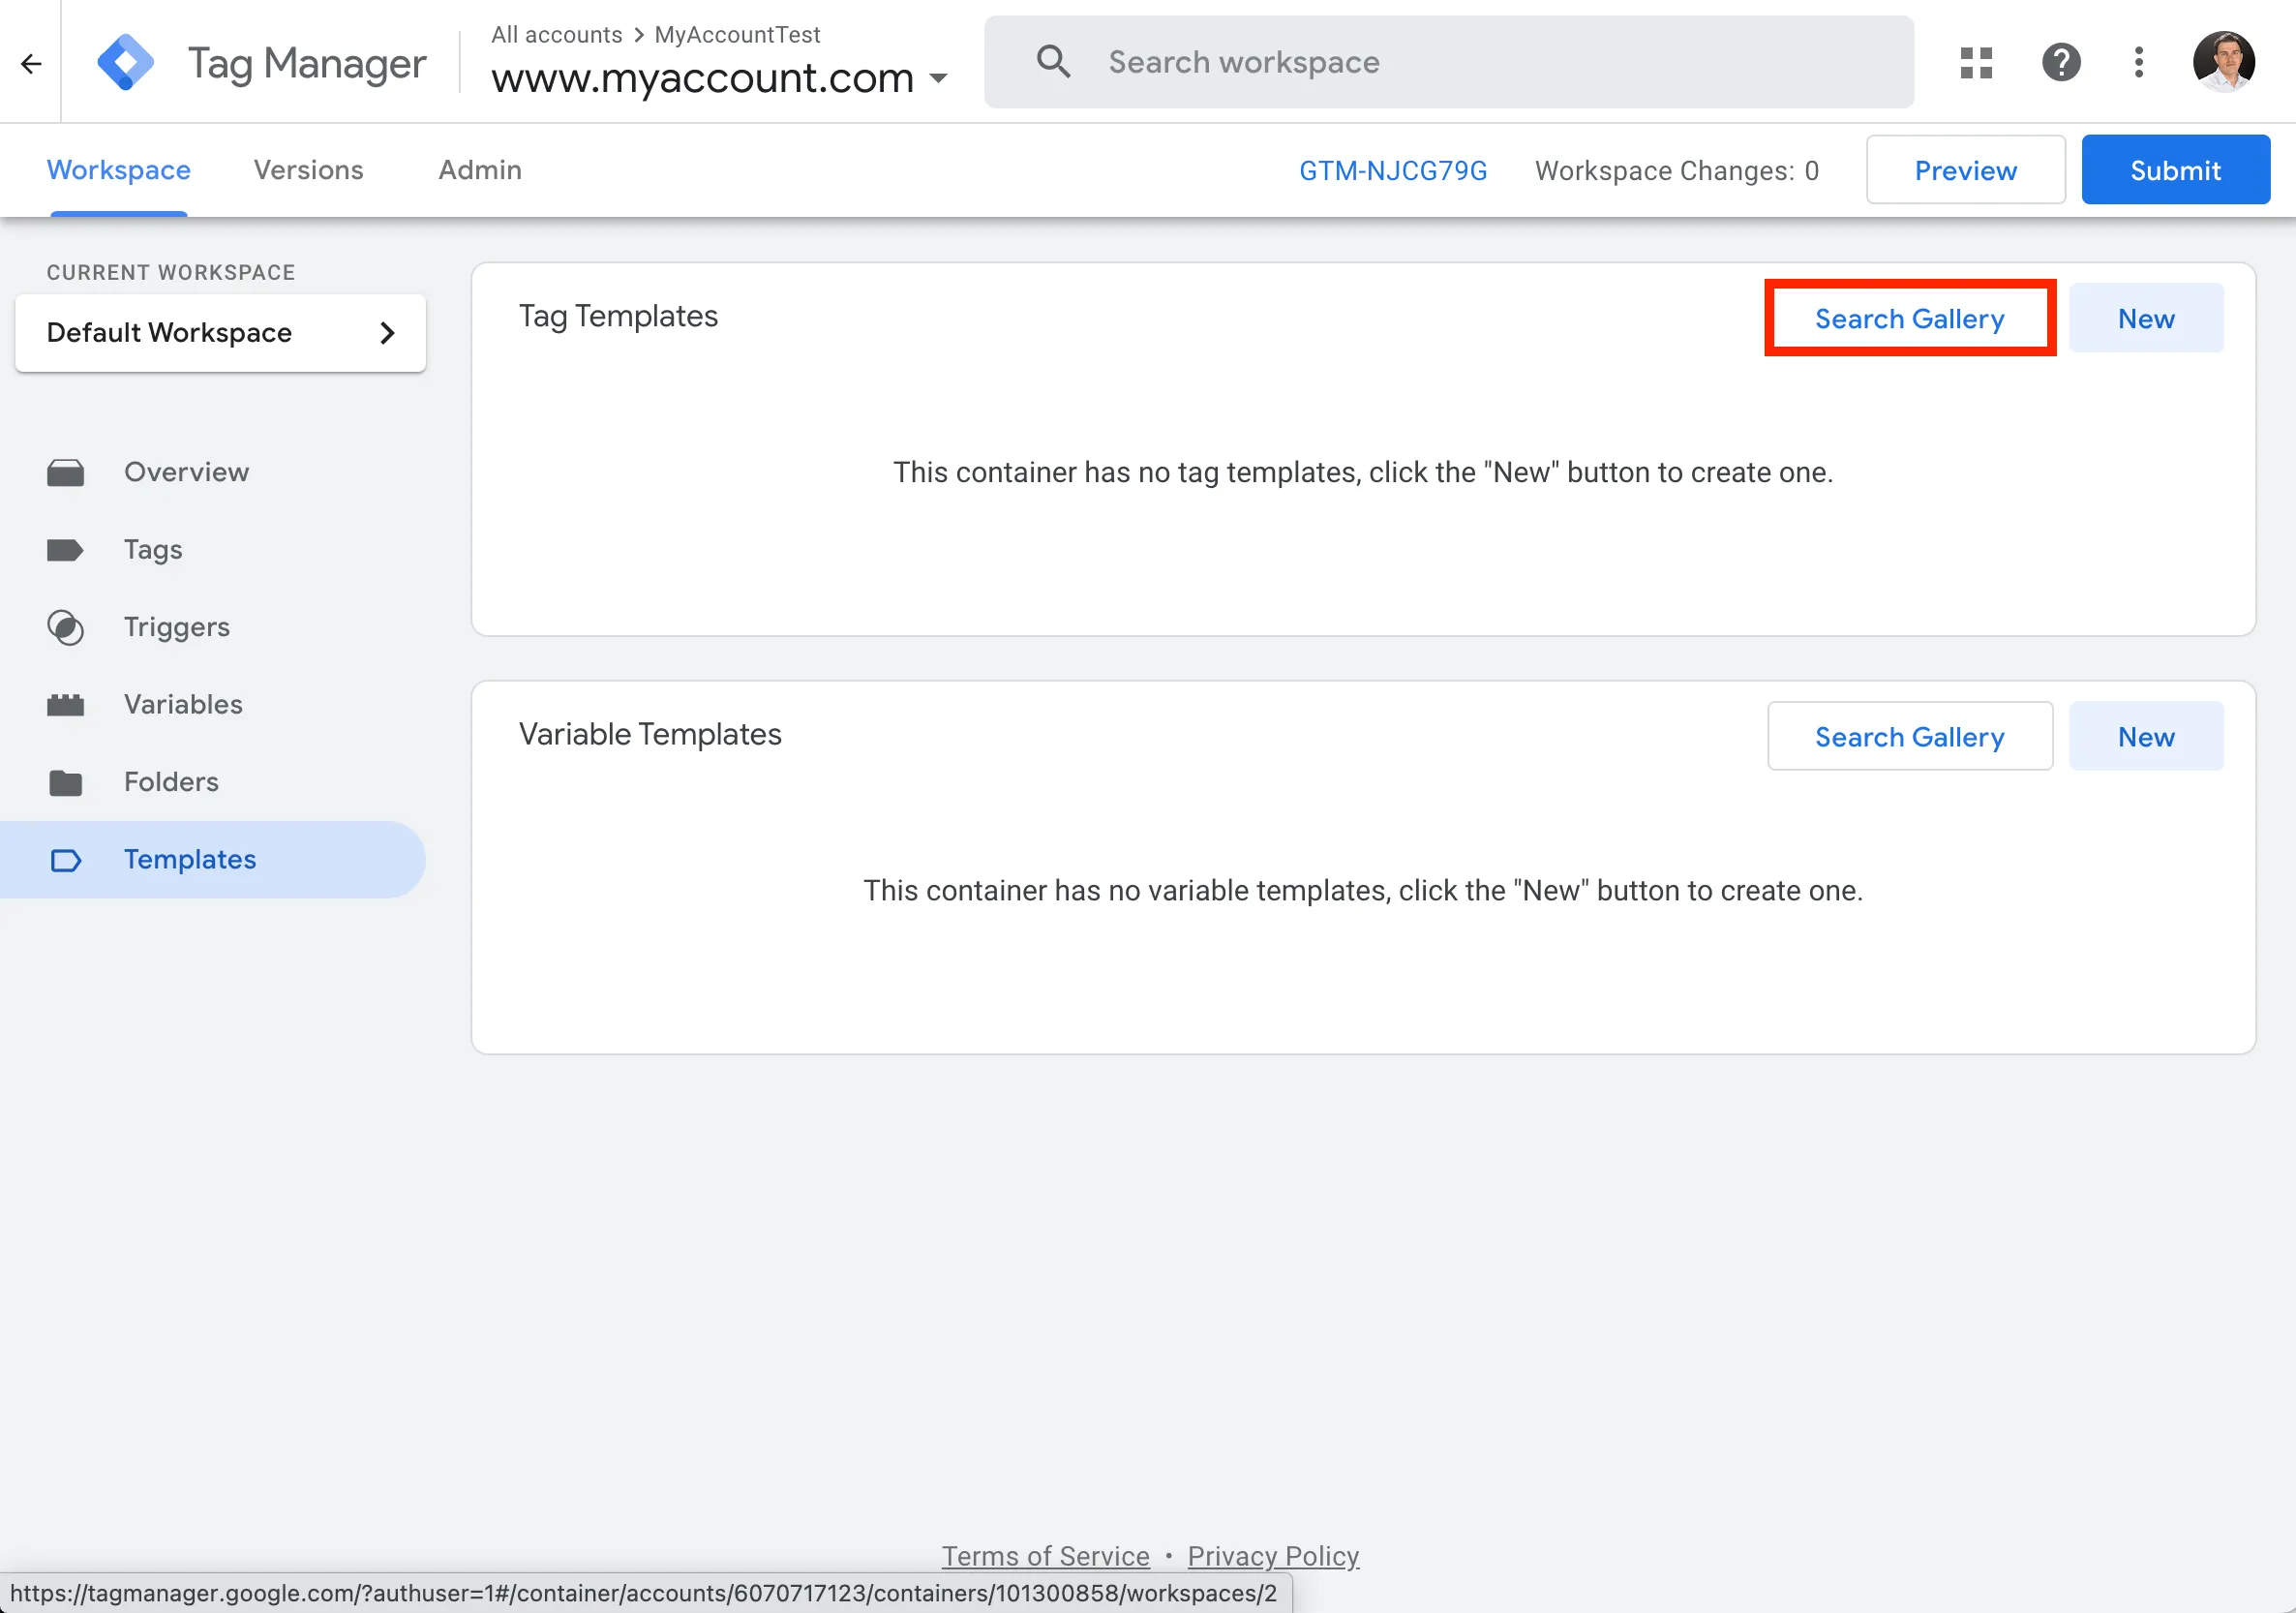
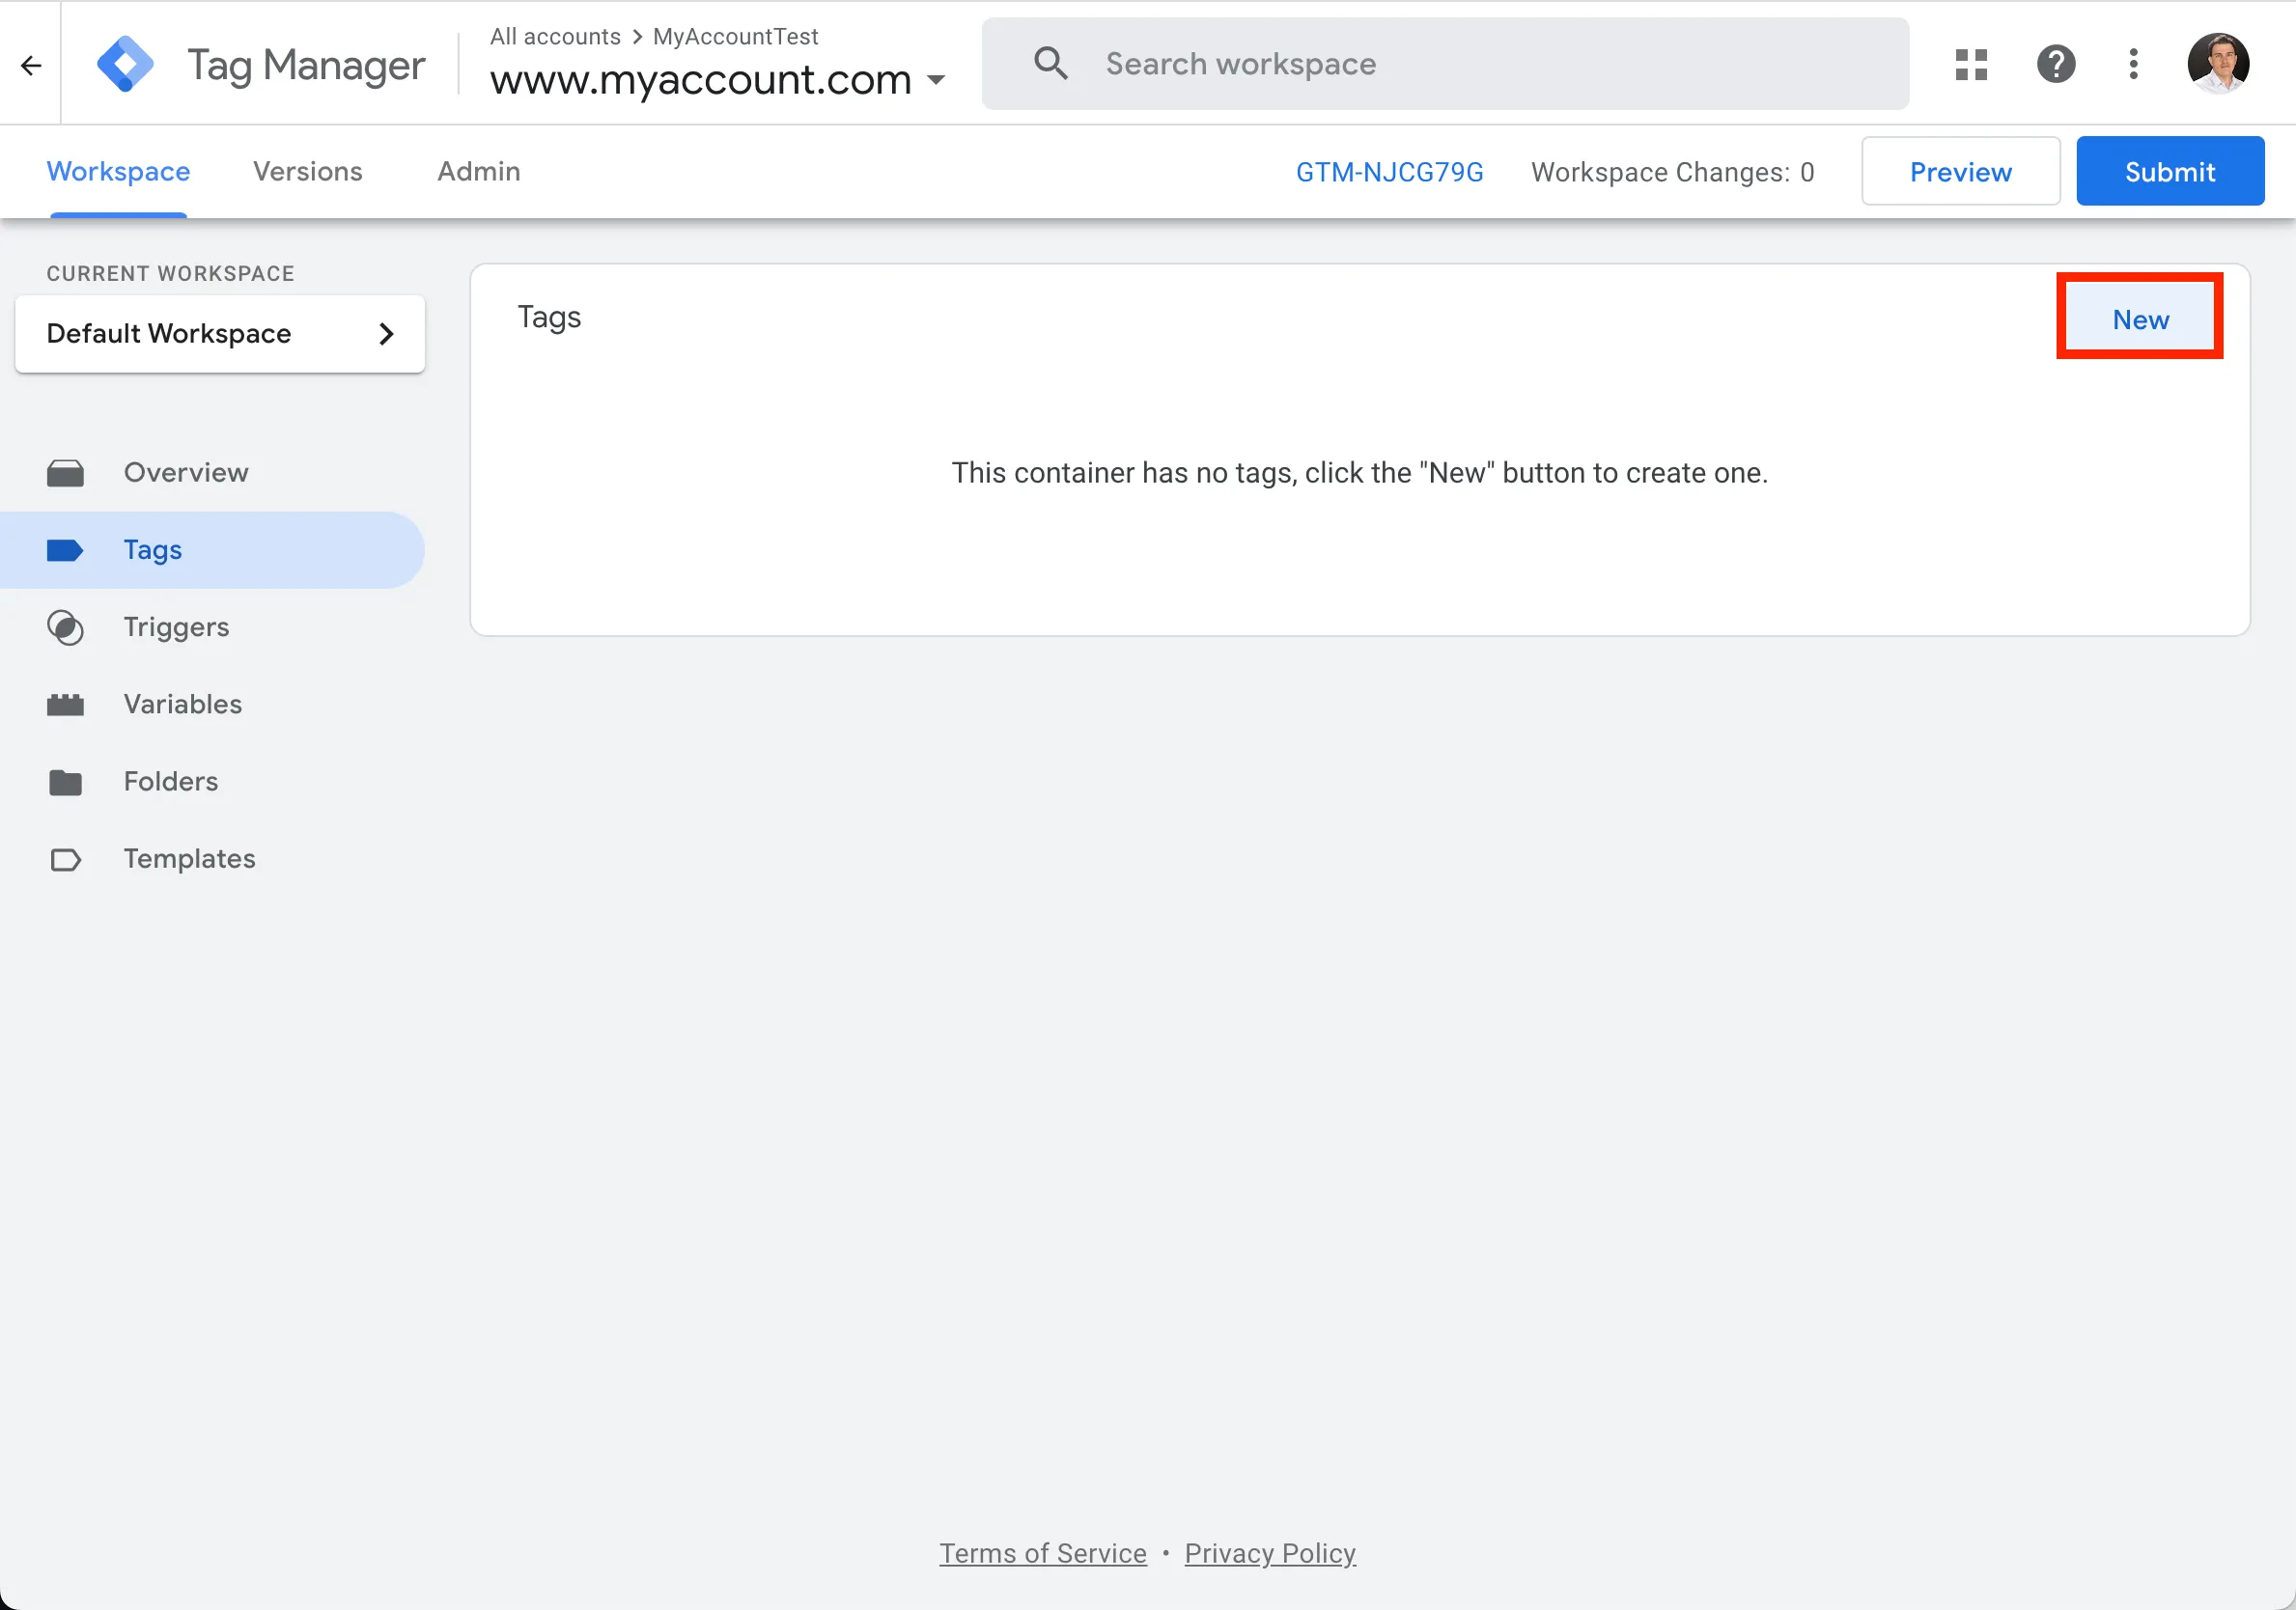
Open your container and go to the templates section
-
Select Search gallery
-
Type in
contentsquareand select the Contentsquare - Artificial Pageview option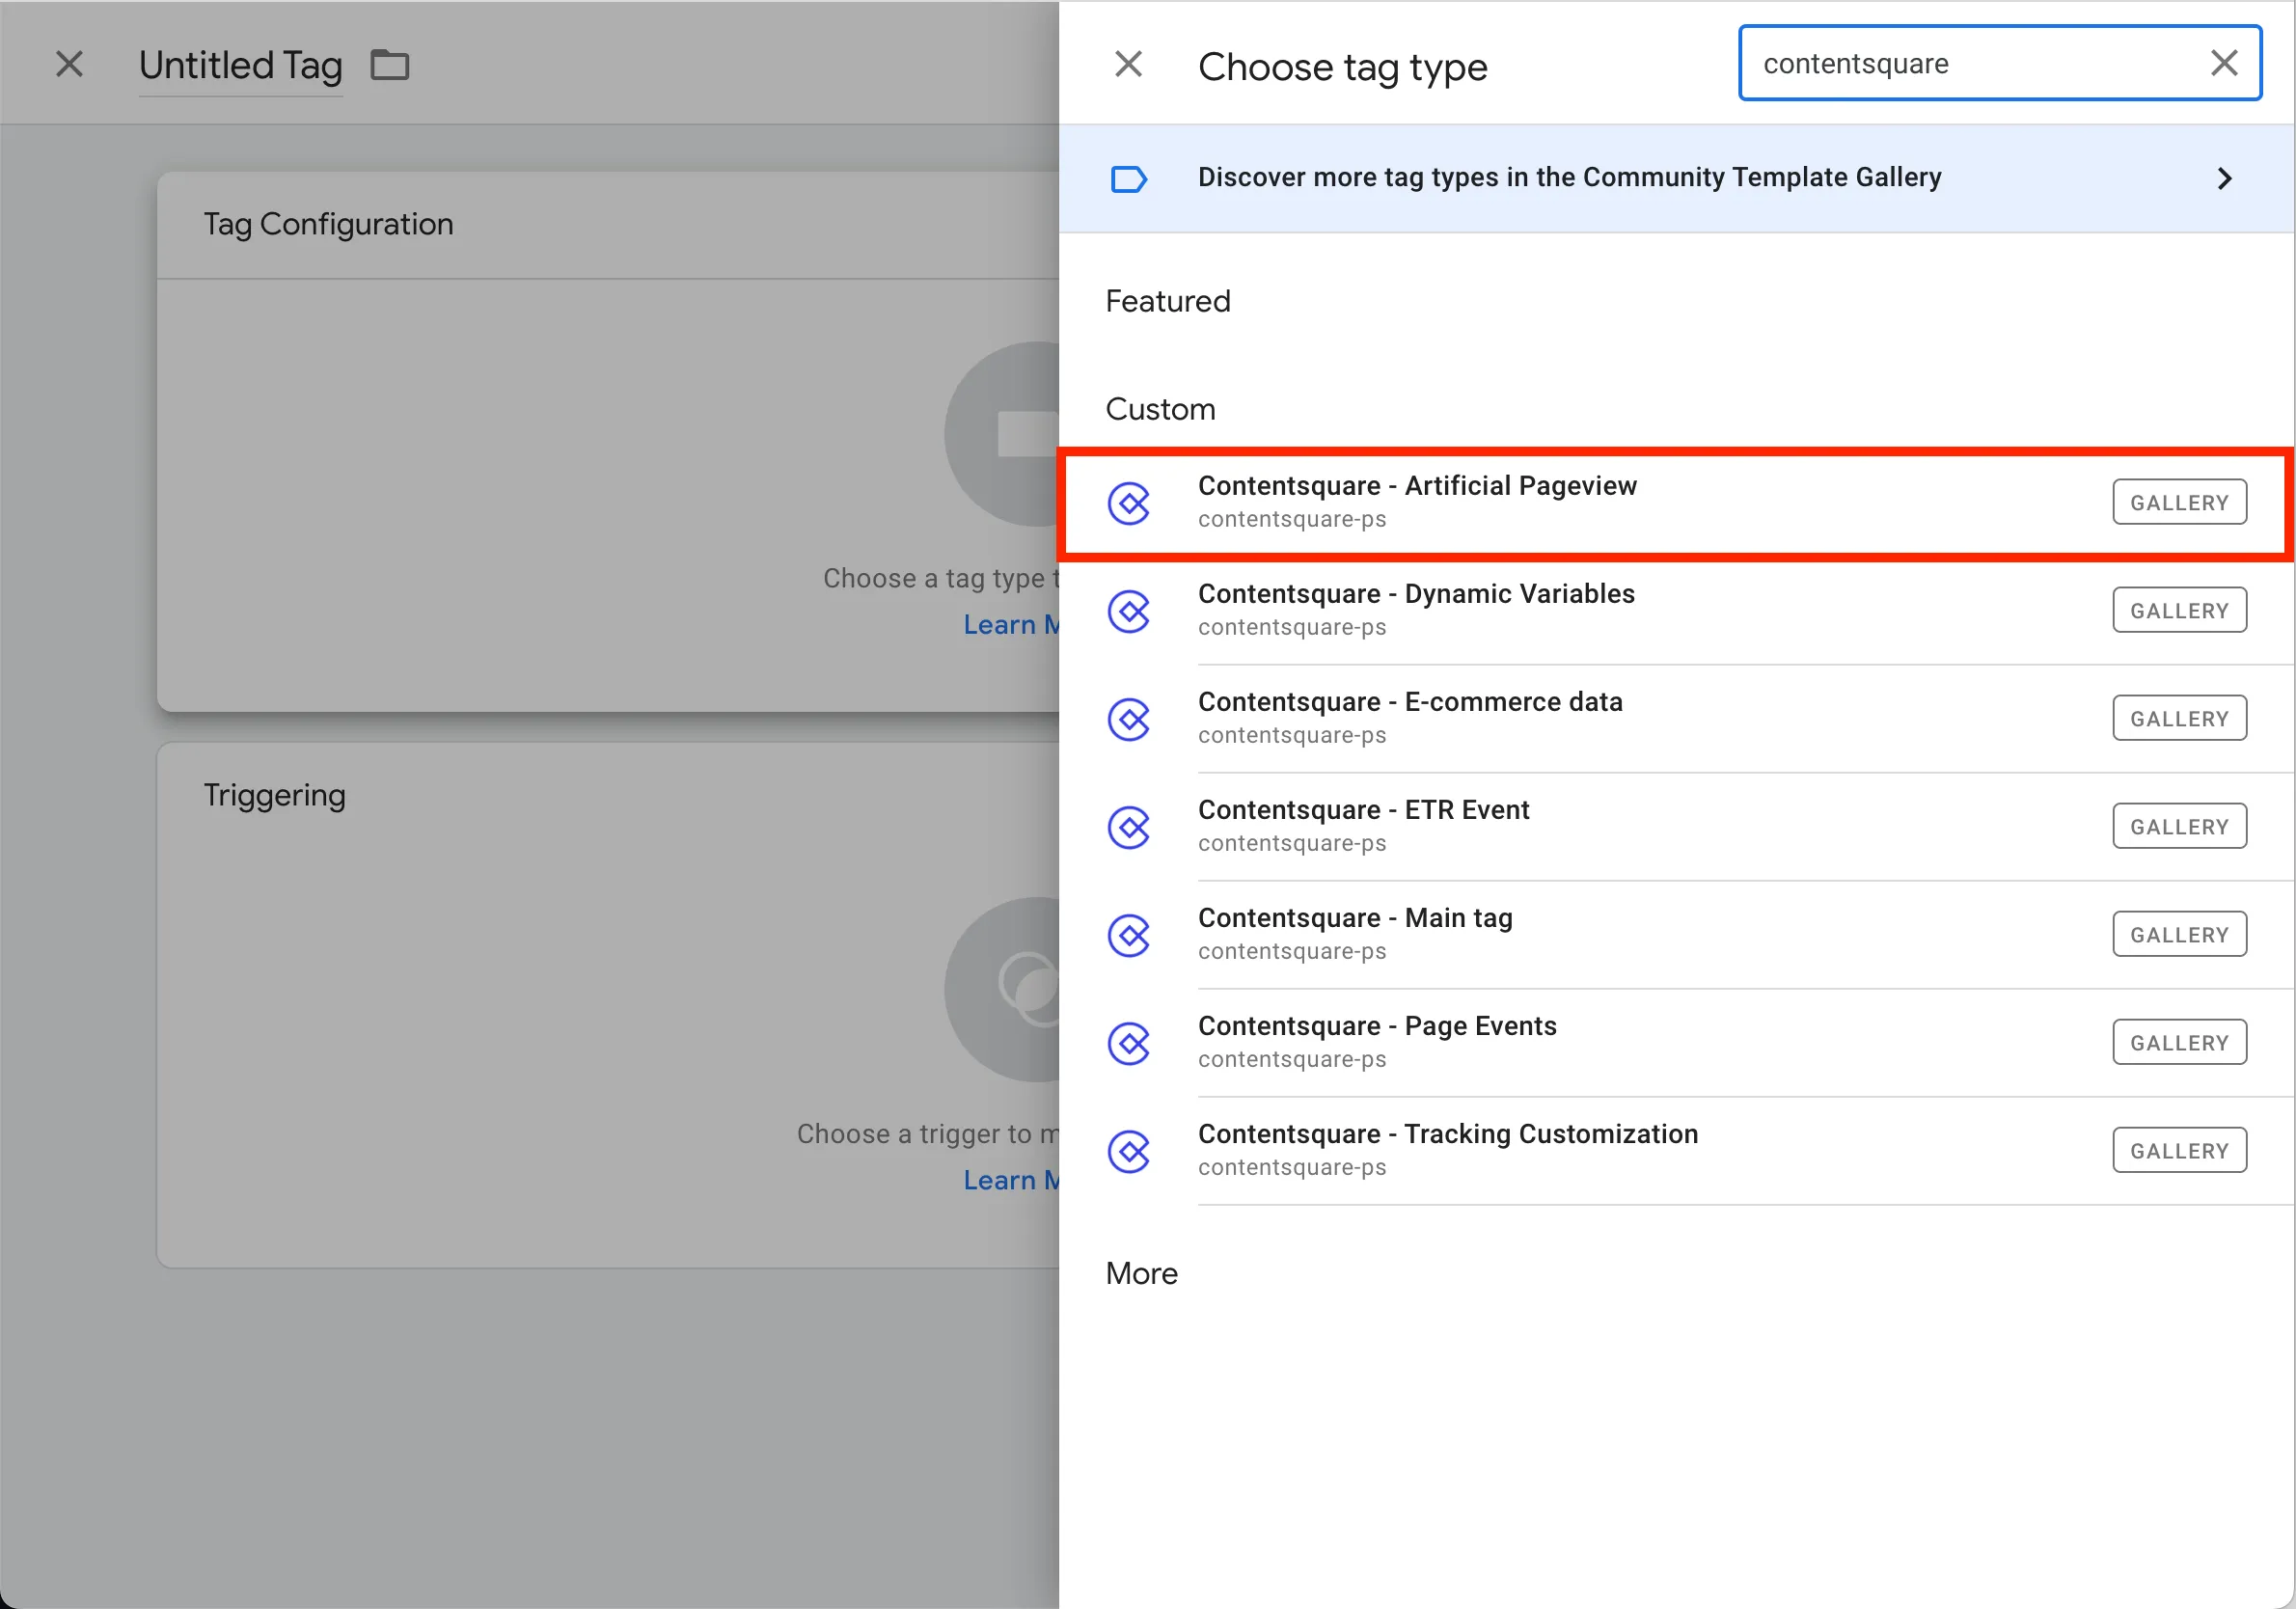
-
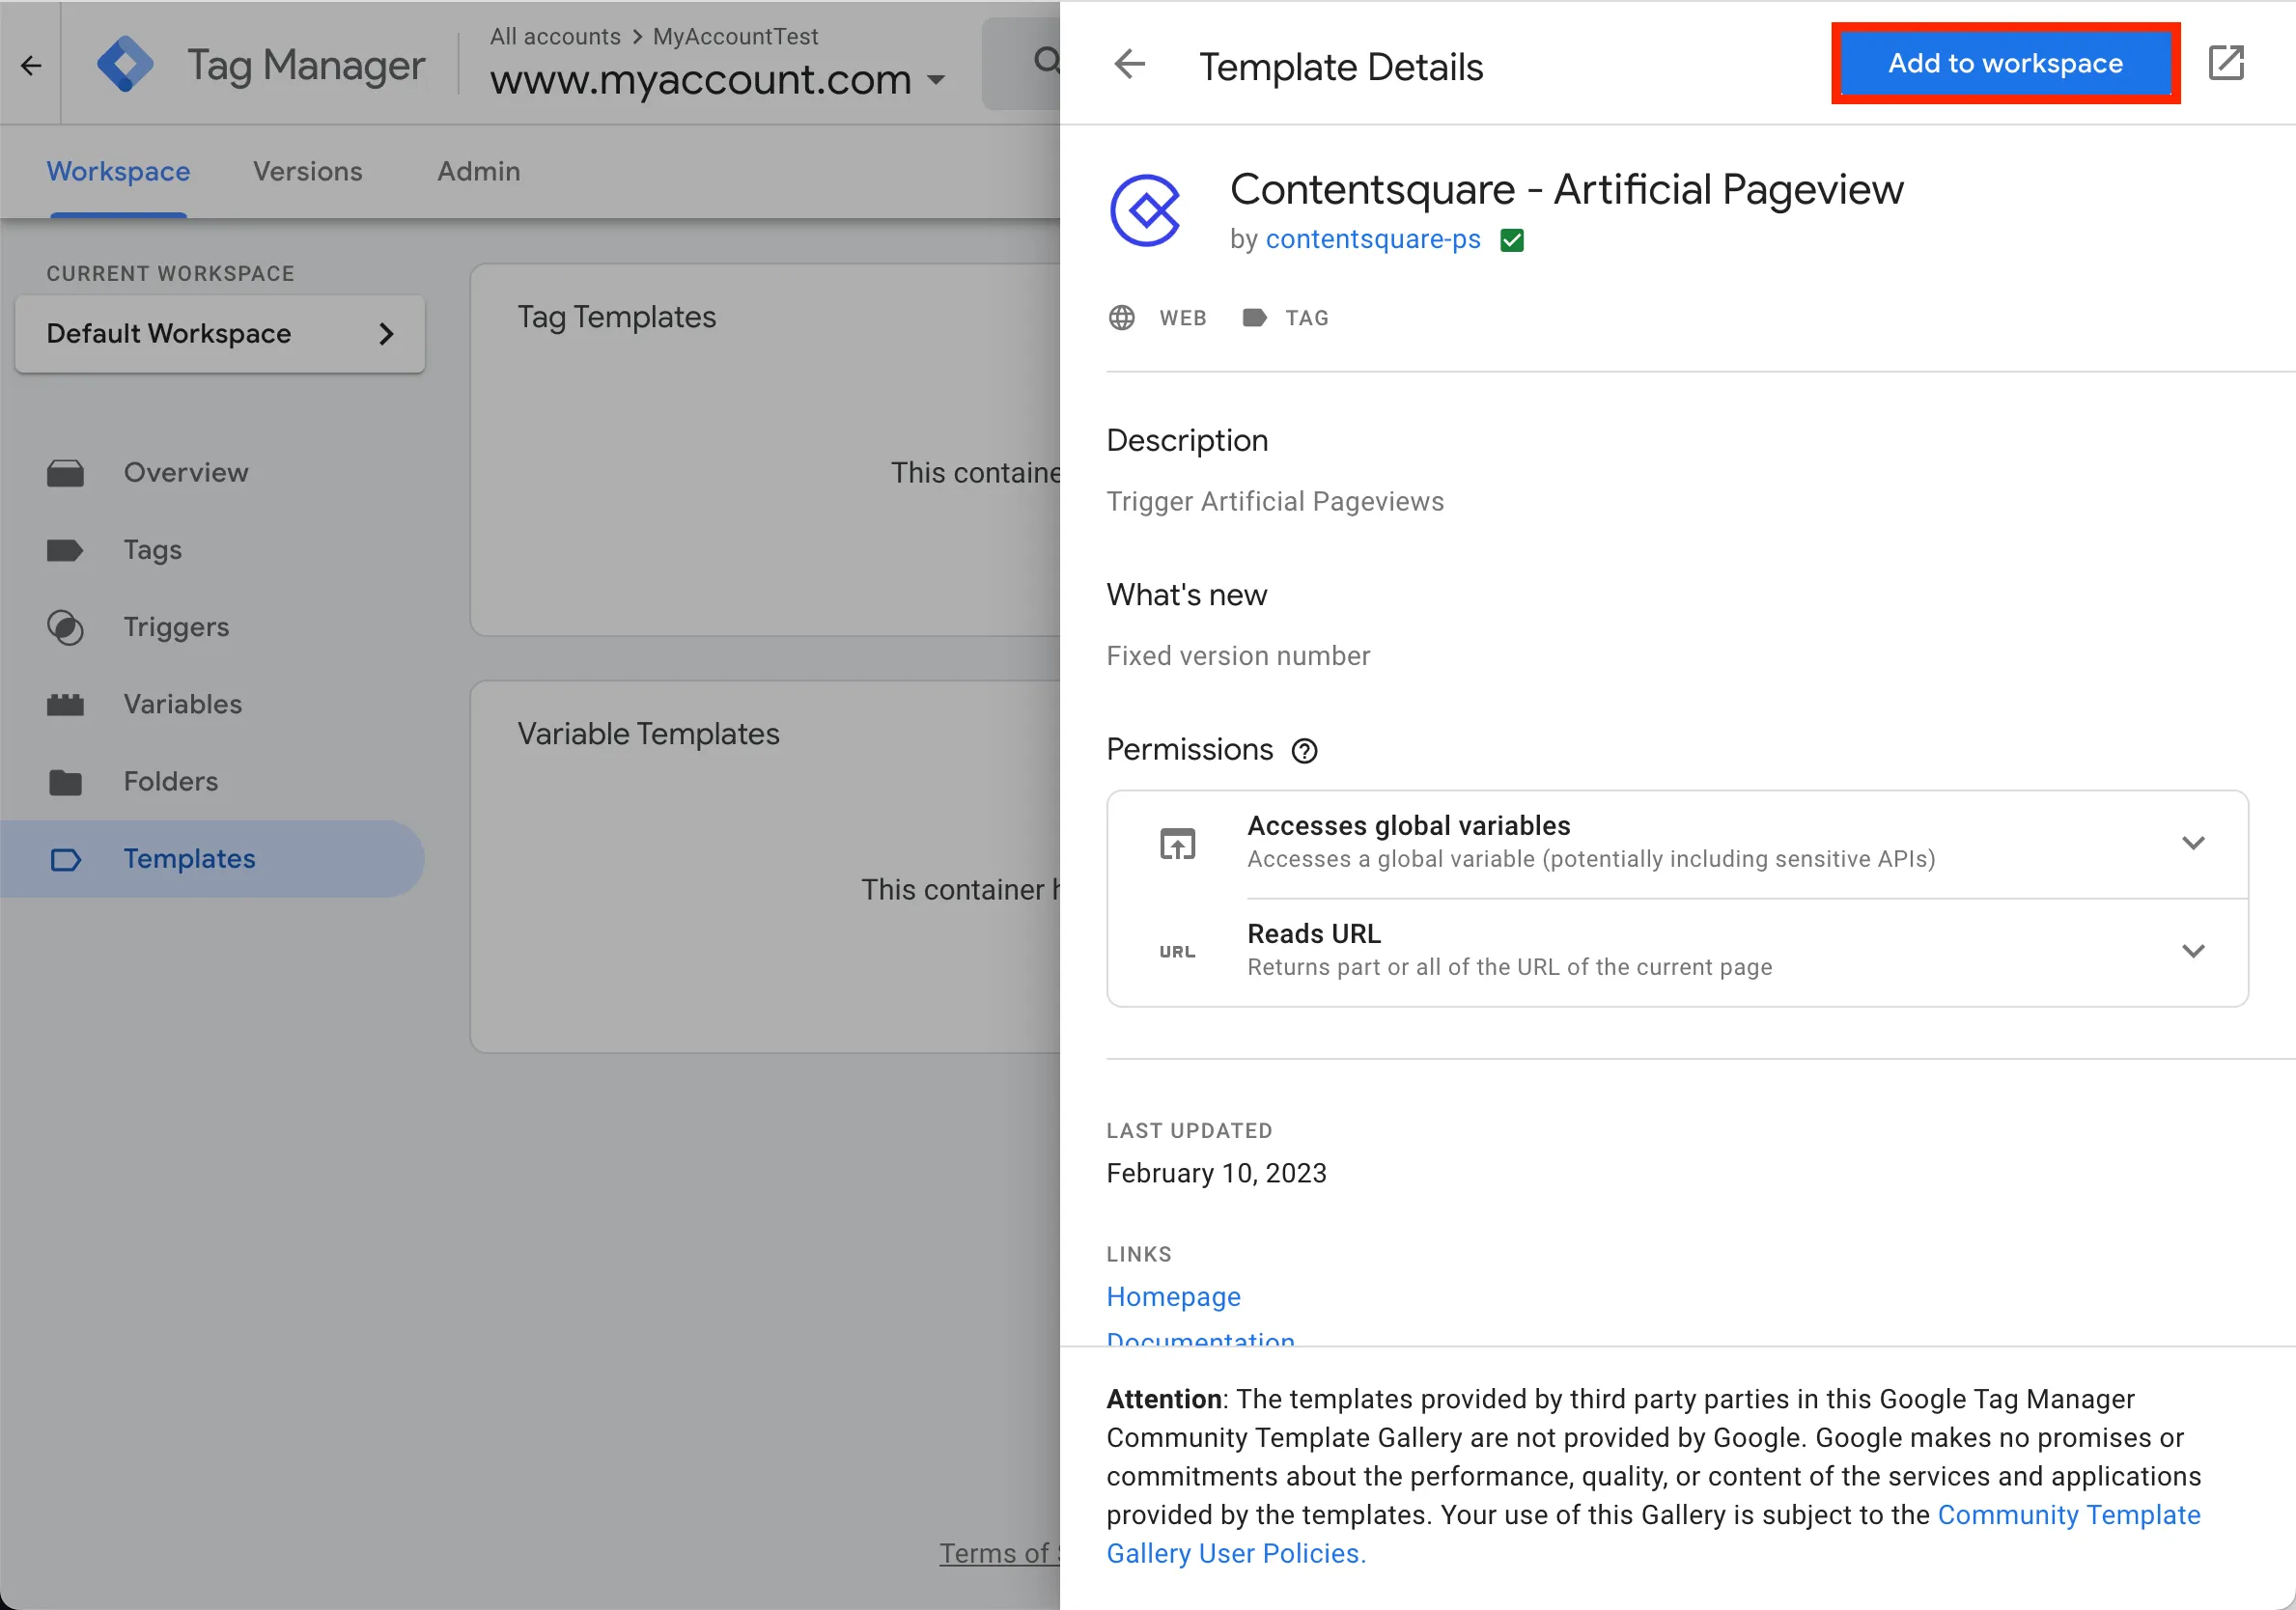
Click Add to workspace
-
Confirm your choice by selecting Add

-
Go to the Tags section and click the New button to create a new tag
-
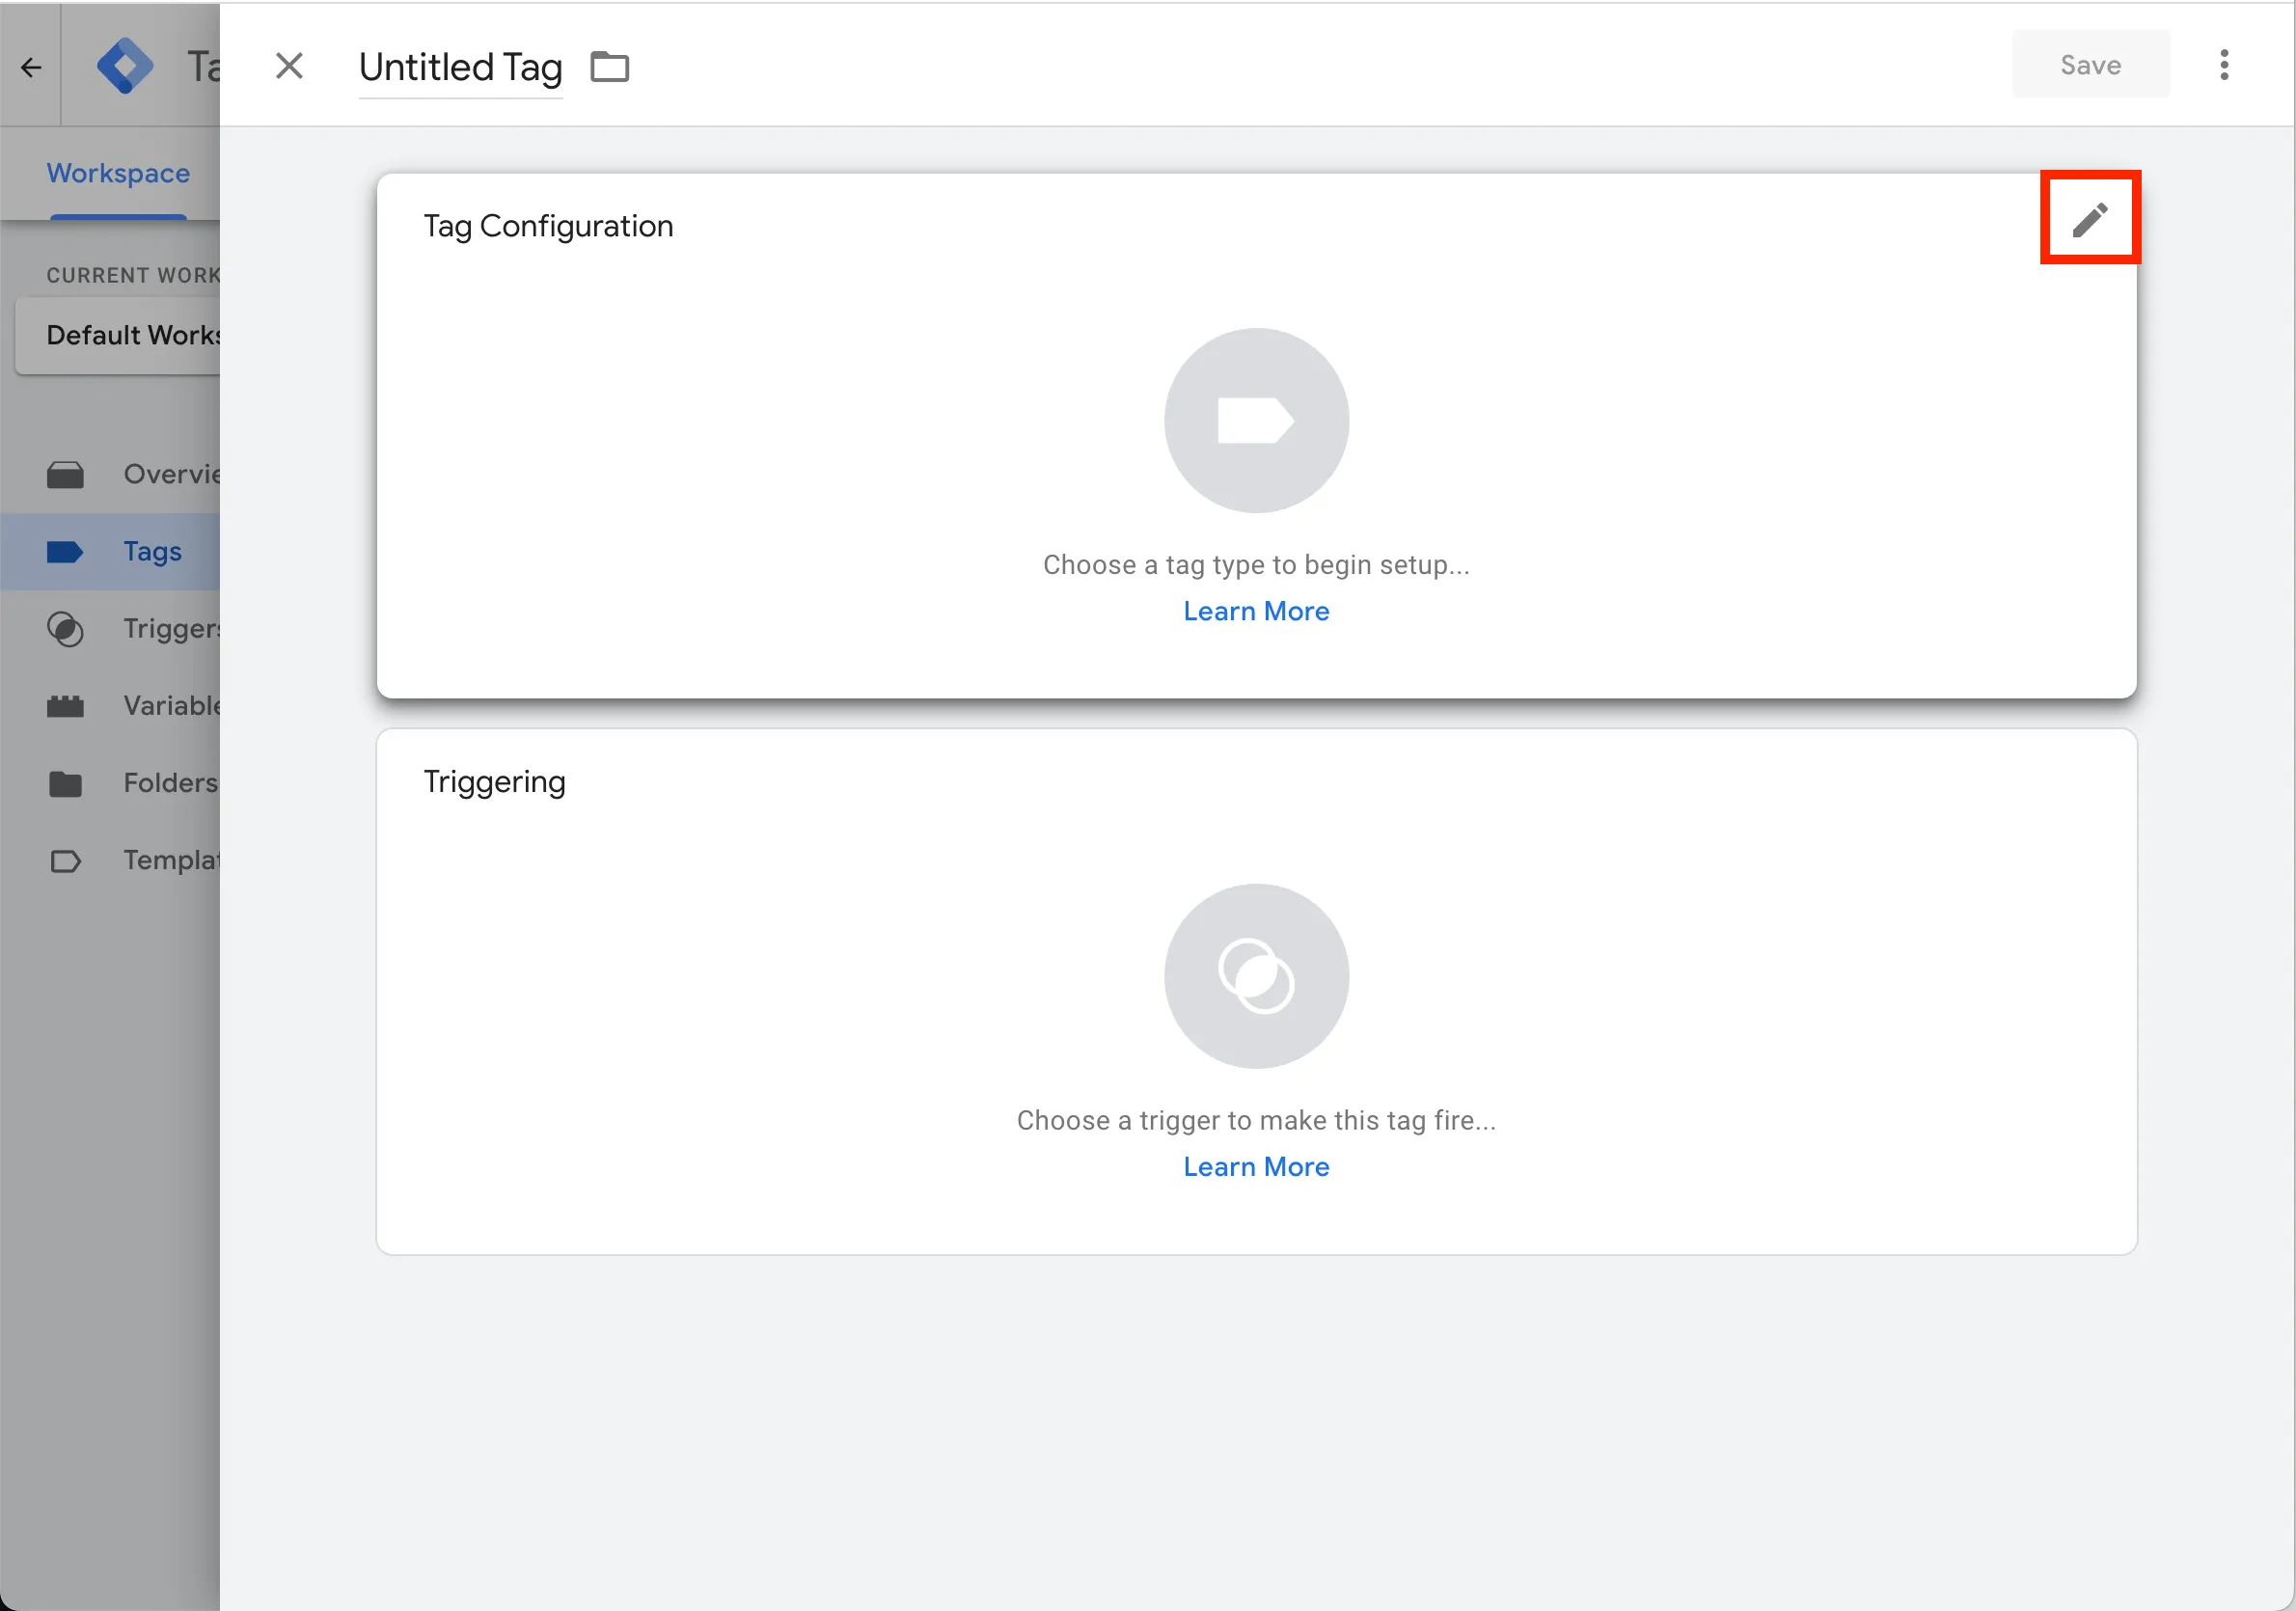
Configure it by selecting the top-right button
-
Type in
contentsquareand select the Contentsquare - Artificial Pageview option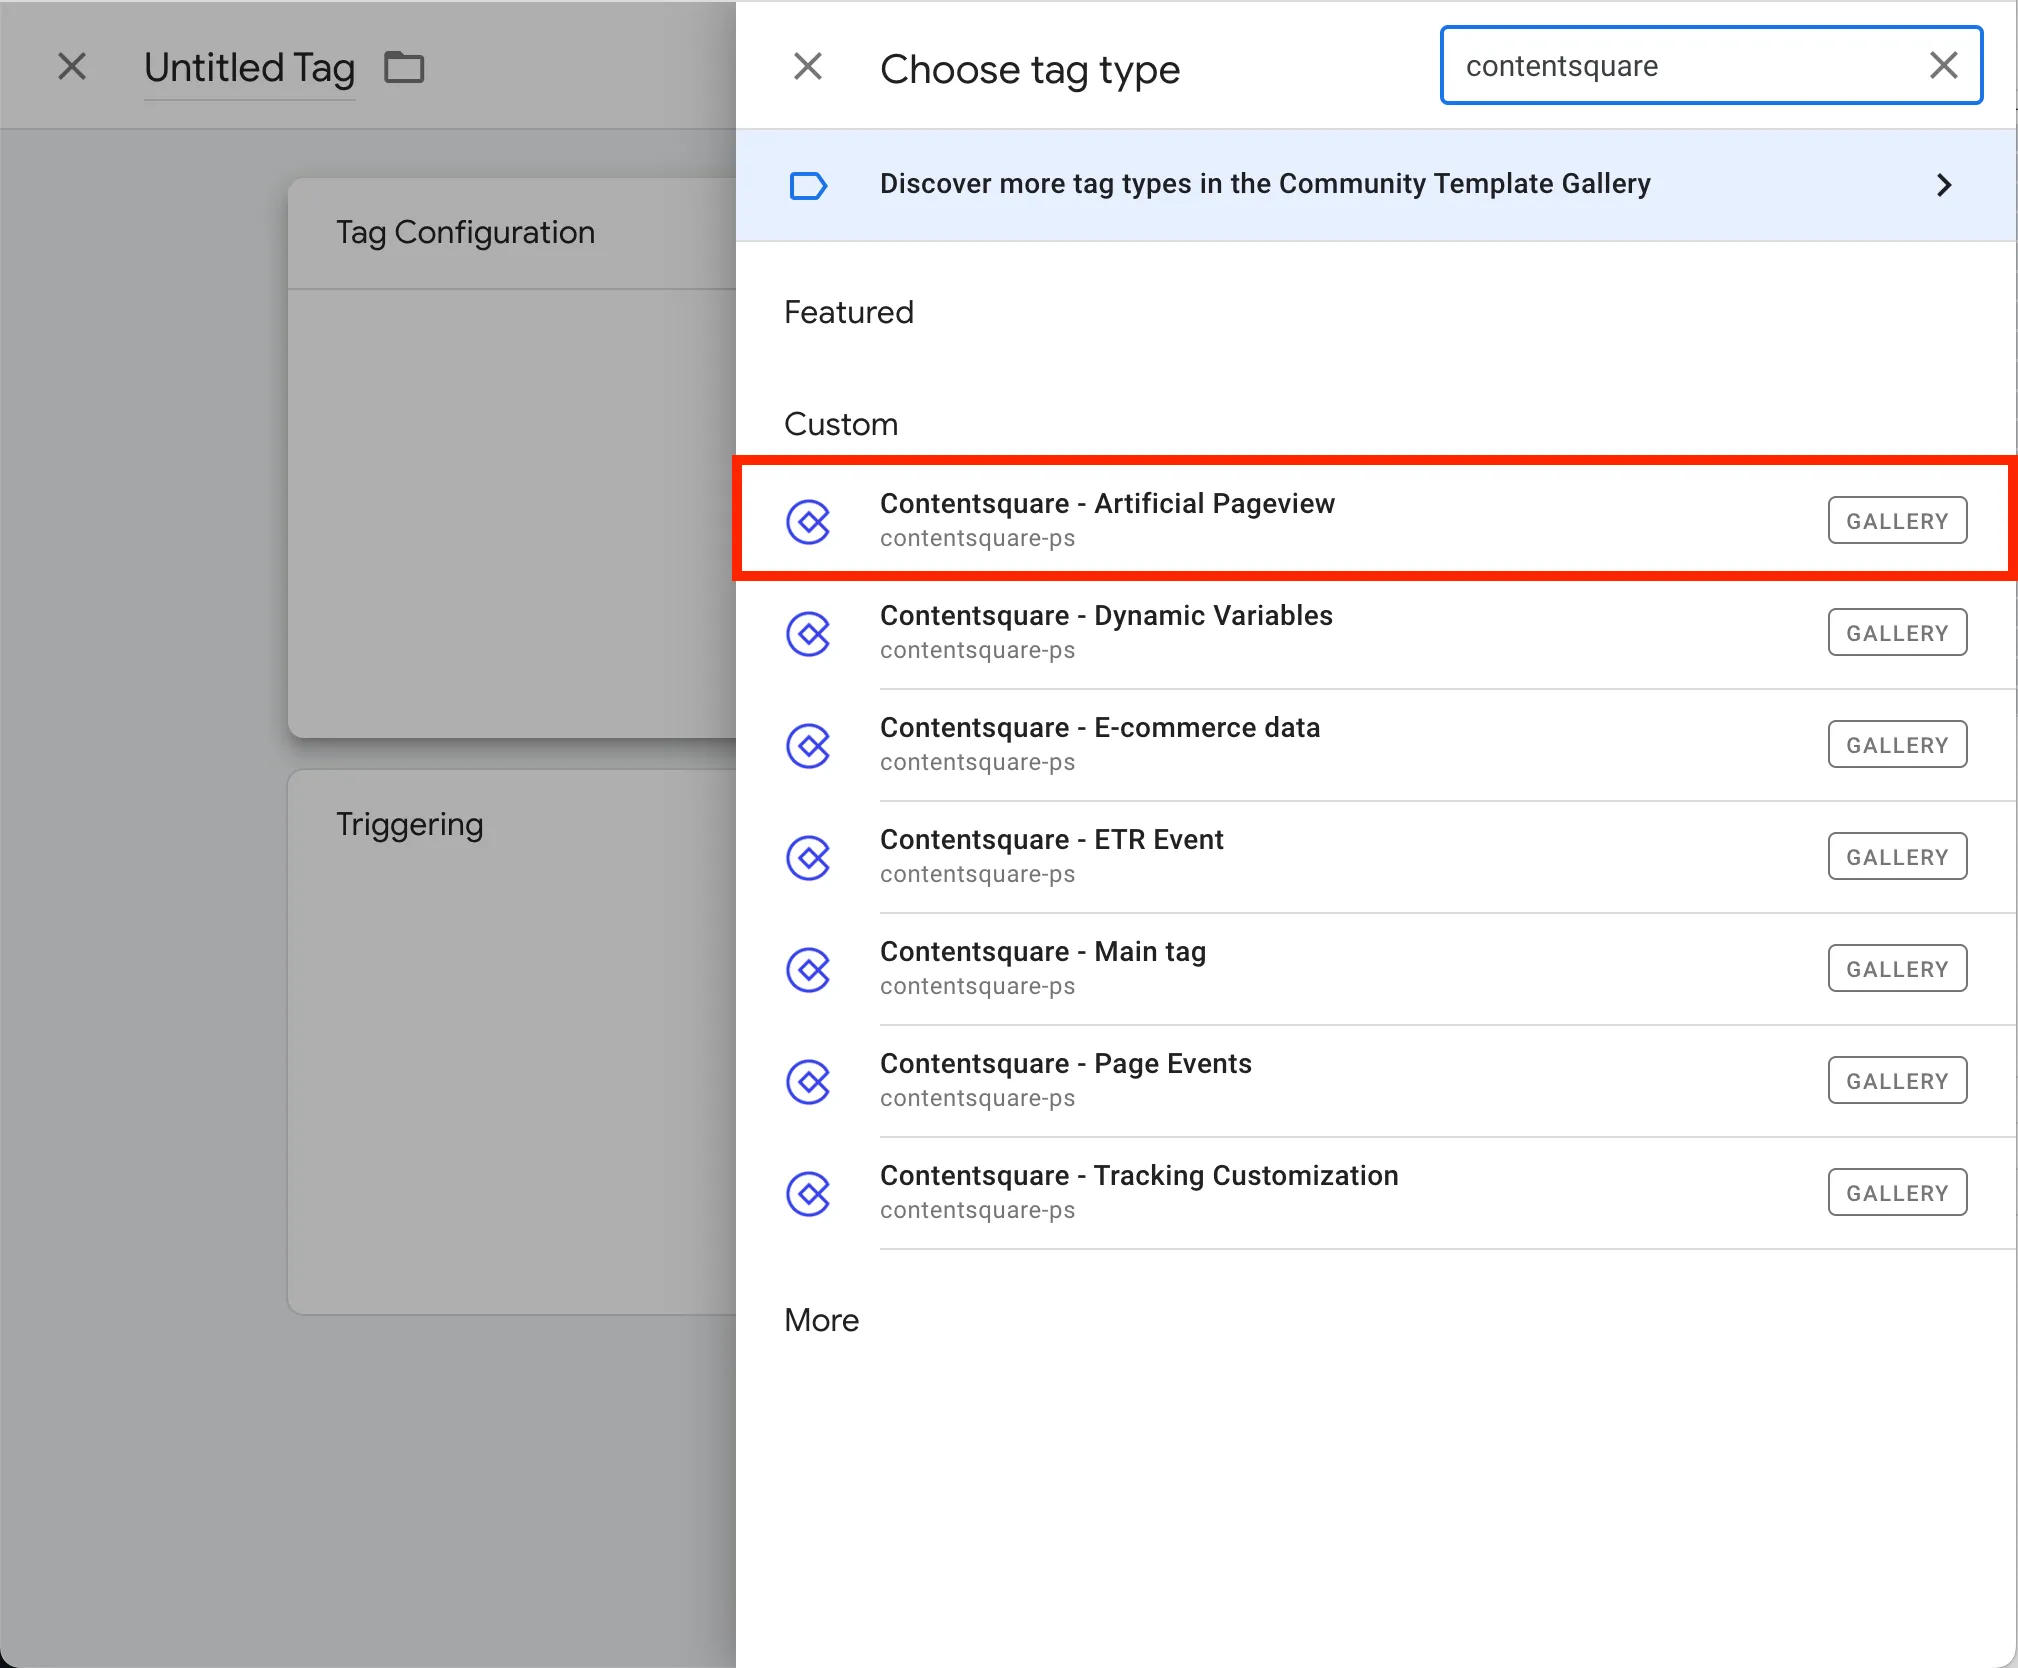
-
Select the tag and configure:
- Select the Free text option and enter the value under
Artificial Pageview value. - If there's a modal (sometimes called "popup") on your website and you need to deploy APV, then select
This is for the opening a popuporThis is for the closing of a popupin the drop-down.
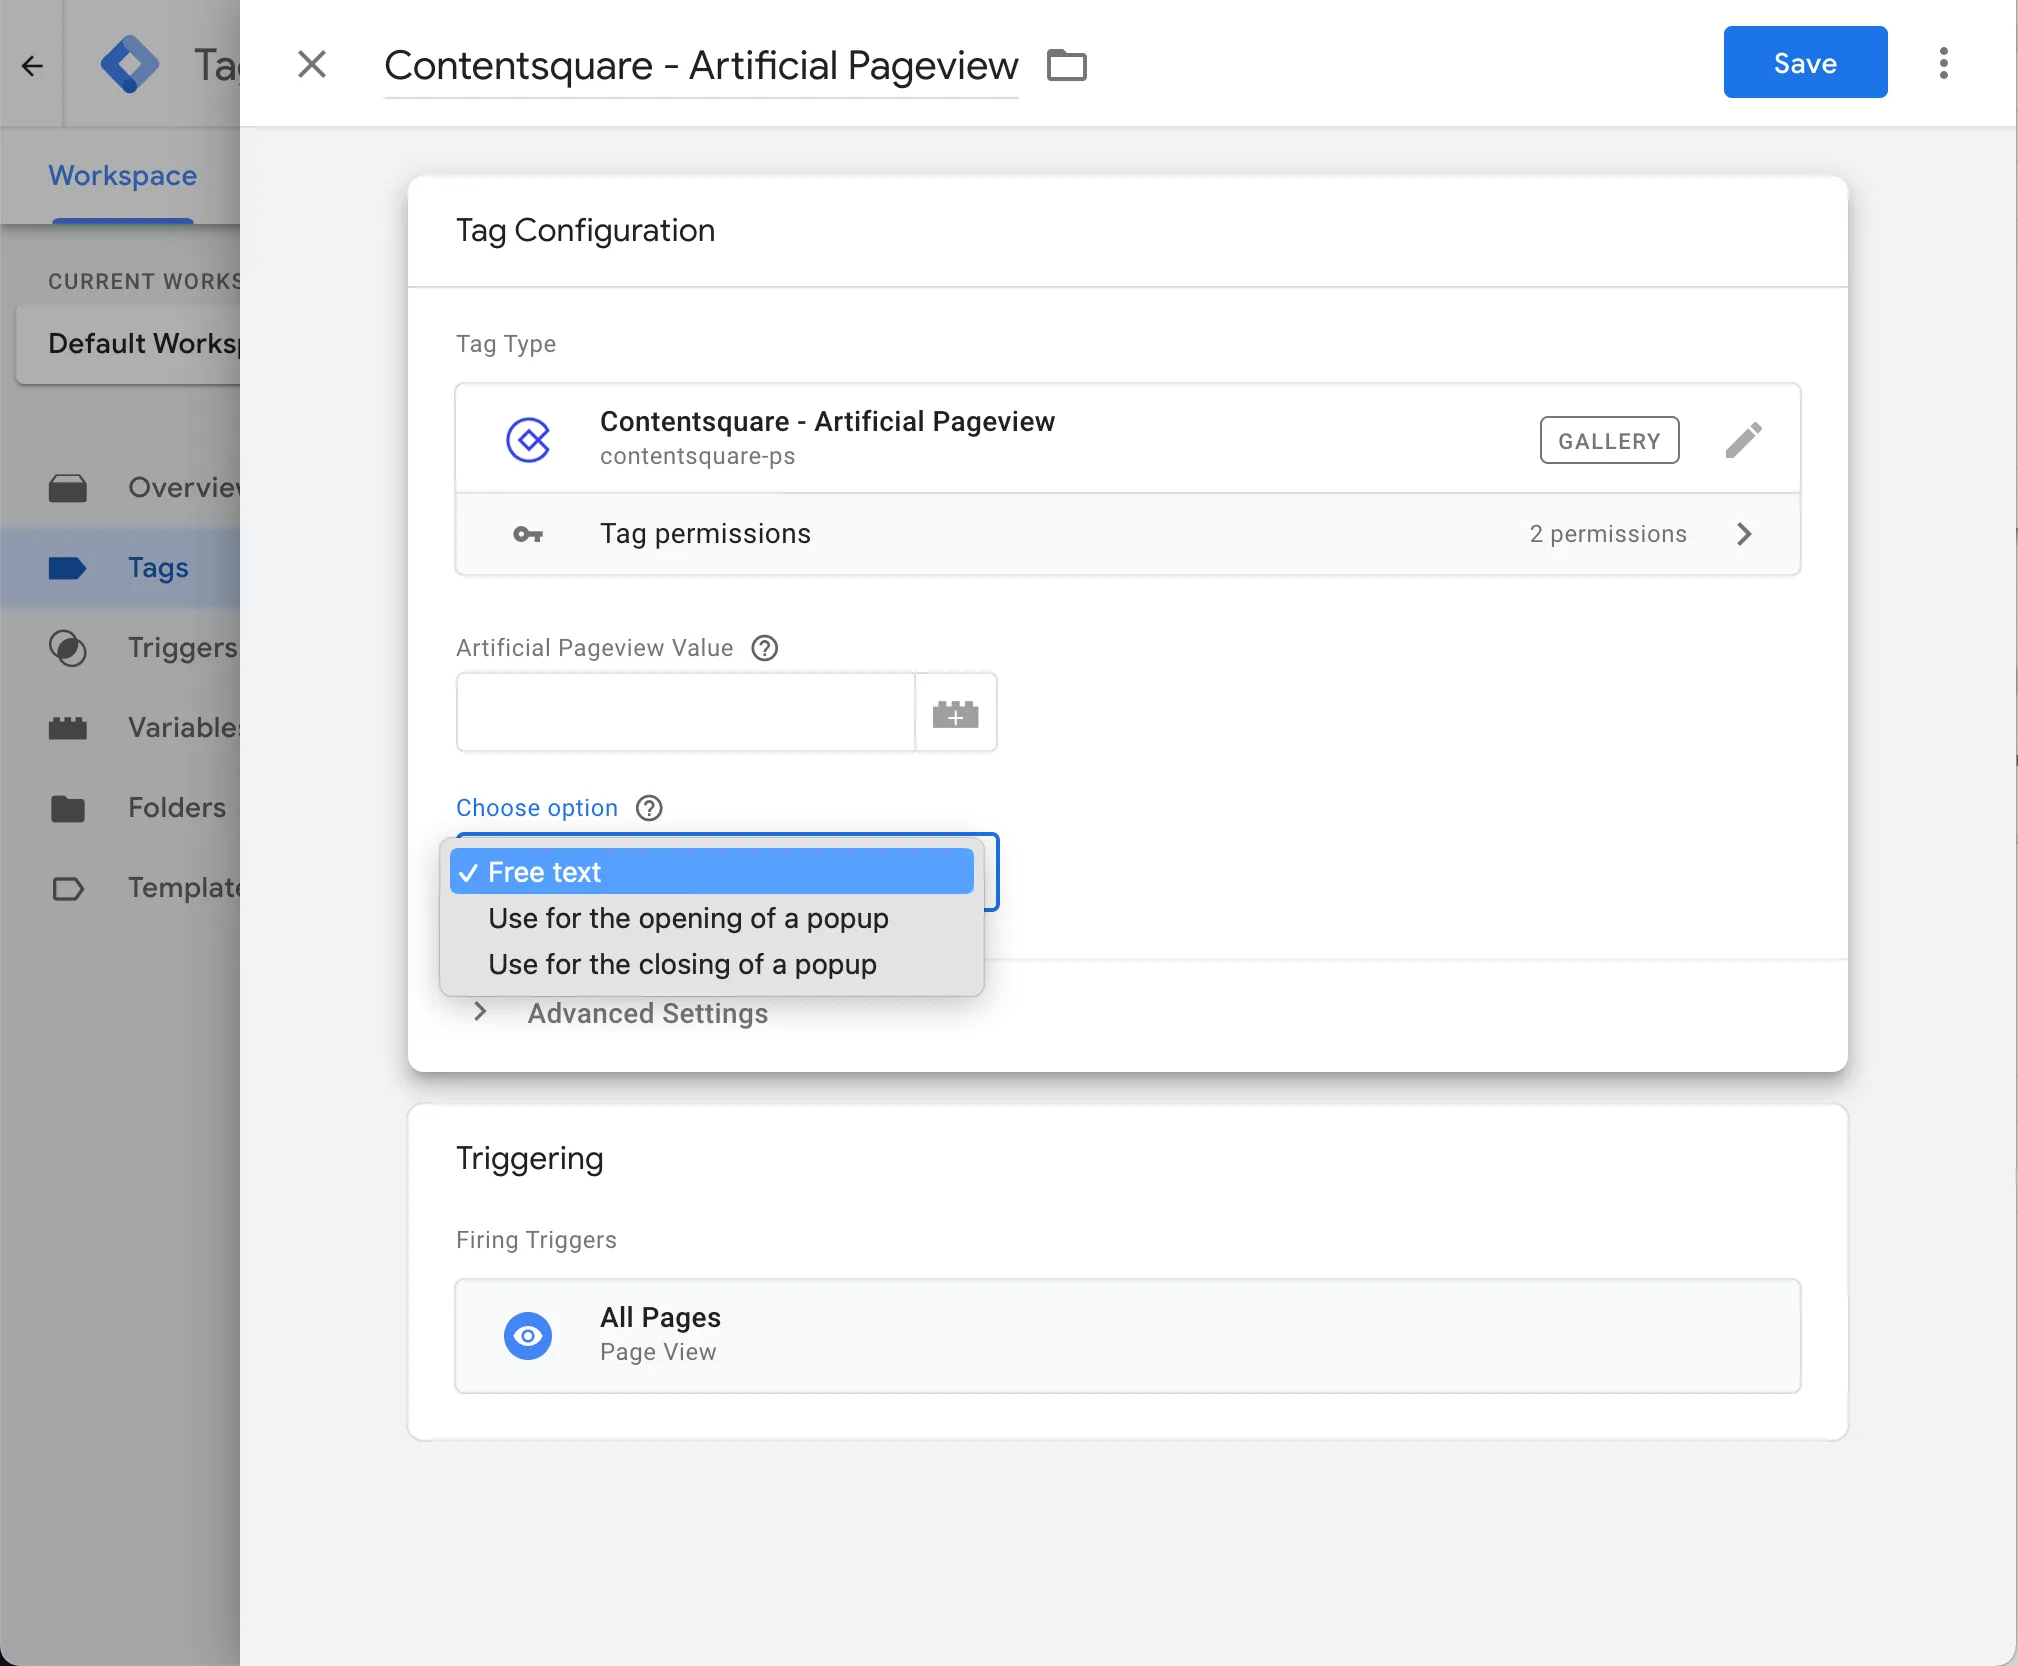
- Select the Free text option and enter the value under
Dynamic URLs
Section titled Dynamic URLs-
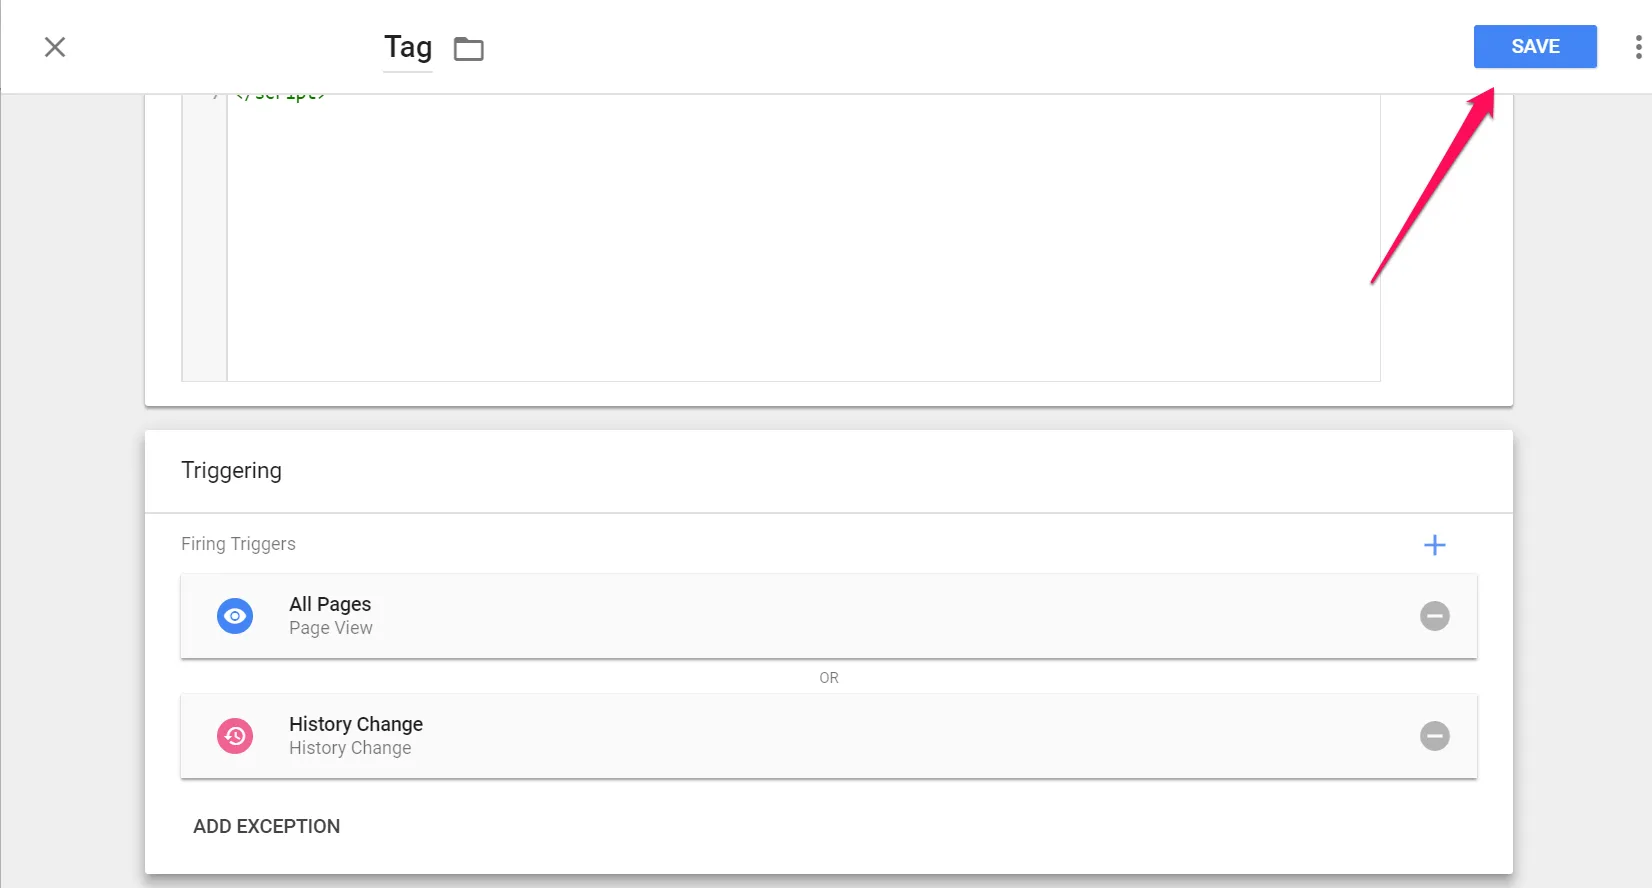
Amend the Main tag configuration by adding a new trigger to it.
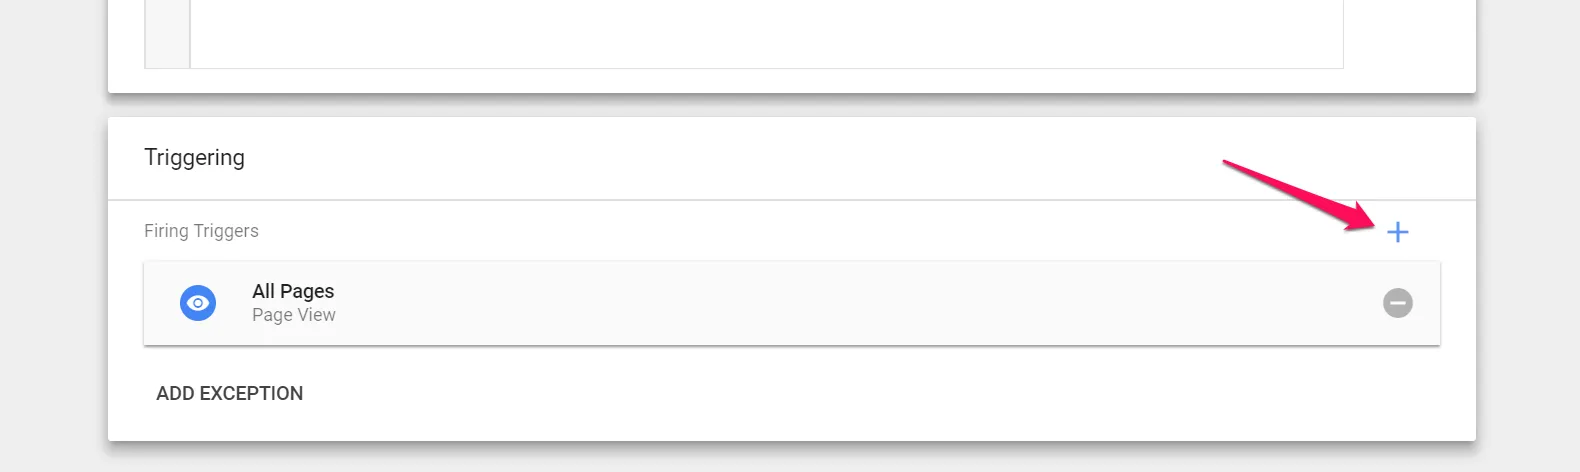
-
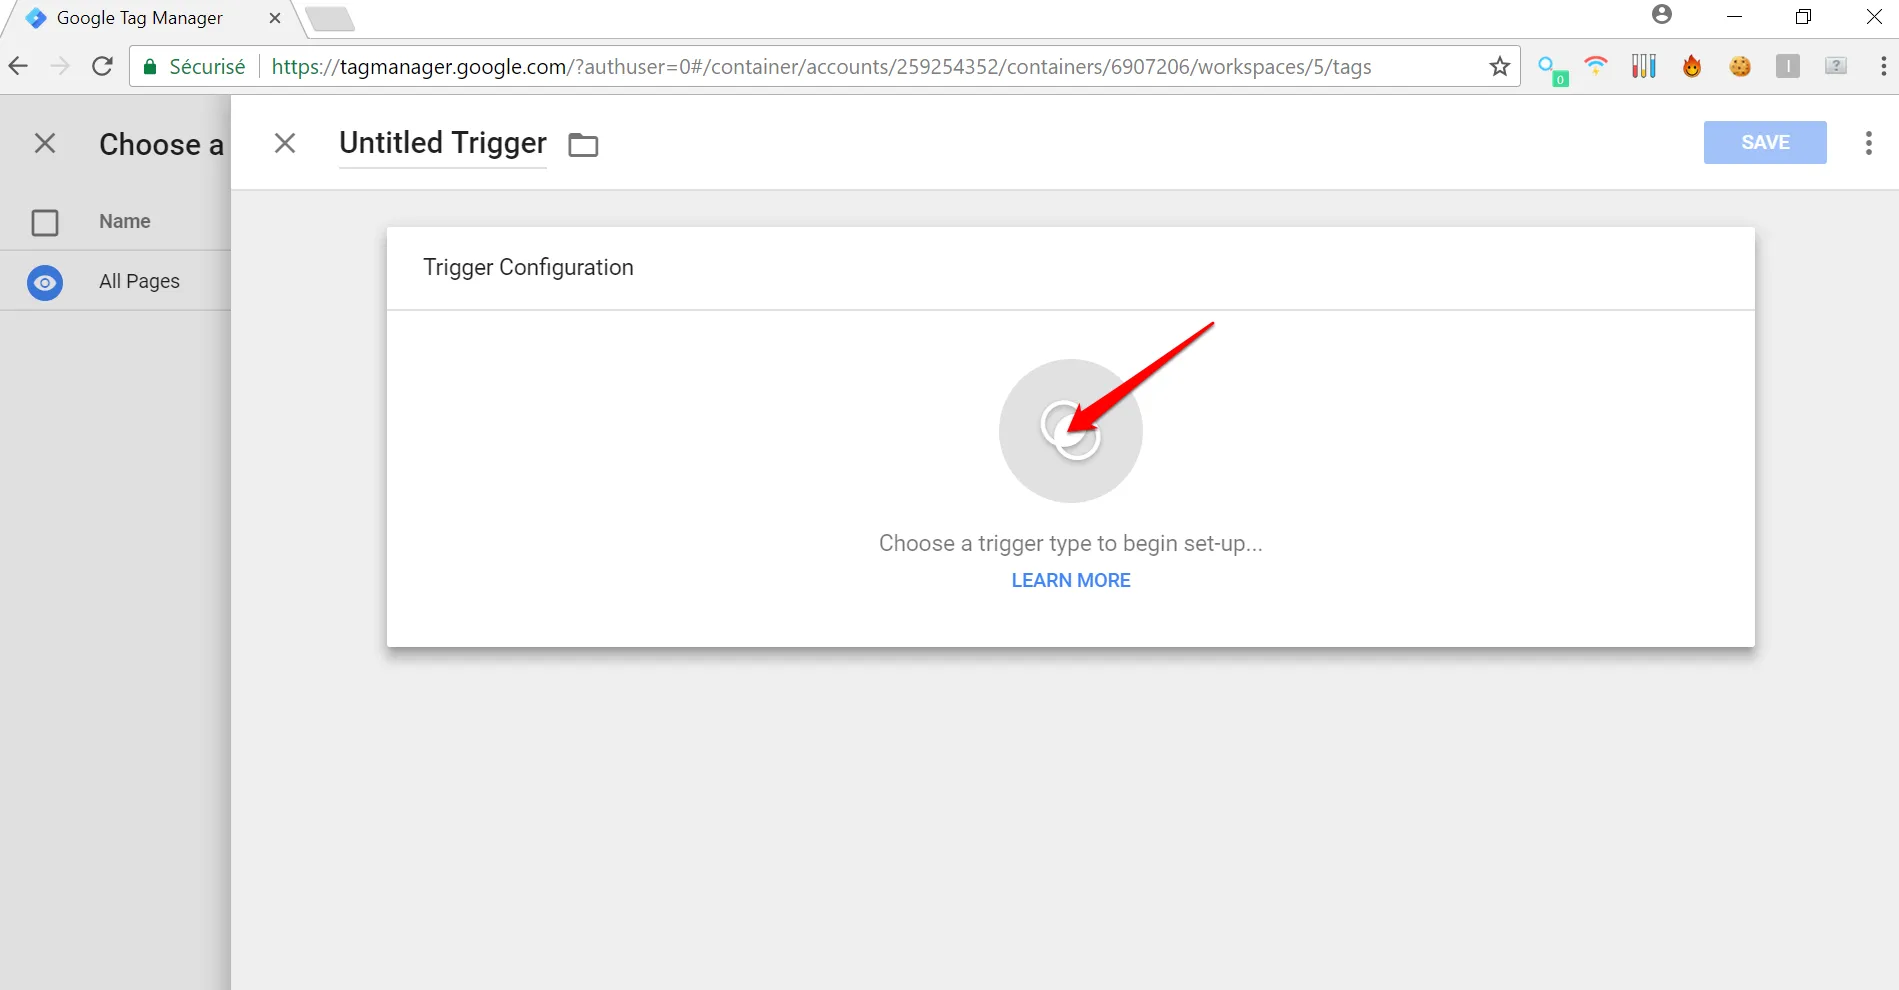
Create a new trigger

-
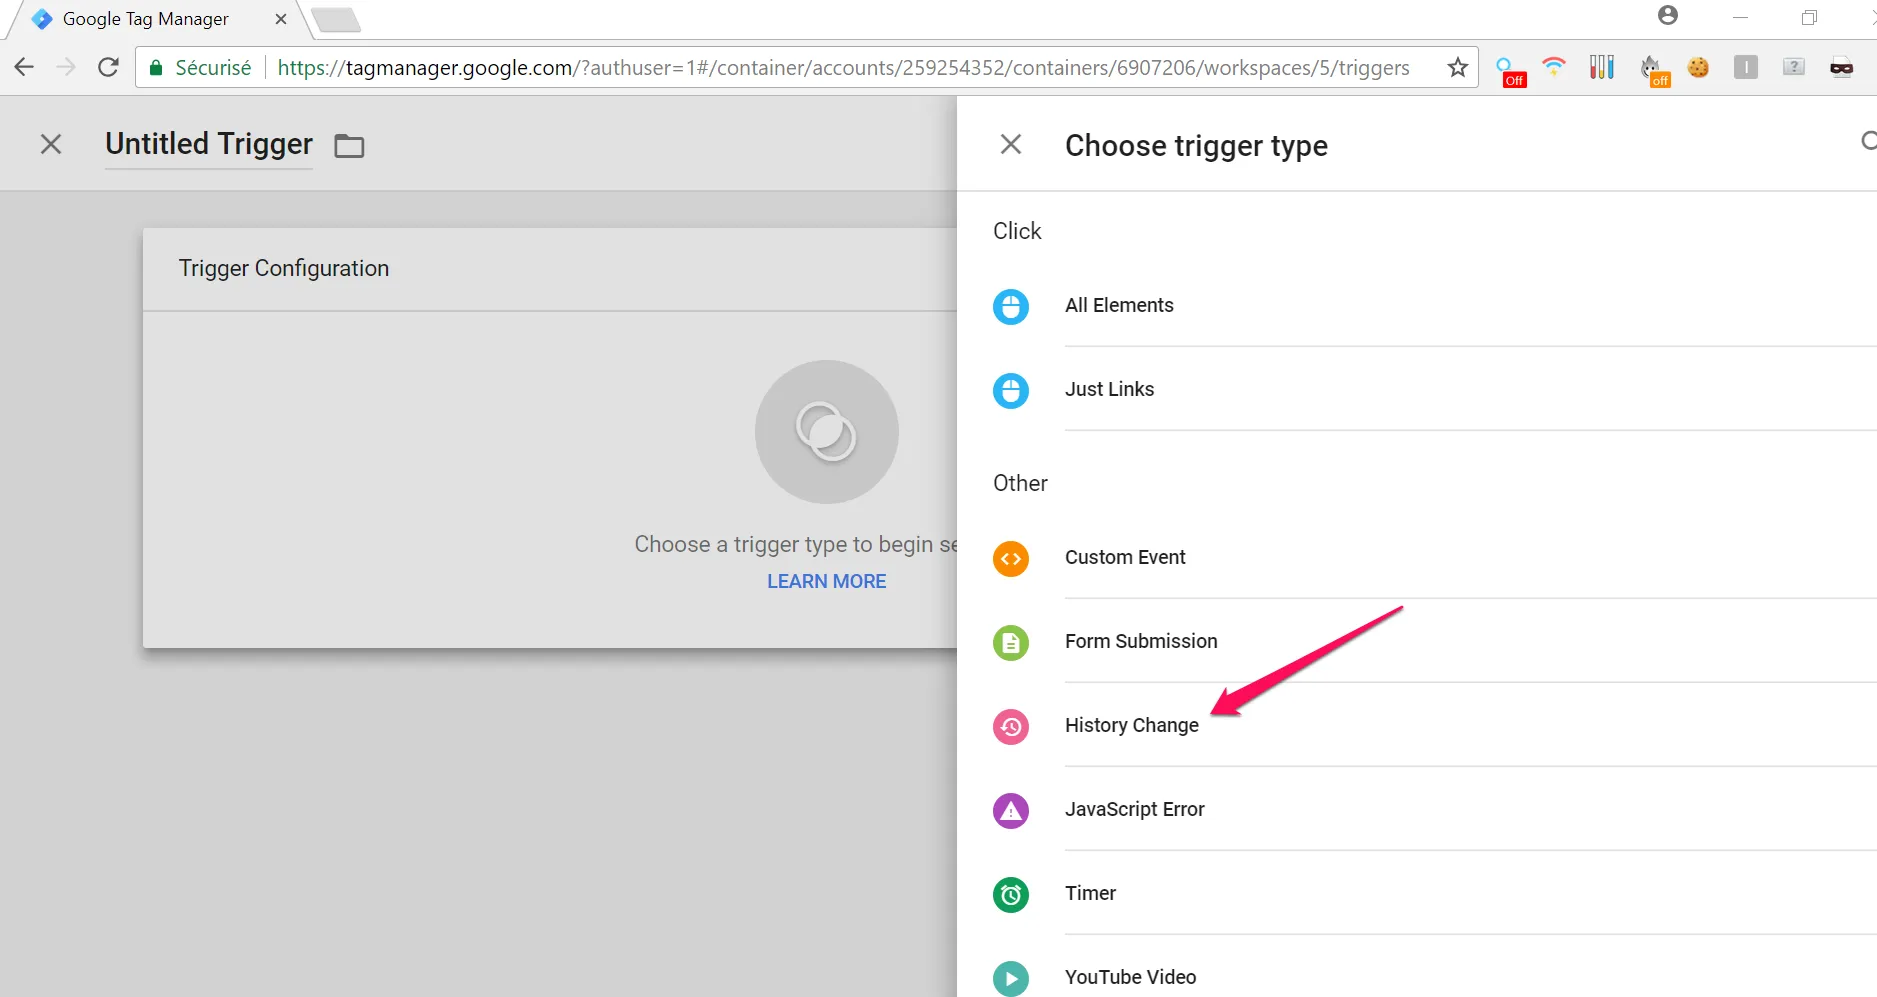
Select "Choose a trigger type to begin setup...".
-
In the list, select the "History Change" trigger.
-
Save your trigger.
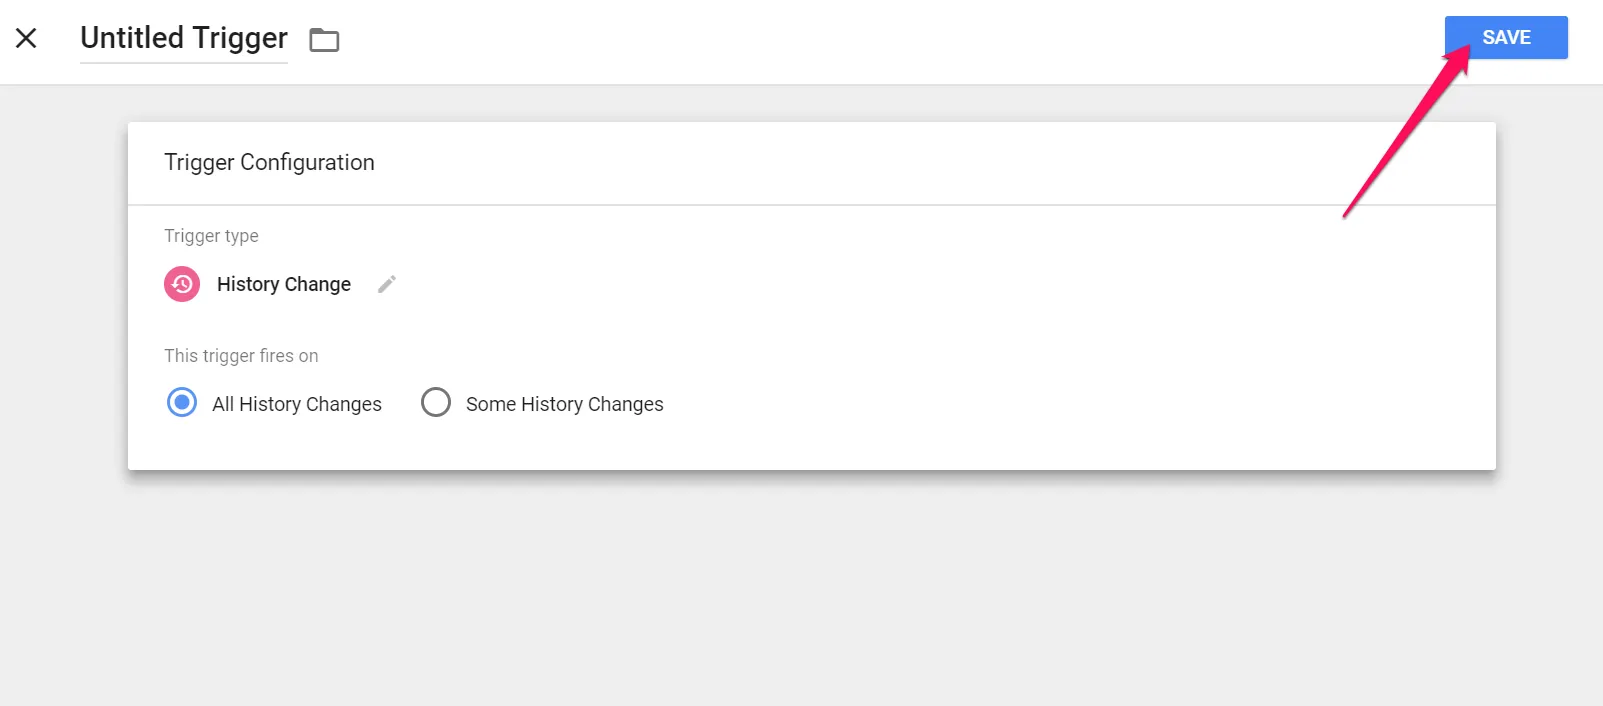
-
Select the "Save" button on the top right.
Google Tag Manager (Custom HTML)
Section titled Google Tag Manager (Custom HTML)Stable URLs
Section titled Stable URLs-
Select "Choose a tag type to begin setup...".

-
In the list, pick the "Custom HTML" tag.
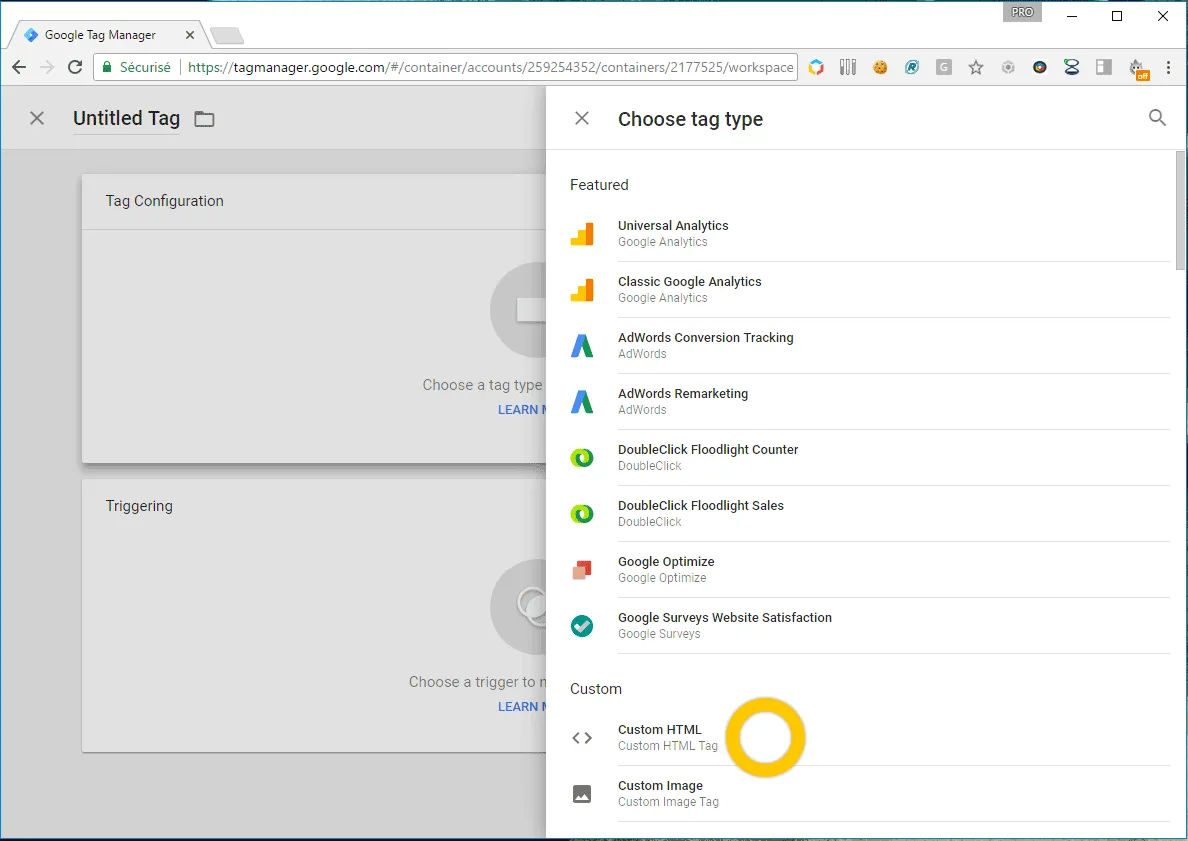
-
Write the snippet to be fired in the HTML field. It should be similar to this:
<script type="text/javascript">window._uxa = window._uxa || [];window._uxa.push(["setQuery",window.location.search + (window.location.search ? "&" : "?") + "cs-popin-dedicated_query_string", { lifespan: 'onNextPageviewOnly' }]);window._uxa.push(["trackPageview",window.location.pathname + window.location.hash.replace("#", "?__"), { lifespan: 'onNextPageviewOnly' }]);</script>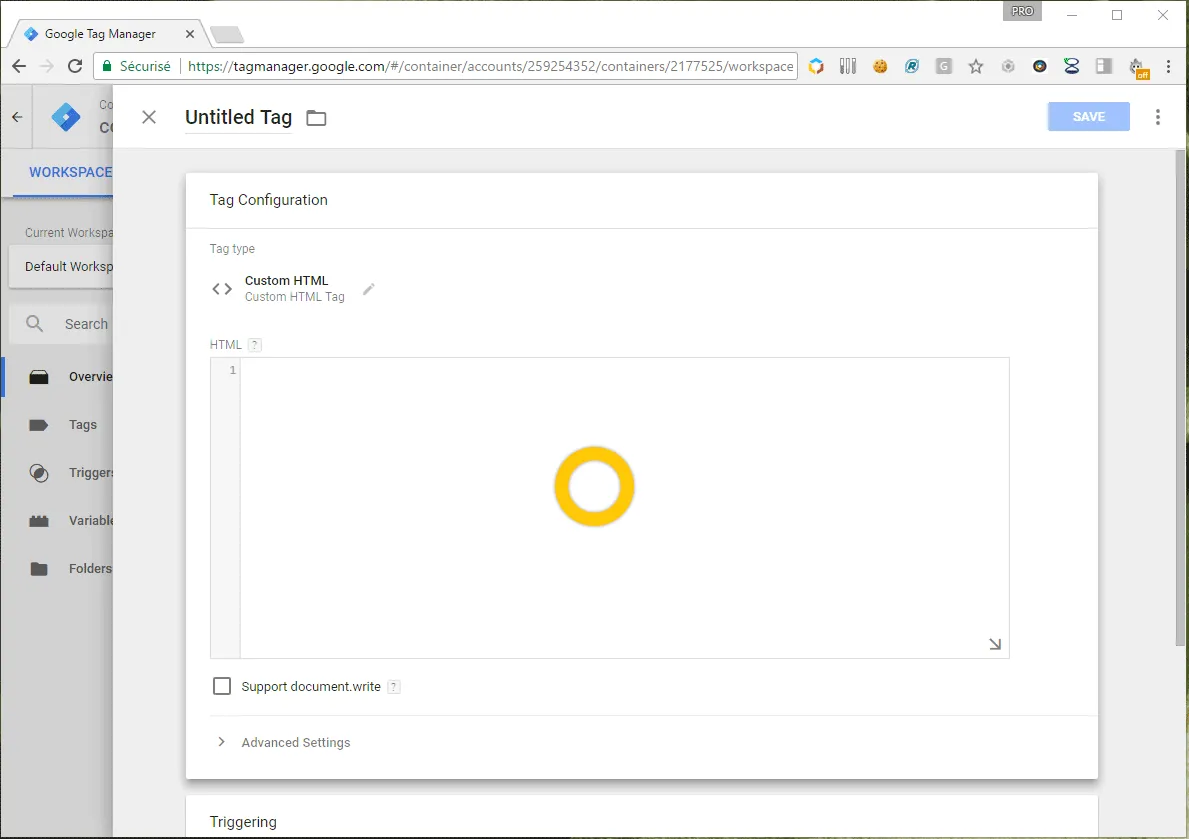
-
Select "Choose a trigger to make this tag fire...".
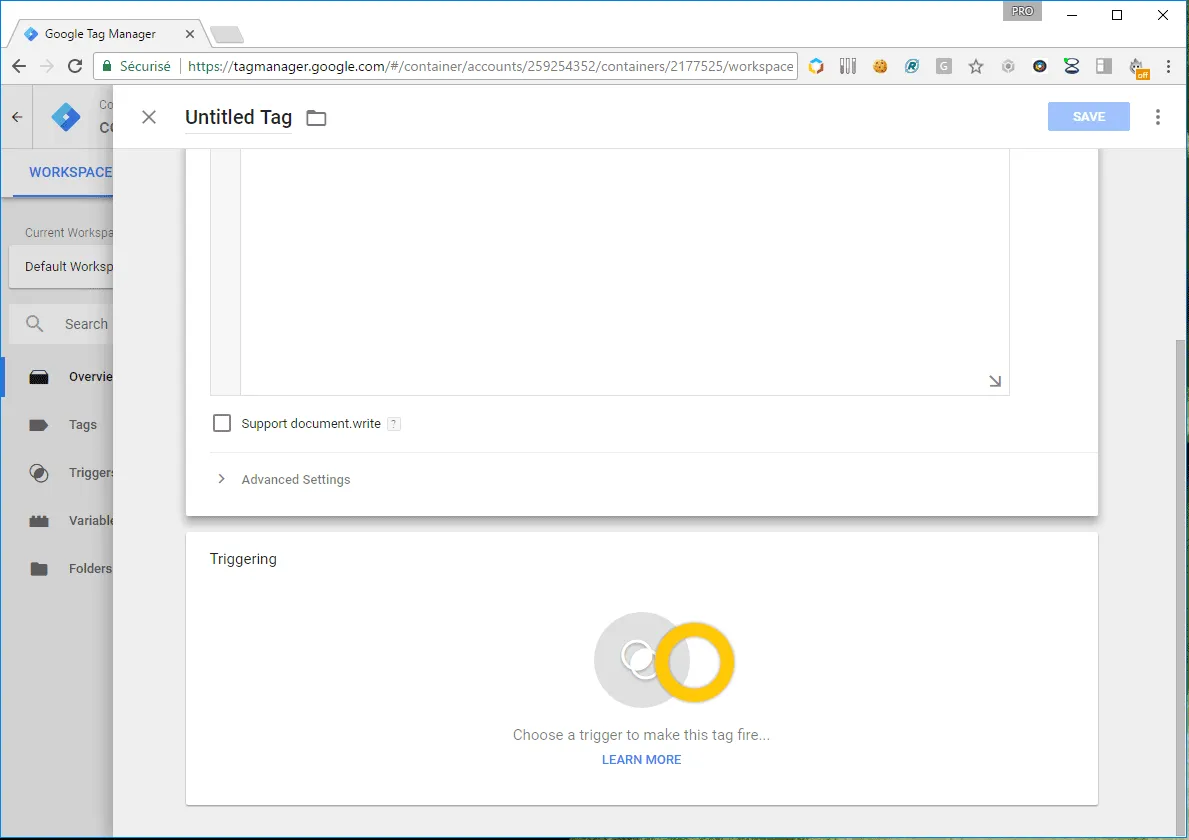
-
Create a new trigger to make this tag fire
-
Select "Choose a trigger type to begin setup...".
-
In the list, pick the "All Elements" trigger.
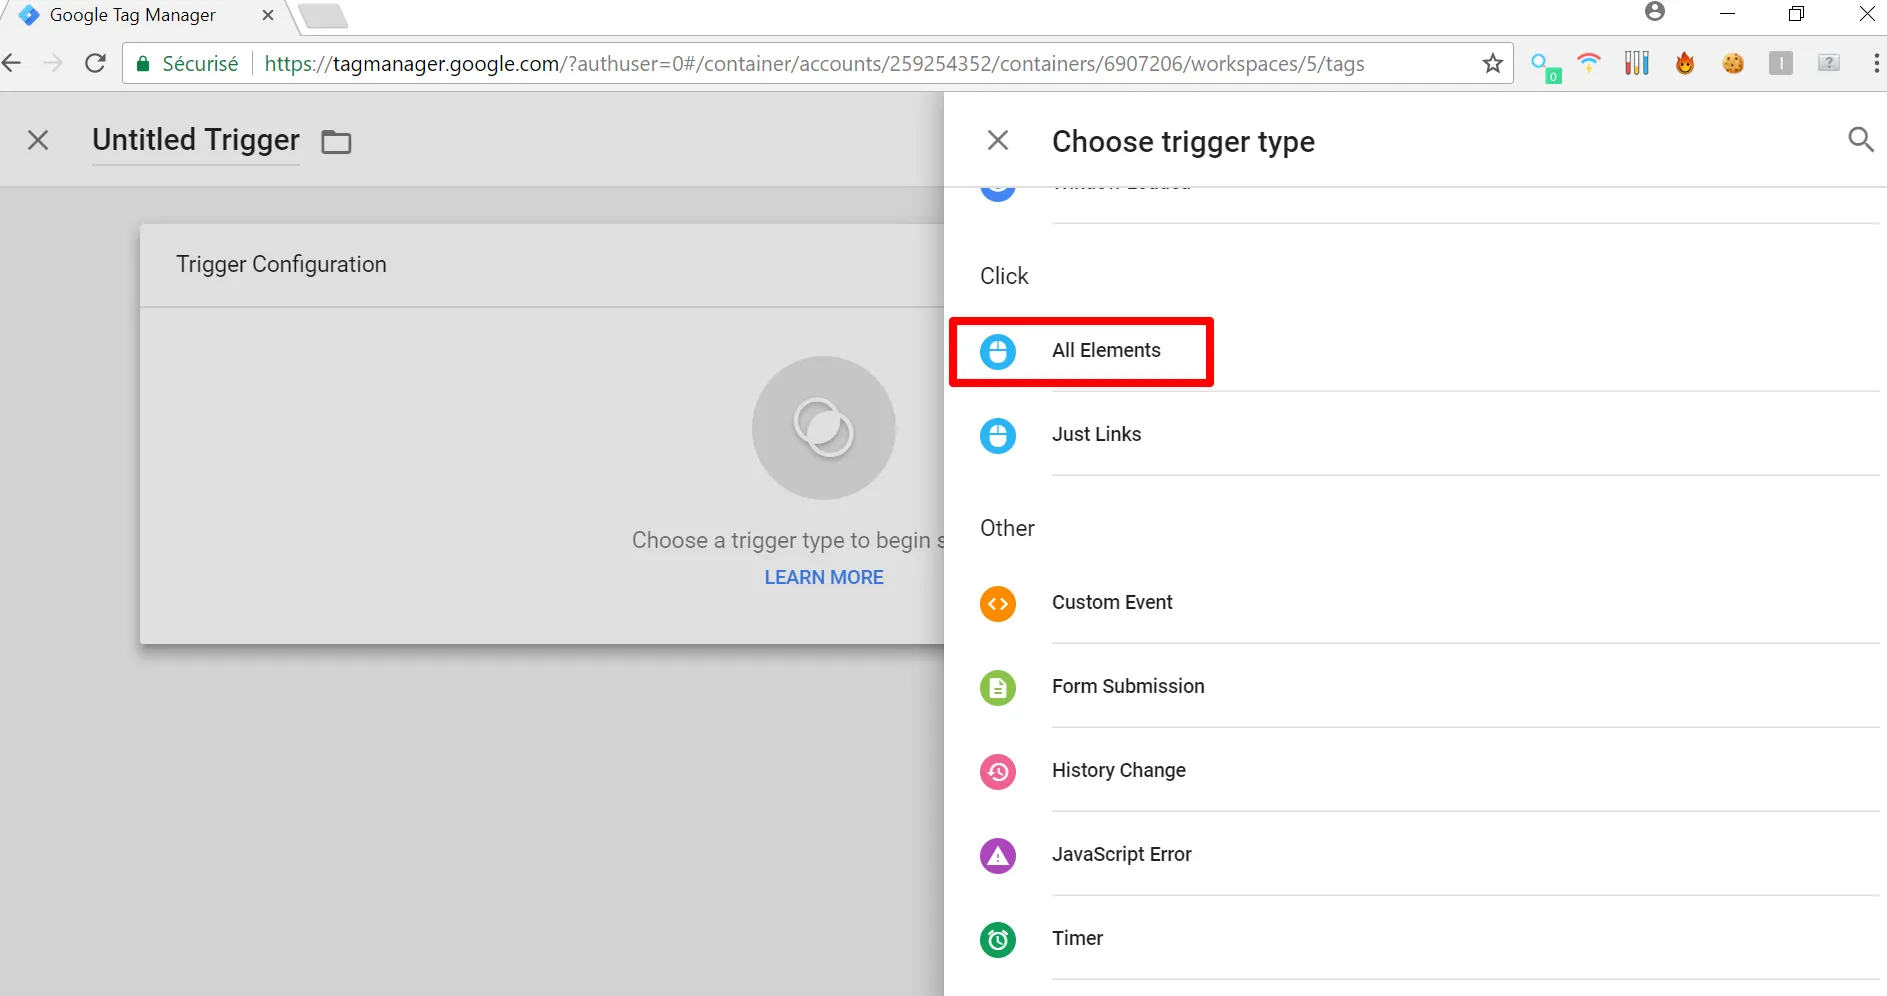
-
Check "Some Clicks"
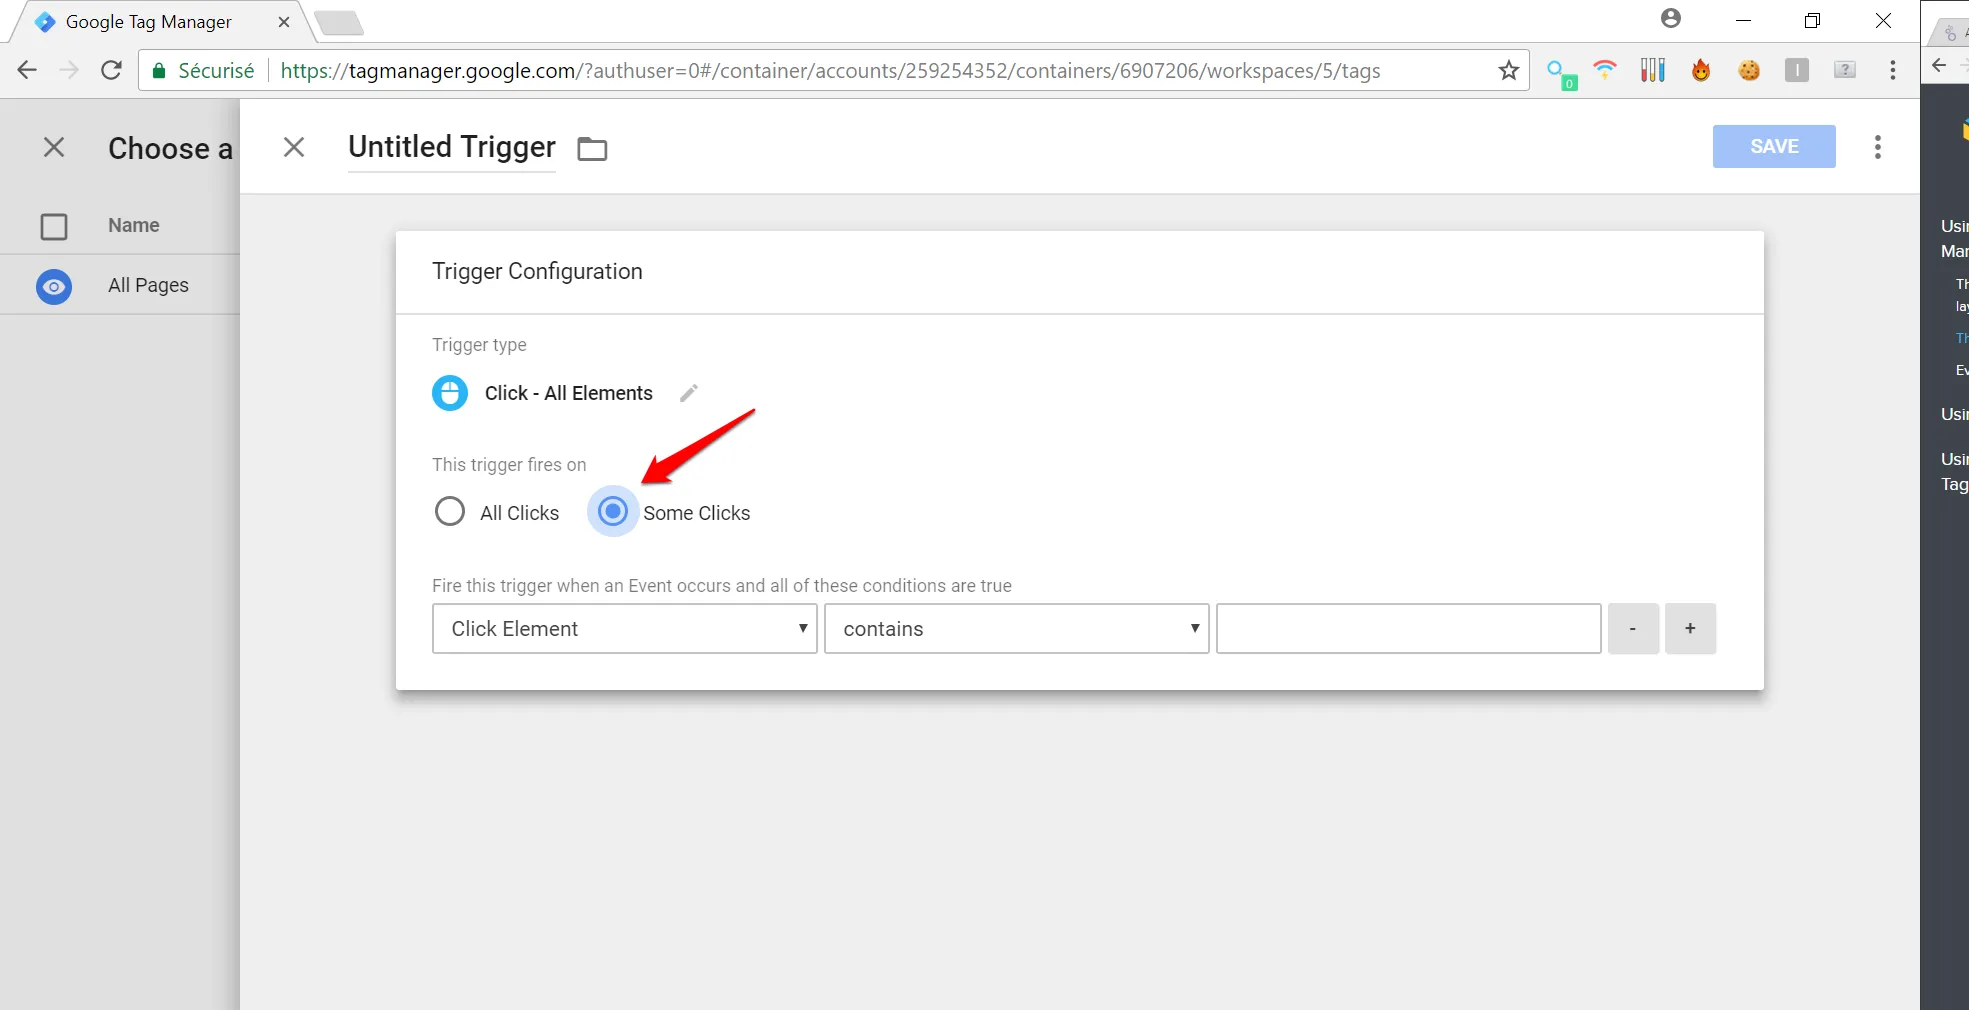
-
Select "Click Element", "matches CSS selector" and enter a valid CSS filter corresponding to the element you want to track.
For example the valid CSS for:
<button class="btn btn primary">Submit</button>Will be:
.btn.btn.primary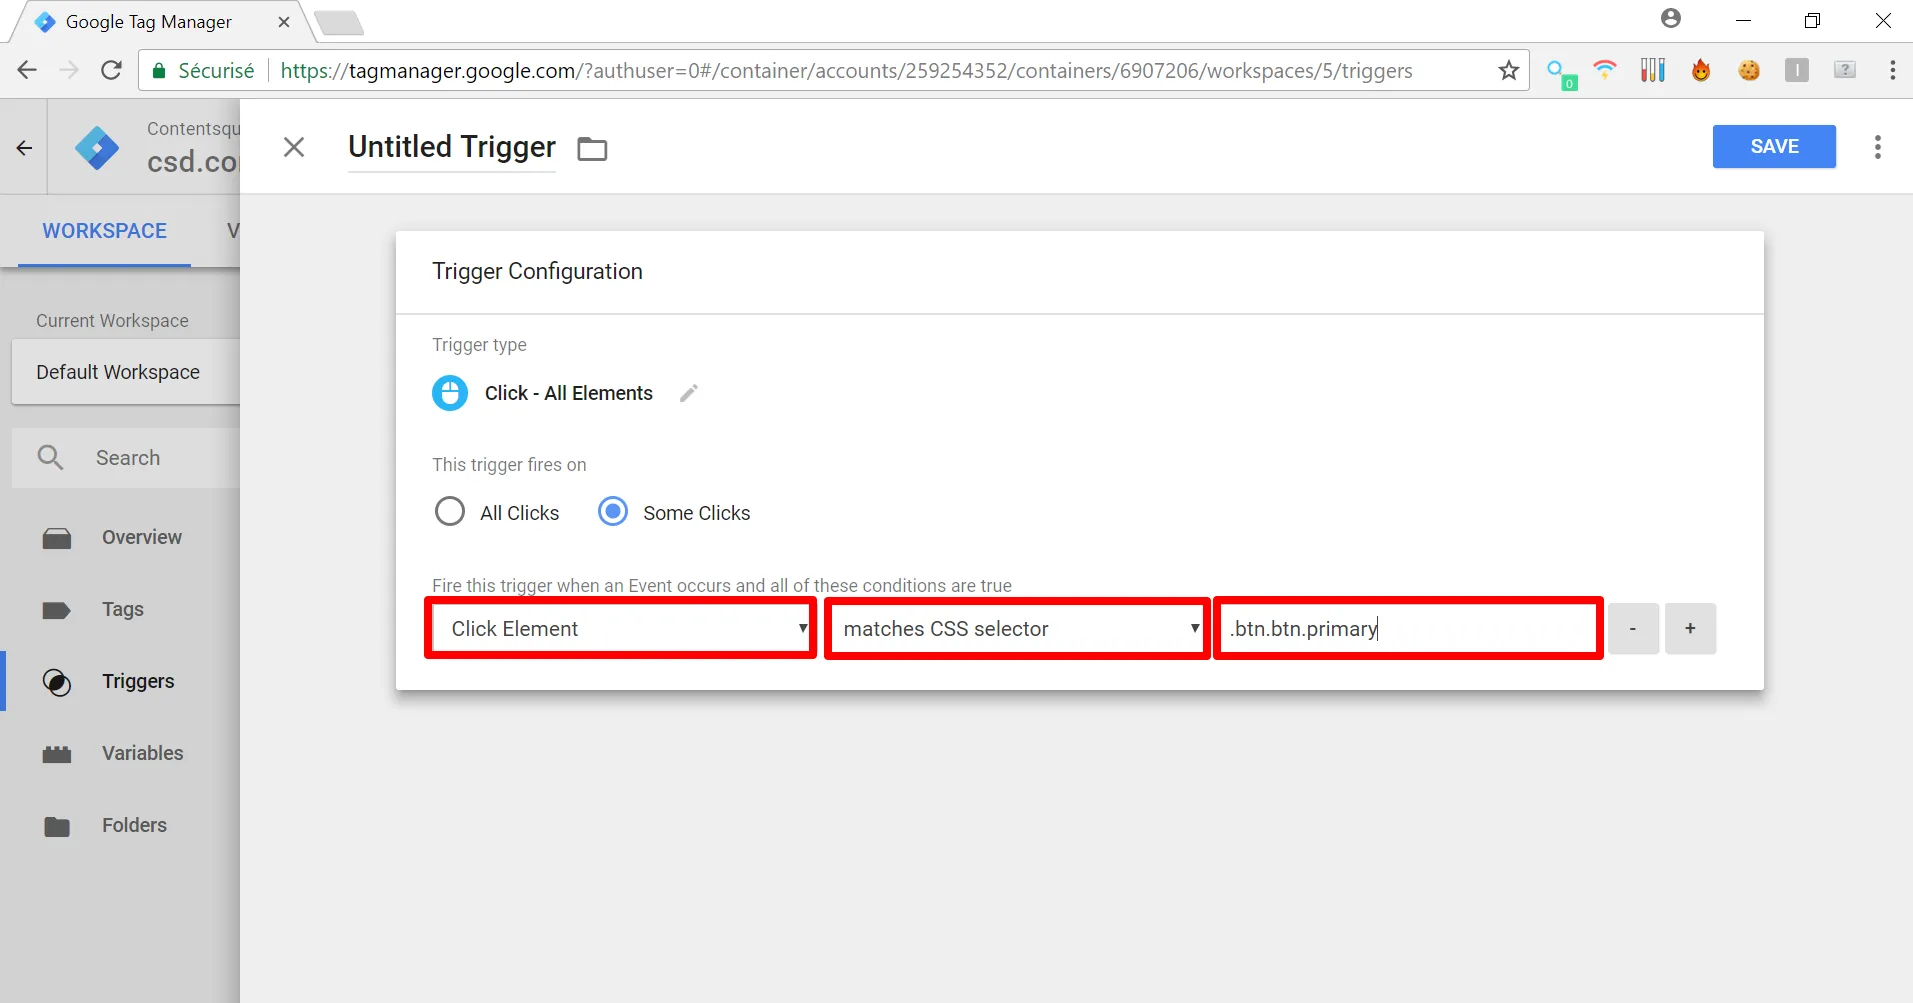
Dynamic URLs
Section titled Dynamic URLs-
Amend the Main tag configuration by adding a new trigger to it.
-
Create a new trigger
-
Select "Choose a trigger type to begin setup...".
-
In the list, select the "History Change" trigger.
-
Save your trigger.
-
Select the "Save" button on the top right.
Tealium
Section titled TealiumStable URLs
Section titled Stable URLsAssign the event you might already have in place a custom HTML snippet and write the snippet to be fired in the HTML field. It should be similar to this:
<script type="text/javascript"> window._uxa = window._uxa || []; window._uxa.push([ "setQuery", window.location.search + (window.location.search ? "&" : "?") + "cs-popin-dedicated_query_string", { lifespan: 'onNextPageviewOnly' } ]); window._uxa.push([ "trackPageview", window.location.pathname + window.location.hash.replace("#", "?__"), { lifespan: 'onNextPageviewOnly' } ]);</script>Dynamic URLs
Section titled Dynamic URLsCreate (or select an already existing) event that occurs on each history change or view re-routing. Assign this event to the Contentsquare extension.
Adobe Launch
Section titled Adobe LaunchStable URLs
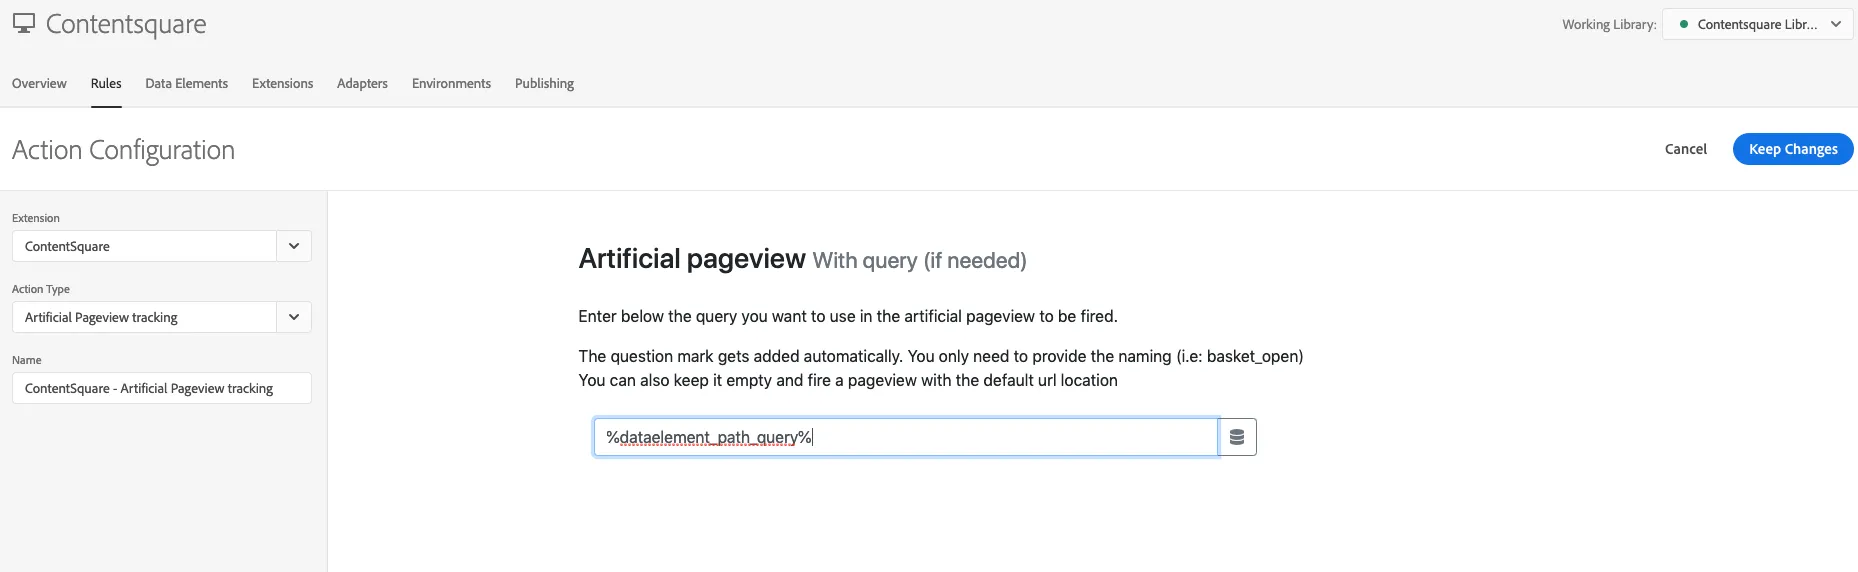
Section titled Stable URLsArtificial Pageviews
Section titled Artificial PageviewsWhen setting up the rule, make sure to target the specific event or condition needed. For instance, for an add to bag action, you could either follow the click route:

Or the custom event route:
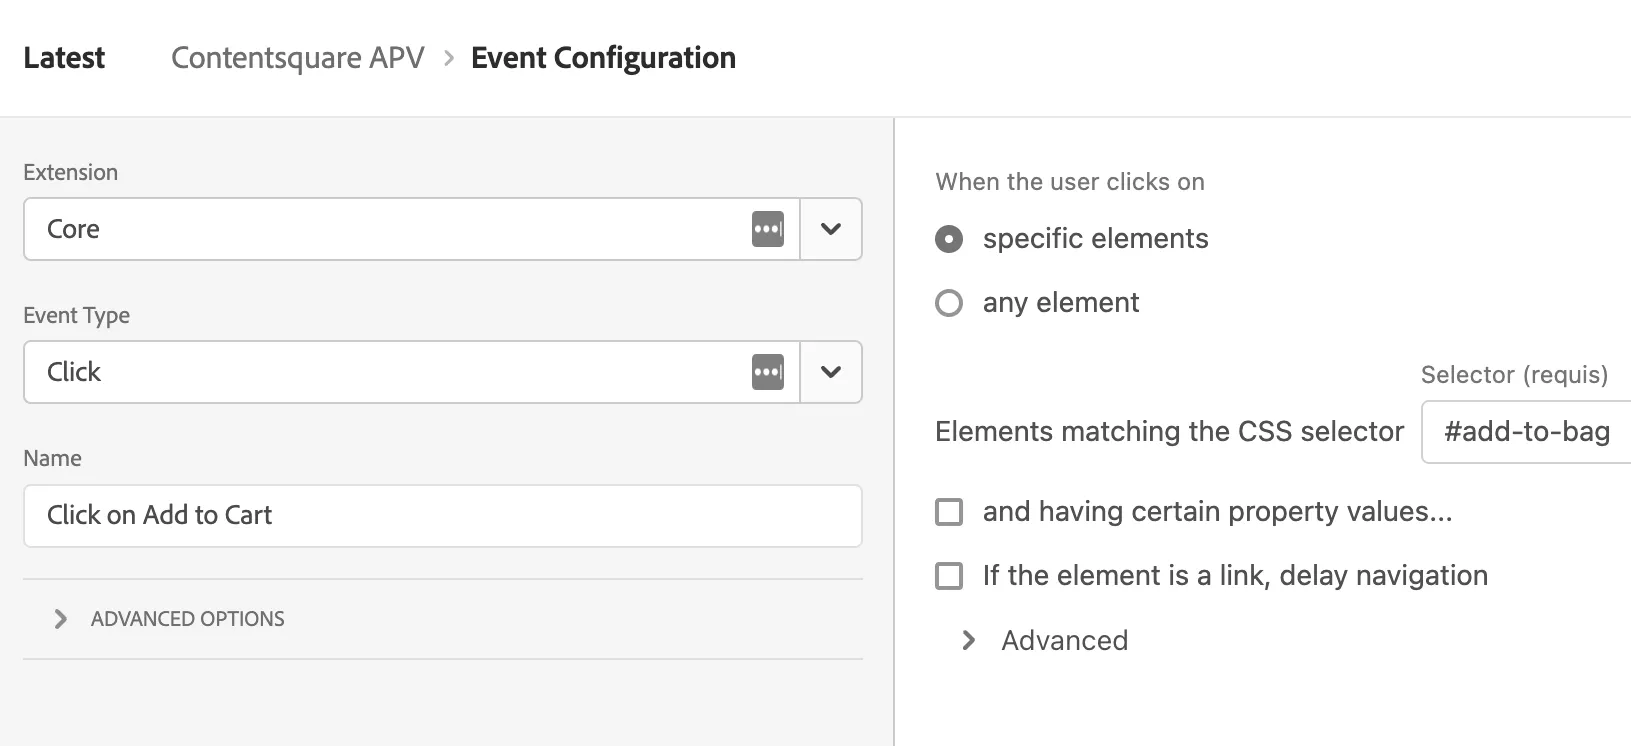
Once you've chosen the desired event, you can select the Artificial Pageview tracking action from the Contentsquare extension.
Depending on the pageview you'd need to track, you can either specify the query to be passed to the Contentsquare servers:
Or, leave the input field empty, which will allow our script to capture the current URL automatically:
You can also use Data Elements as a query string for artificial pageviews.
Dynamic URLs
Section titled Dynamic URLsIn the event of a SPA implementation, if the path/query automatically changes on each re-routing, utilise the built-in history change event to fire the CS tag on each of these occurrences.
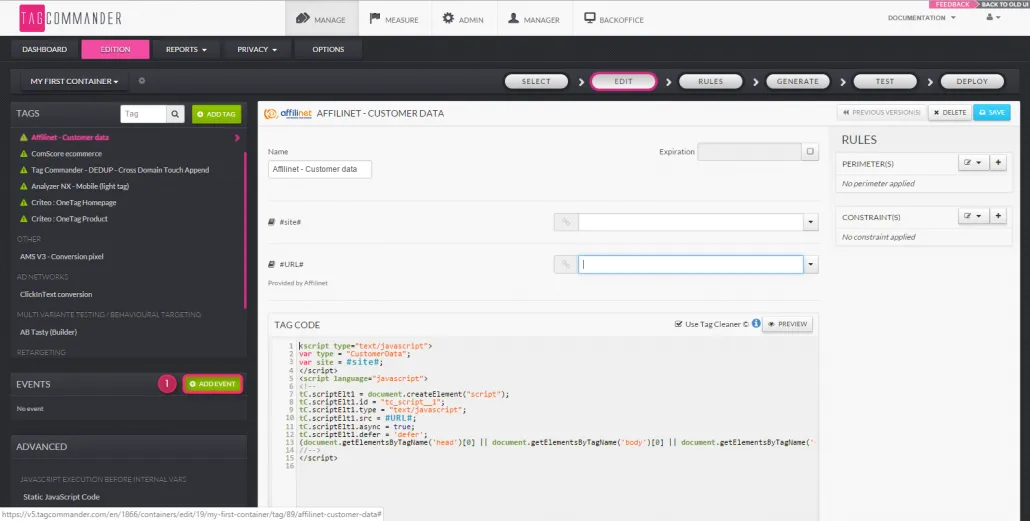
Commanders Act
Section titled Commanders Act-
To add a new event, go to the "EDIT" step, and click "ADD EVENT" (1):
A configuration window will appear, with several fields:
- (1) "Name": Name of the event you wish to add
- (2) "Id": The event's ID (to be completed only if you know it and want to trigger the event based on its ID; otherwise, leave the field empty, and it will be generated automatically by Commanders Act)
- (3) JavaScript code: Area where the event's JavaScript code is entered
- (4) "Use Tag Cleaner": Feature allowing you to "correct" the event (rewrites it to avoid JavaScript errors and makes it compatible with the container's code)
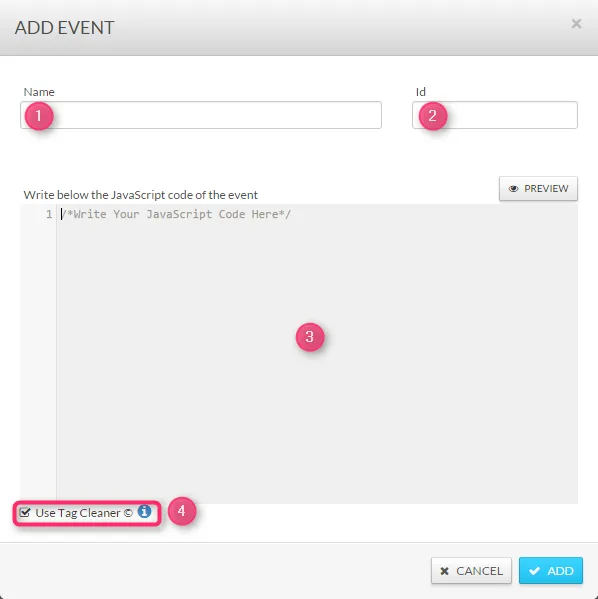
-
Click "ADD" to add your event to the container.
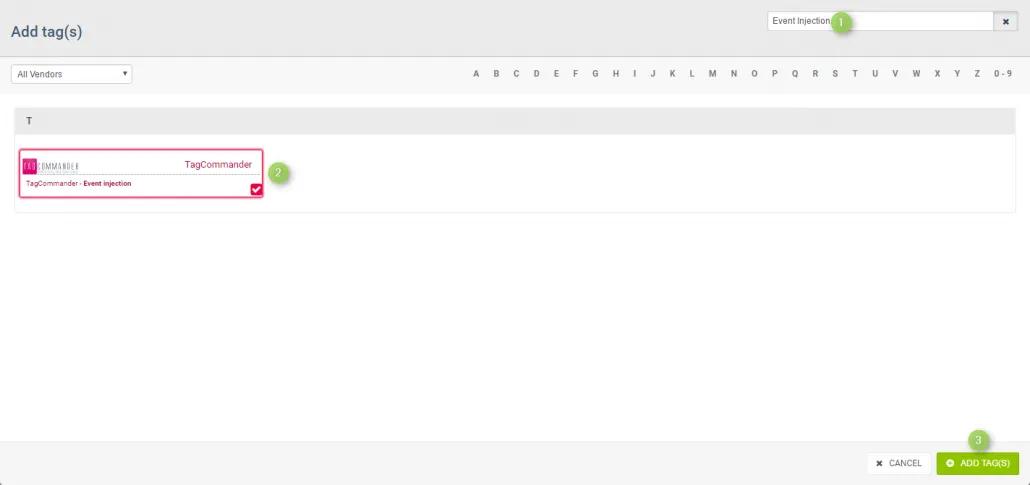
-
Go to the tag library. Once there:
- Write "Event Injection" in the search engine
- Select the tag
- Add the tag
In case of tracking pageviews with Contentsquare, the code to be deployed should follow this guideline:
window._uxa = window._uxa || [];window._uxa.push(['trackPageview', <PATH_TO_SEND> ]);(4) Go to your website; place the cursor on the element you wish to place an event on and do a right click. In the menu that opens up, select "Inspect Element". (5) In the console, once the element is highlighted, right-click again. (6) Choose "copy" from the menu. (7) > "Copy Selector".
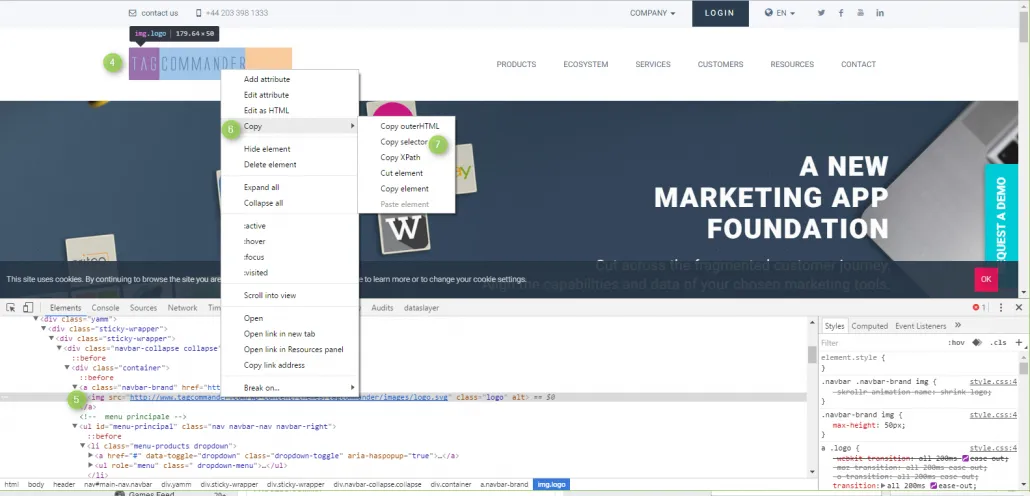
(8) If you know the element's ID (starting with a #): copy and paste it in the #CSS_PATH# field.

(9) If you do not know or cannot find the ID: copy and paste the element's information starting with "#" and replace " > " with a single space in the code line.

(10) Copy and paste the line in the interface's #CSS_Path# field.
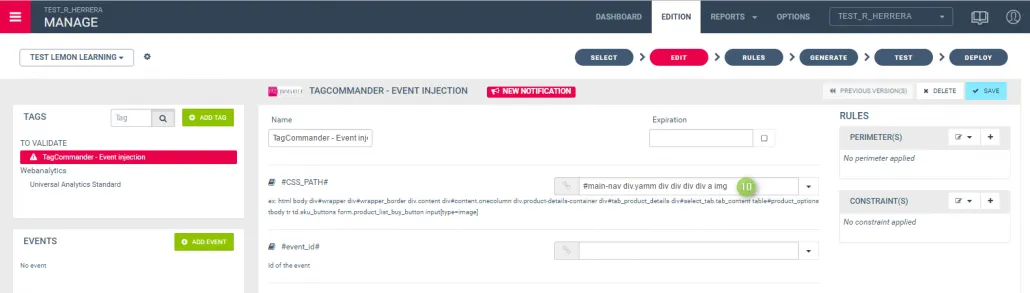
Now enter the ID of the event you wish to summon in the corresponding field.
Proceed to the deployment step as you do with other tags.
Shopify
Section titled Shopify-
Within the main menu, select Online Store > Themes, then click the Actions drop-down menu, and Edit Code.

-
Open the relevant Liquid file where you want to trigger an artificial pageview based on your own JavaScript logic. You can put this in the main
theme.liquidfile or in a specific Liquid file.Let's say you want to trigger this artificial pageview only when a certain action takes place like when an item is added to the cart. You would need to wrap this code inside your own condition, callback function, or event listener.
-
In the snippet below, replace
<PATH_TO_SEND>with your unique path.<script type="text/javascript">window._uxa = window._uxa || [];window._uxa.push(['trackPageview', <PATH_TO_SEND> ]);</script>You either hard-code a static value for the path like
Added_to_cartor use Shopify's Liquid Objects ↗/Liquid Tags ↗ to grab the dynamic data from it like below:<script type="text/javascript">// Contentsquare Send Artificial Pageviewsdocument.getElementById("AddToCart").addEventListener('click', function() {window._uxa = window._uxa || [];window._uxa.push(["trackPageview", "Added_to_cart_" + {{ custom_tag.value}}])});</script> -
Insert this code after the main tracking tag block.
The end result of adding this code into the Liquid file:
<!-- Contentsquare Tags Start --><script type="text/javascript">// Contentsquare Main Tracking Tag(function () {window._uxa = window._uxa || [];if (typeof CS_CONF === "undefined") {window._uxa.push(["setPath",window.location.pathname + window.location.hash.replace("#", "?__")]);var mt = document.createElement("script");mt.type = "text/javascript";mt.async = true;mt.src = "//t.contentsquare.net/uxa/769238b6e1309.js";document.getElementsByTagName("head")[0].appendChild(mt);} else {window._uxa.push(["trackPageview",window.location.pathname + window.location.hash.replace("#", "?__")]);}});</script><script type="text/javascript">// Contentsquare Send Artificial Pageviewsdocument.getElementById("AddToCart").addEventListener('click', function() {window._uxa = window._uxa || [];window._uxa.push(["trackPageview", "Added_to_cart_" + {{ custom_tag.value}}])});</script> -
To modify the entire path that is sent, use the
setPathcommand:<script type="text/javascript">// Contentsquare Send Artificial Pageviewsdocument.getElementById("AddToCart").addEventListener('click', function() {window._uxa = window._uxa || [];window._uxa.push(["setPath", "Added_to_cart_" + {{ custom_tag.value }}]);window._uxa.push(["trackPageview"]);});</script>For more information, see the
setPathcommand. -
To modify only the query string, use the
setQuerycommand:<script type="text/javascript">// Contentsquare Send Artificial Pageviewsdocument.getElementById("AddToCart").addEventListener('click', function() {window._uxa = window._uxa || [];window._uxa.push(["setQuery", "Added_to_cart_" + {{ custom_tag.value }}]);window._uxa.push(["trackPageview"]);});</script>
For more information, read about the setQuery command.
Custom HTML
Section titled Custom HTMLTo send a pageview, use the trackPageview command:
<script type="text/javascript"> window._uxa = window._uxa || []; window._uxa.push(['trackPageview', <PATH_TO_SEND>]);</script><PATH_TO_SEND> is limited to 255 characters.
Stable URLs
Section titled Stable URLsFor instance, in case you wanted to keep track of the modal window appearing when adding an item to the cart:
<script type="text/javascript"> window._uxa = window._uxa || []; window._uxa.push([ "setQuery", window.location.search + (window.location.search ? "&" : "?") + "cs-popin-dedicated_query_string", { lifespan: 'onNextPageviewOnly' } ]); window._uxa.push([ "trackPageview", window.location.pathname + window.location.hash.replace("#", "?__"), { lifespan: 'onNextPageviewOnly' } ]);</script>Dynamic URLs
Section titled Dynamic URLsWith custom variables
Section titled With custom variables<script> (function () { window._uxa = window._uxa || []; try { if (typeof dataLayer !== "undefined") { for (var i = 0; i < dataLayer.length; i++) { window._uxa.push([ "setCustomVariable", 1, "Sample Variable", dataLayer[i].sampleVariable, 3 ]); } } } catch (e) {} if (typeof CS_CONF === "undefined") { window._uxa.push([ "setPath", window.location.pathname + window.location.hash.replace("#", "?__") ]); var mt = document.createElement("script"); mt.type = "text/javascript"; mt.async = true; mt.src = "//t.contentsquare.net/uxa/{{YOUR_TAG_ID}}.js"; document.getElementsByTagName("head")[0].appendChild(mt); } else { window._uxa.push([ "trackPageview", window.location.pathname + window.location.hash.replace("#", "?__") ]); } })();</script>Without custom variables
Section titled Without custom variables<script> (function () { window._uxa = window._uxa || []; if (typeof CS_CONF === "undefined") { window._uxa.push([ "setPath", window.location.pathname + window.location.hash.replace("#", "?__") ]); var mt = document.createElement("script"); mt.type = "text/javascript"; mt.async = true; mt.src = "//t.contentsquare.net/uxa/{{YOUR_TAG_ID}}.js"; document.getElementsByTagName("head")[0].appendChild(mt); } else { window._uxa.push([ "trackPageview", window.location.pathname + window.location.hash.replace("#", "?__") ]); } })();</script>Tracking a modal opening
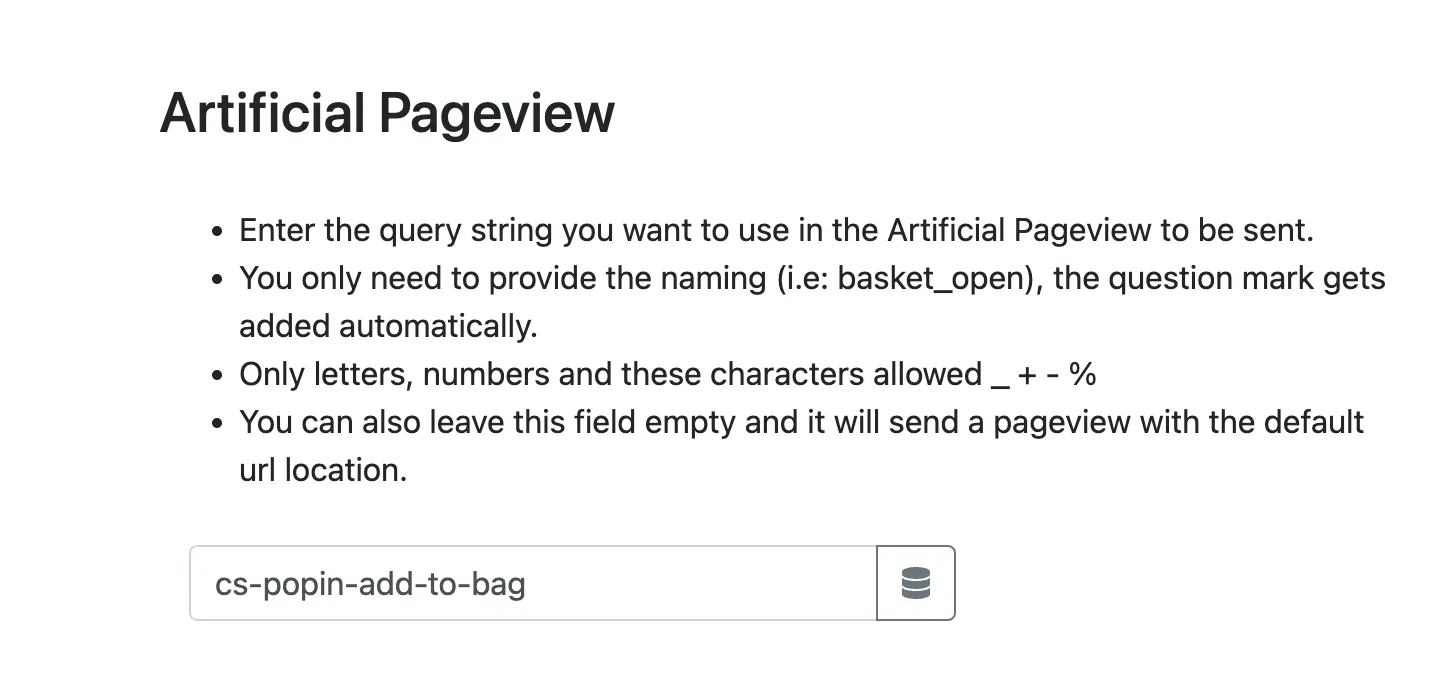
Section titled Tracking a modal openingTo track a modal (or "popin") opening/closing during the user's navigation, use artificial pageviews.
-
A first artificial pageview needs to be sent when the modal is opened — the sent URL will be the current one, followed by a string of characters allowing you to identify the modal.
<script type="text/javascript">window._uxa = window._uxa || [];window._uxa.push(["setQuery",window.location.search + (window.location.search ? "&" : "?") + "cs-popin-dedicated_query_string", { lifespan: 'onNextPageviewOnly' }]);window._uxa.push(["trackPageview",window.location.pathname + window.location.hash.replace("#", "?__"), { lifespan: 'onNextPageviewOnly' }]);</script> -
A second artificial pageview needs to be sent when the modal is closed. The sent URL will be the current one.
<script type="text/javascript">window._uxa = window._uxa || [];window._uxa.push(["trackPageview",window.location.pathname + window.location.hash.replace("#", "?__")]);</script>
Single Page Application
Section titled Single Page ApplicationThe Contentsquare Tracking tag sends only one pageview per full reload. In a Single Page Application (SPA), that would be only once per session.
To handle this, an artificial pageview on every page change is needed — use the "History Change" event which is available in most Tag Management Systems.
You can fire the following script on every page and on history change. It fires the main tag the first time and then sends an artificial pageview for each next call.
<script type="text/javascript"> window._uxa = window._uxa || []; /* First call */ if (typeof CS_CONF === "undefined") { window._uxa.push([ "setPath", window.location.pathname + window.location.hash.replace("#", "?__") ]); var mt = document.createElement("script"); mt.type = "text/javascript"; mt.async = true; mt.src = "//t.contentsquare.net/uxa/{{YOUR_TAG_ID}}.js"; document.getElementsByTagName("head")[0].appendChild(mt); } else { /* Every next call */ window._uxa.push([ "trackPageview", window.location.pathname + window.location.hash.replace("#", "?__") ]); }</script>Following a single page check-out
Section titled Following a single page check-outIf your checkout only fires one full reload, the main tag will be called just once, and only one natural pageview will be sent.
We thus only collect:
shop.com/checkout/
Instead of:
shop.com/checkout/step1shop.com/checkout/step2shop.com/checkout/step3shop.com/checkout/step4
To achieve this result, it is necessary to:
-
Change the natural pageview URL (the first that was sent)
-
Send an artificial pageview for every step
Here is the corresponding code, which uses the setPath function and artificial pageviews:
/* 1. Change the natural URL pageview, before loading the main tag */
window._uxa = window._uxa || [];window._uxa.push(["setPath", "checkout/step1"]);
(function () {  var mt = document.createElement("script");  mt.type = "text/javascript";  mt.async = true;  mt.src = "//t.contentsquare.net/uxa/{{YOUR_TAG_ID}}.js";  document.getElementsByTagName("head")[0].appendChild(mt);})();
/* ... Step Change Event ... */
/* 2. Send an artificial page for every step change*/
window._uxa = window._uxa || [];window._uxa.push(["trackPageview", "checkout/step" + n]);
/* Repeat step 2 as much as required */