

The Main Tracking Tag
The Contentsquare Main Tracking Tag or Main tag is the core 'pixel' or 'code snippet' that needs to be implemented on your domain to collect analytics data. It can be implemented through a Tag Management System (TMS) or on the site's template. Find step-by-step guides below.
before the implementation, you need to gather the following information:
-
A Contentsquare Tag ID will be provided after kicking off the Contentsquare partnership. This 13-character unique ID can be used only on agreed domains — no data will be sent from elsewhere.
-
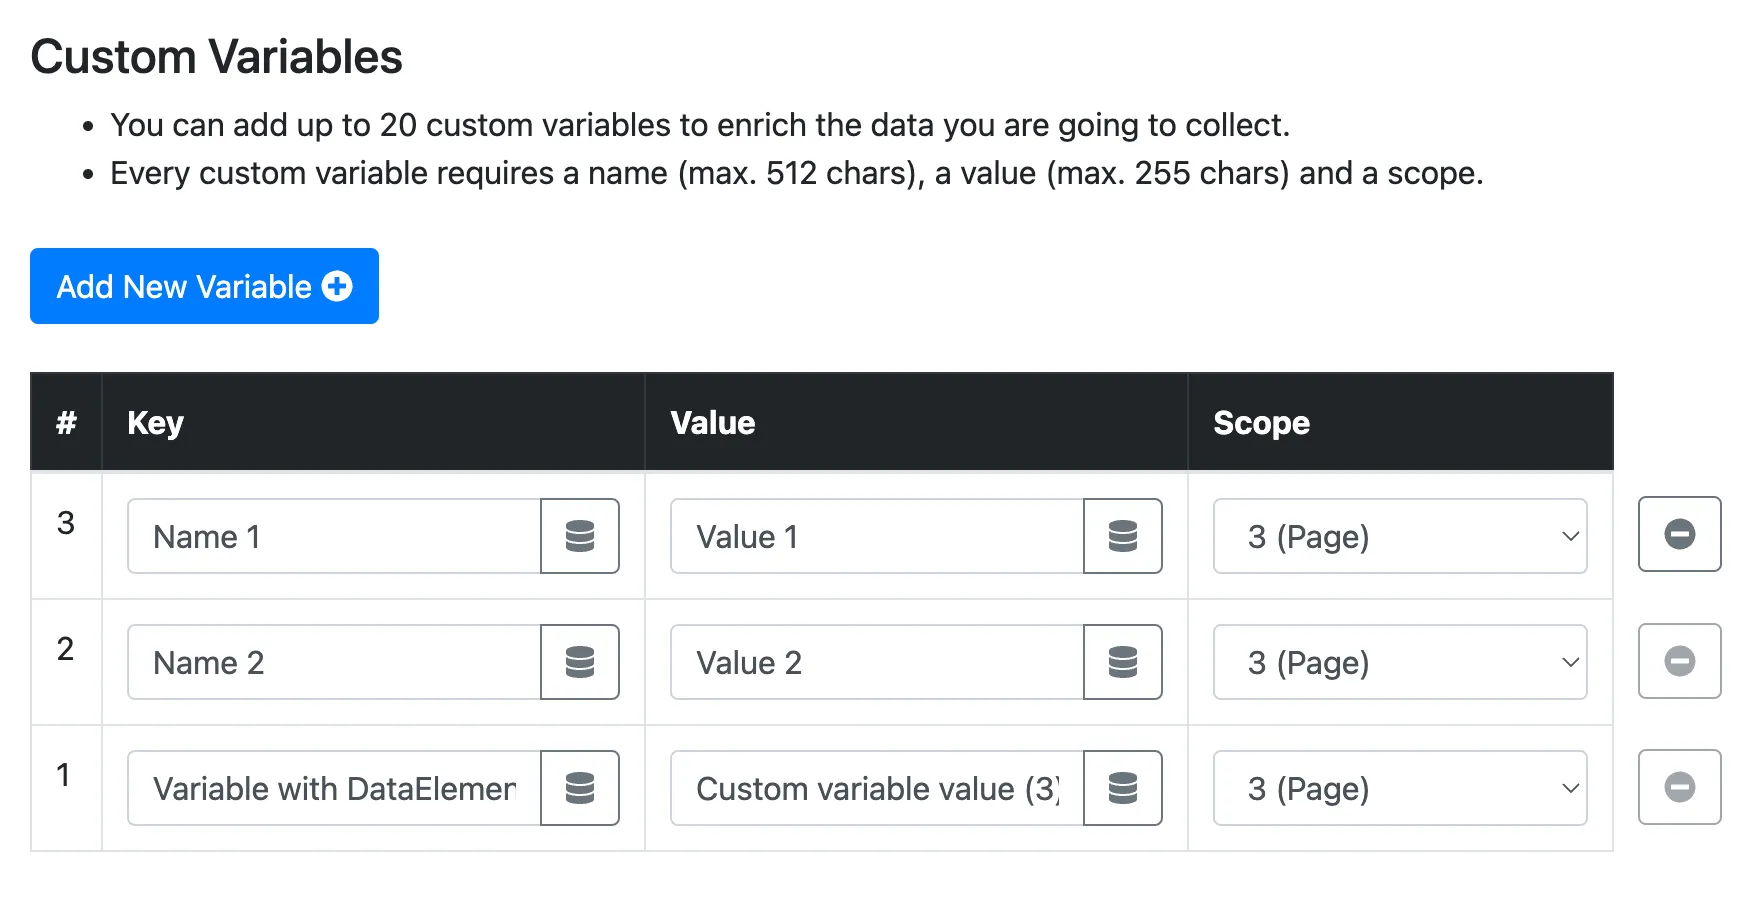
You can provide up to 20 custom variables to enrich the analysis context with details about the pages or the user. They're usually collected from your datalayer or any other JavaScript object implemented throughout the site.
AI-assisted setup
Section titled AI-assisted setupUse the Contentsquare wizard or skills to set up, update, and configure Web Tracking Tag with your AI coding assistant.
Contentsquare wizard
Section titled Contentsquare wizardRun the wizard in your project directory. It configures your AI coding assistant, installs the matching Contentsquare integration, and verifies the installation.
npx @contentsquare/wizard installSupports GitHub Copilot, Cursor, and Claude Code. Requires Node.js ≥ 18 and an AI coding agent with MCP support.
Manual setup
Section titled Manual setupUse this path when you prefer to configure your AI coding assistant yourself.
1. Add the Contentsquare skill
Section titled 1. Add the Contentsquare skillChoose how to install the Contentsquare skill.
Add the Contentsquare marketplace, then install the plugin for Web Tracking Tag:
copilot plugin marketplace add ContentSquare/agentscopilot plugin install contentsquare-web@contentsquareAdd the Contentsquare marketplace, then install the plugin for Web Tracking Tag:
/plugin marketplace add ContentSquare/agents/plugin install contentsquare-web@contentsquareInstall contentsquare from the Cursor marketplace ↗, or add the Contentsquare agents repository ↗ directly. Cursor reads the .cursor-plugin catalog in the repository.
Install the Contentsquare skill pack with the open skills.sh ecosystem:
npx skills add contentsquare/agentsDownload or clone the Contentsquare agents repository ↗, then copy skills/contentsquare-web-tag-install into the location your AI coding assistant scans for skills:
| AI coding assistant | Skill location |
|---|---|
| GitHub Copilot | .github/skills/ or .agents/skills/ |
| Cursor | .cursor/rules/ or the project root |
| Claude Code | .claude/skills/ or the project root |
| Other compatible agents | .agents/skills/ |
2. Ask your AI coding assistant
Section titled 2. Ask your AI coding assistantAfter installing the skill, paste this prompt into your AI coding assistant:
Add Contentsquare to my website using tag ID YOUR_TAG_ID.Query Contentsquare data
Section titled Query Contentsquare dataTo query Contentsquare analytics from your AI coding assistant, configure its Model Context Protocol (MCP) server with https://api.contentsquare.com/mcp. Your assistant completes the OAuth flow the first time it connects.
Prefer to set things up manually? Use one of the following Tag Management System guides, or the Custom HTML snippet.
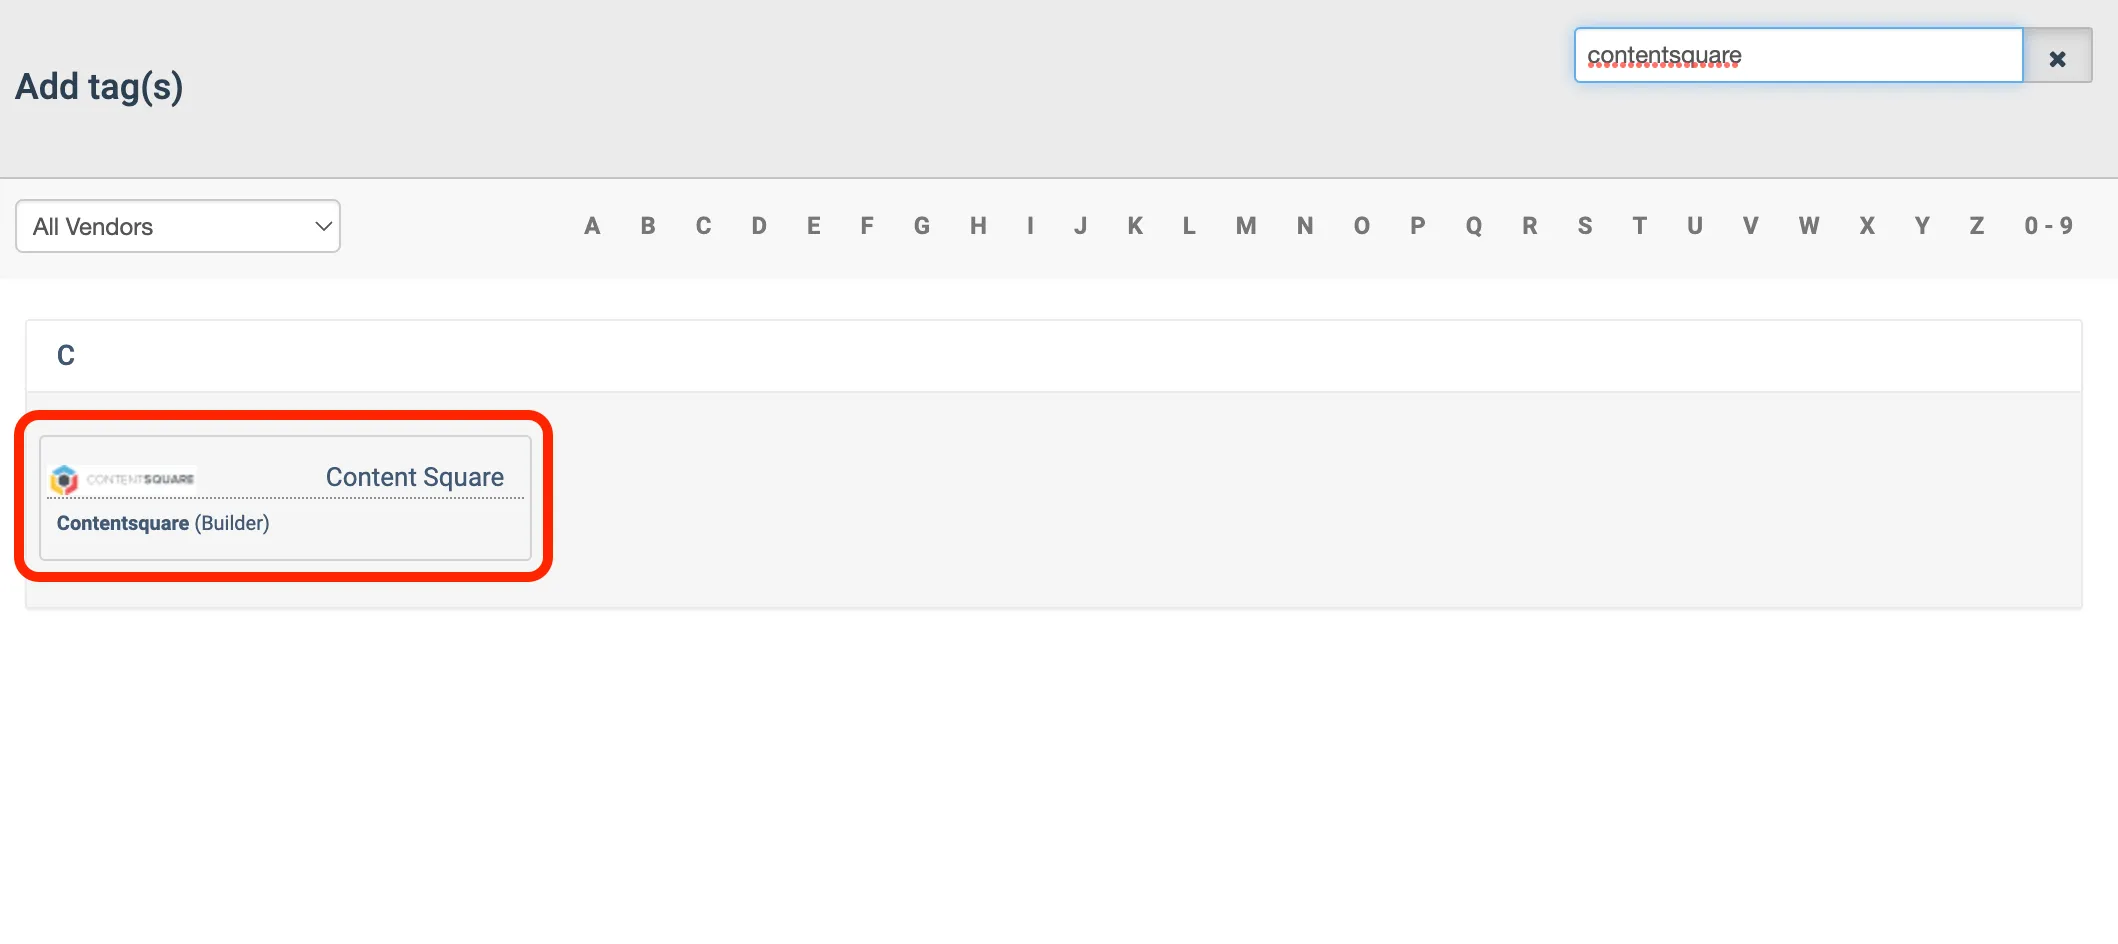
Google Tag Manager (Template)
Section titled Google Tag Manager (Template)-
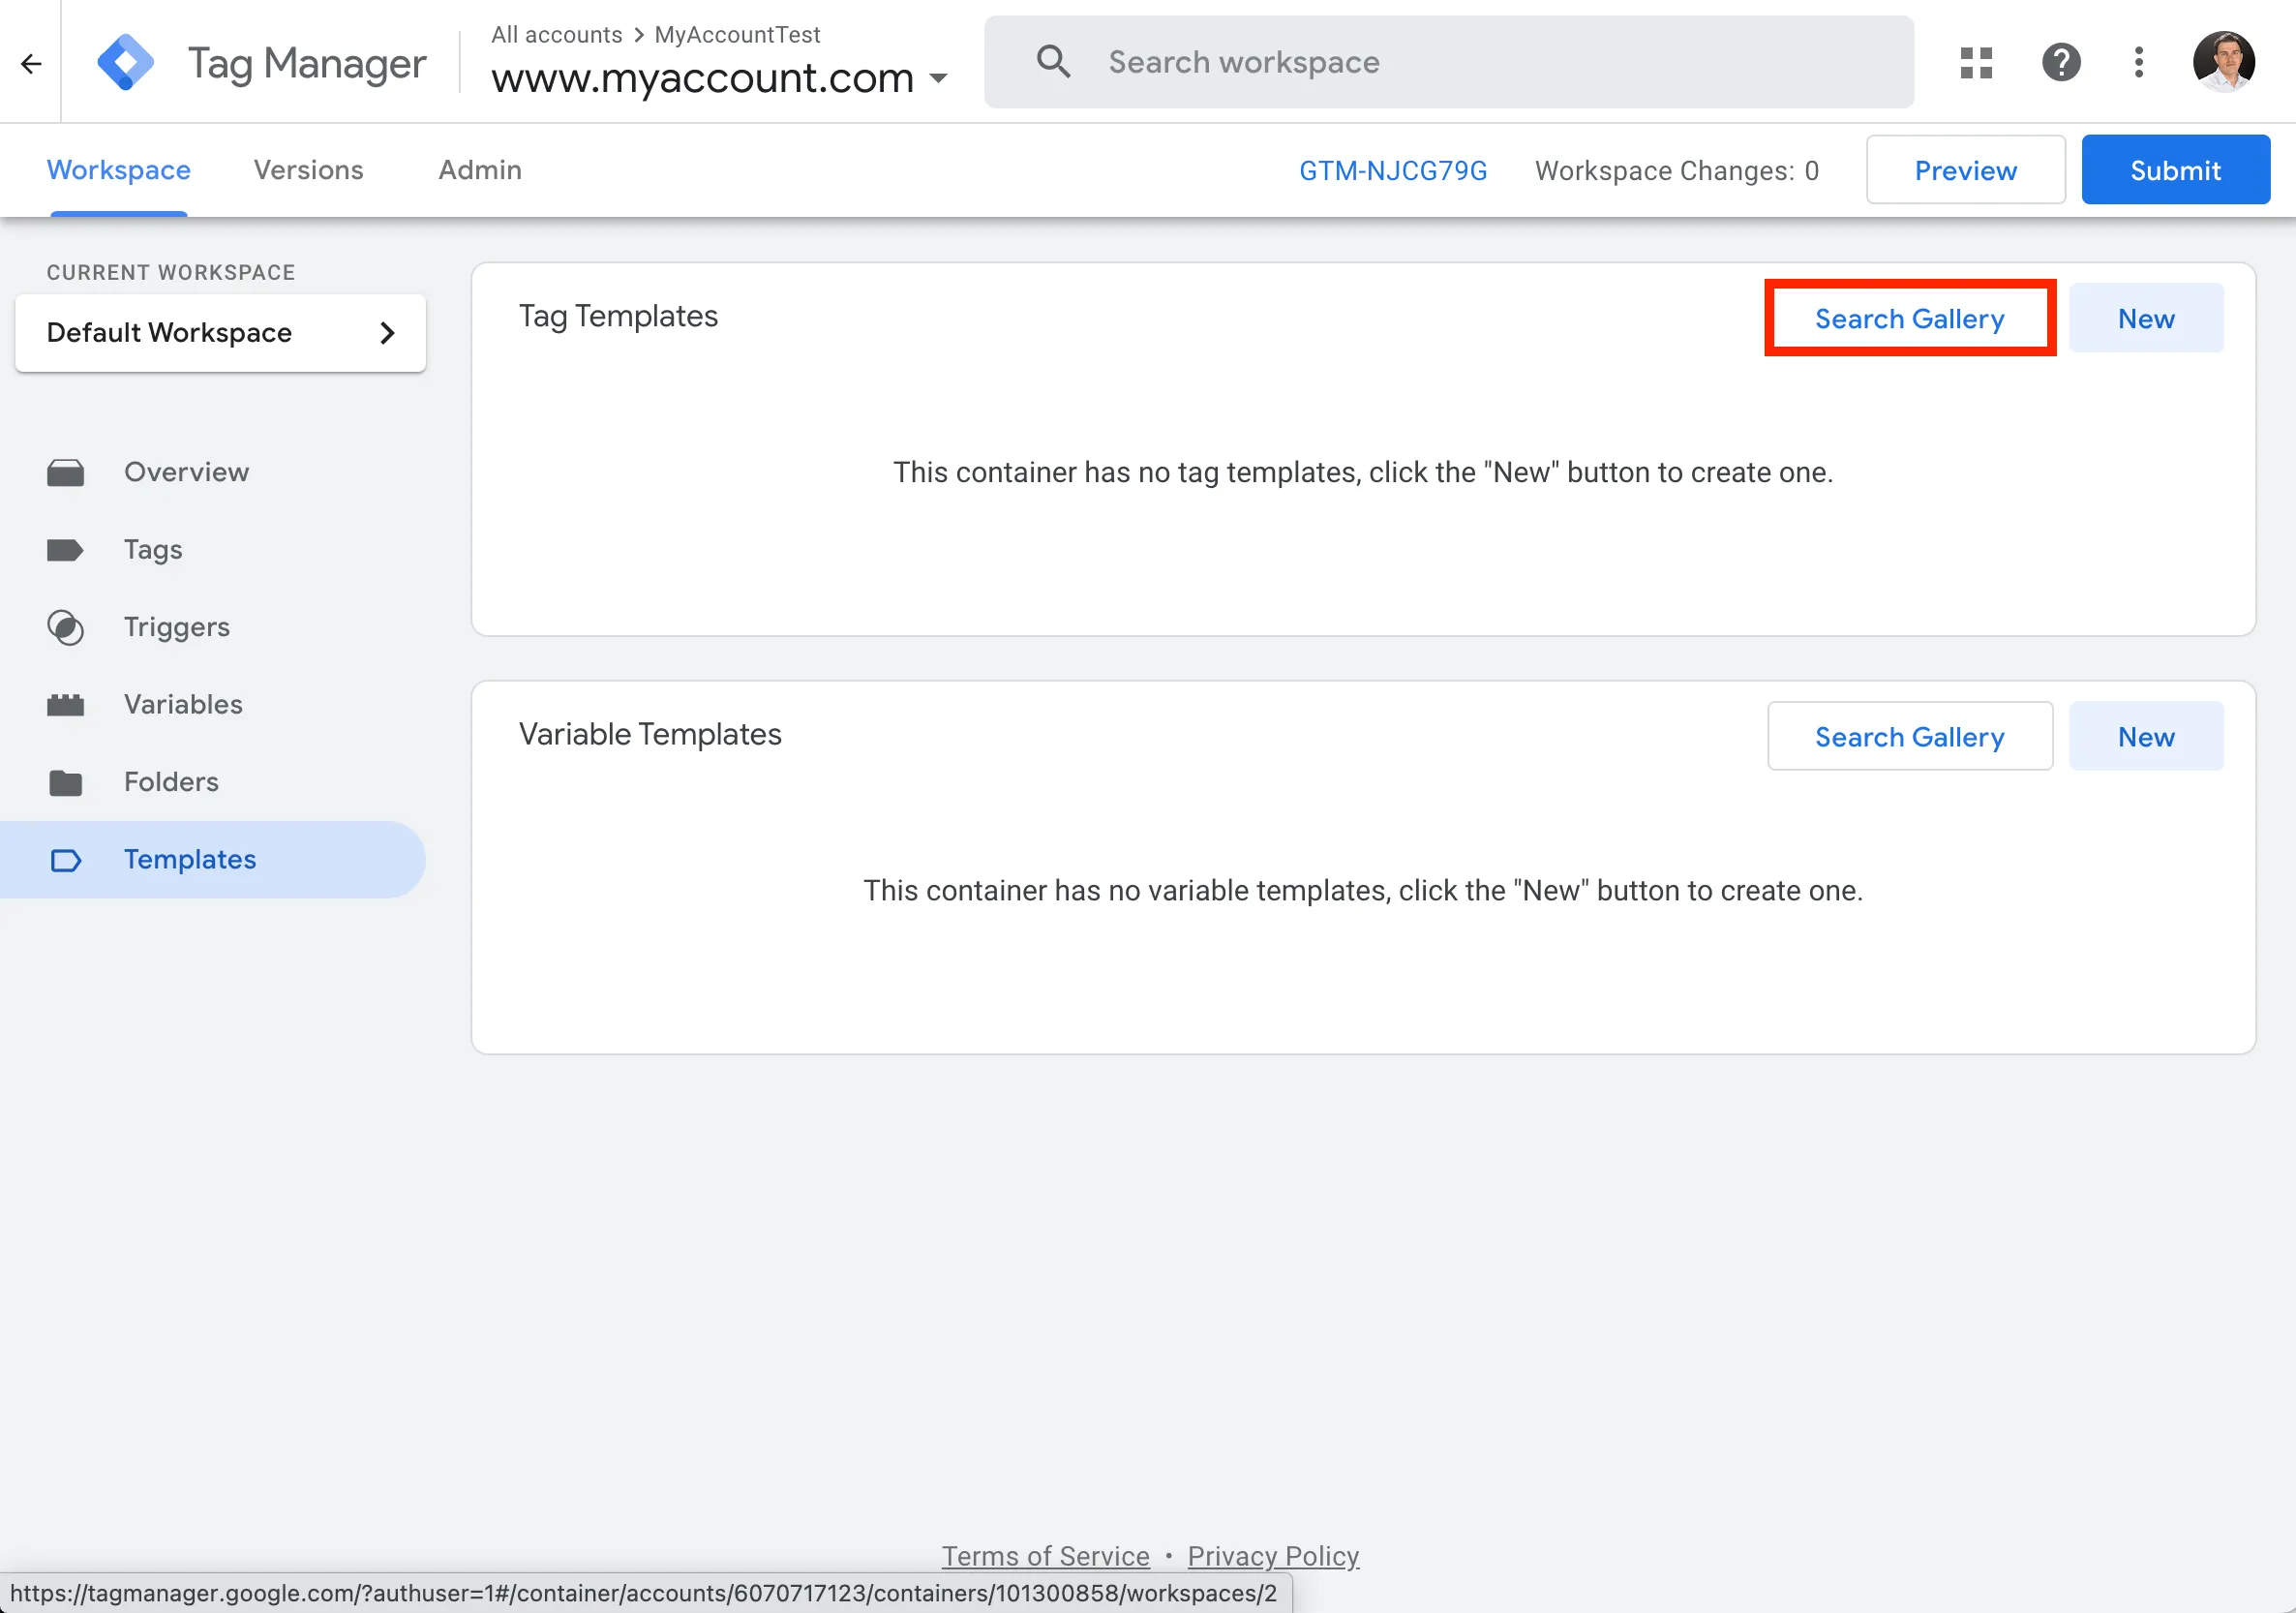
Open your container and go to the templates section.
-
Select Search gallery.
-
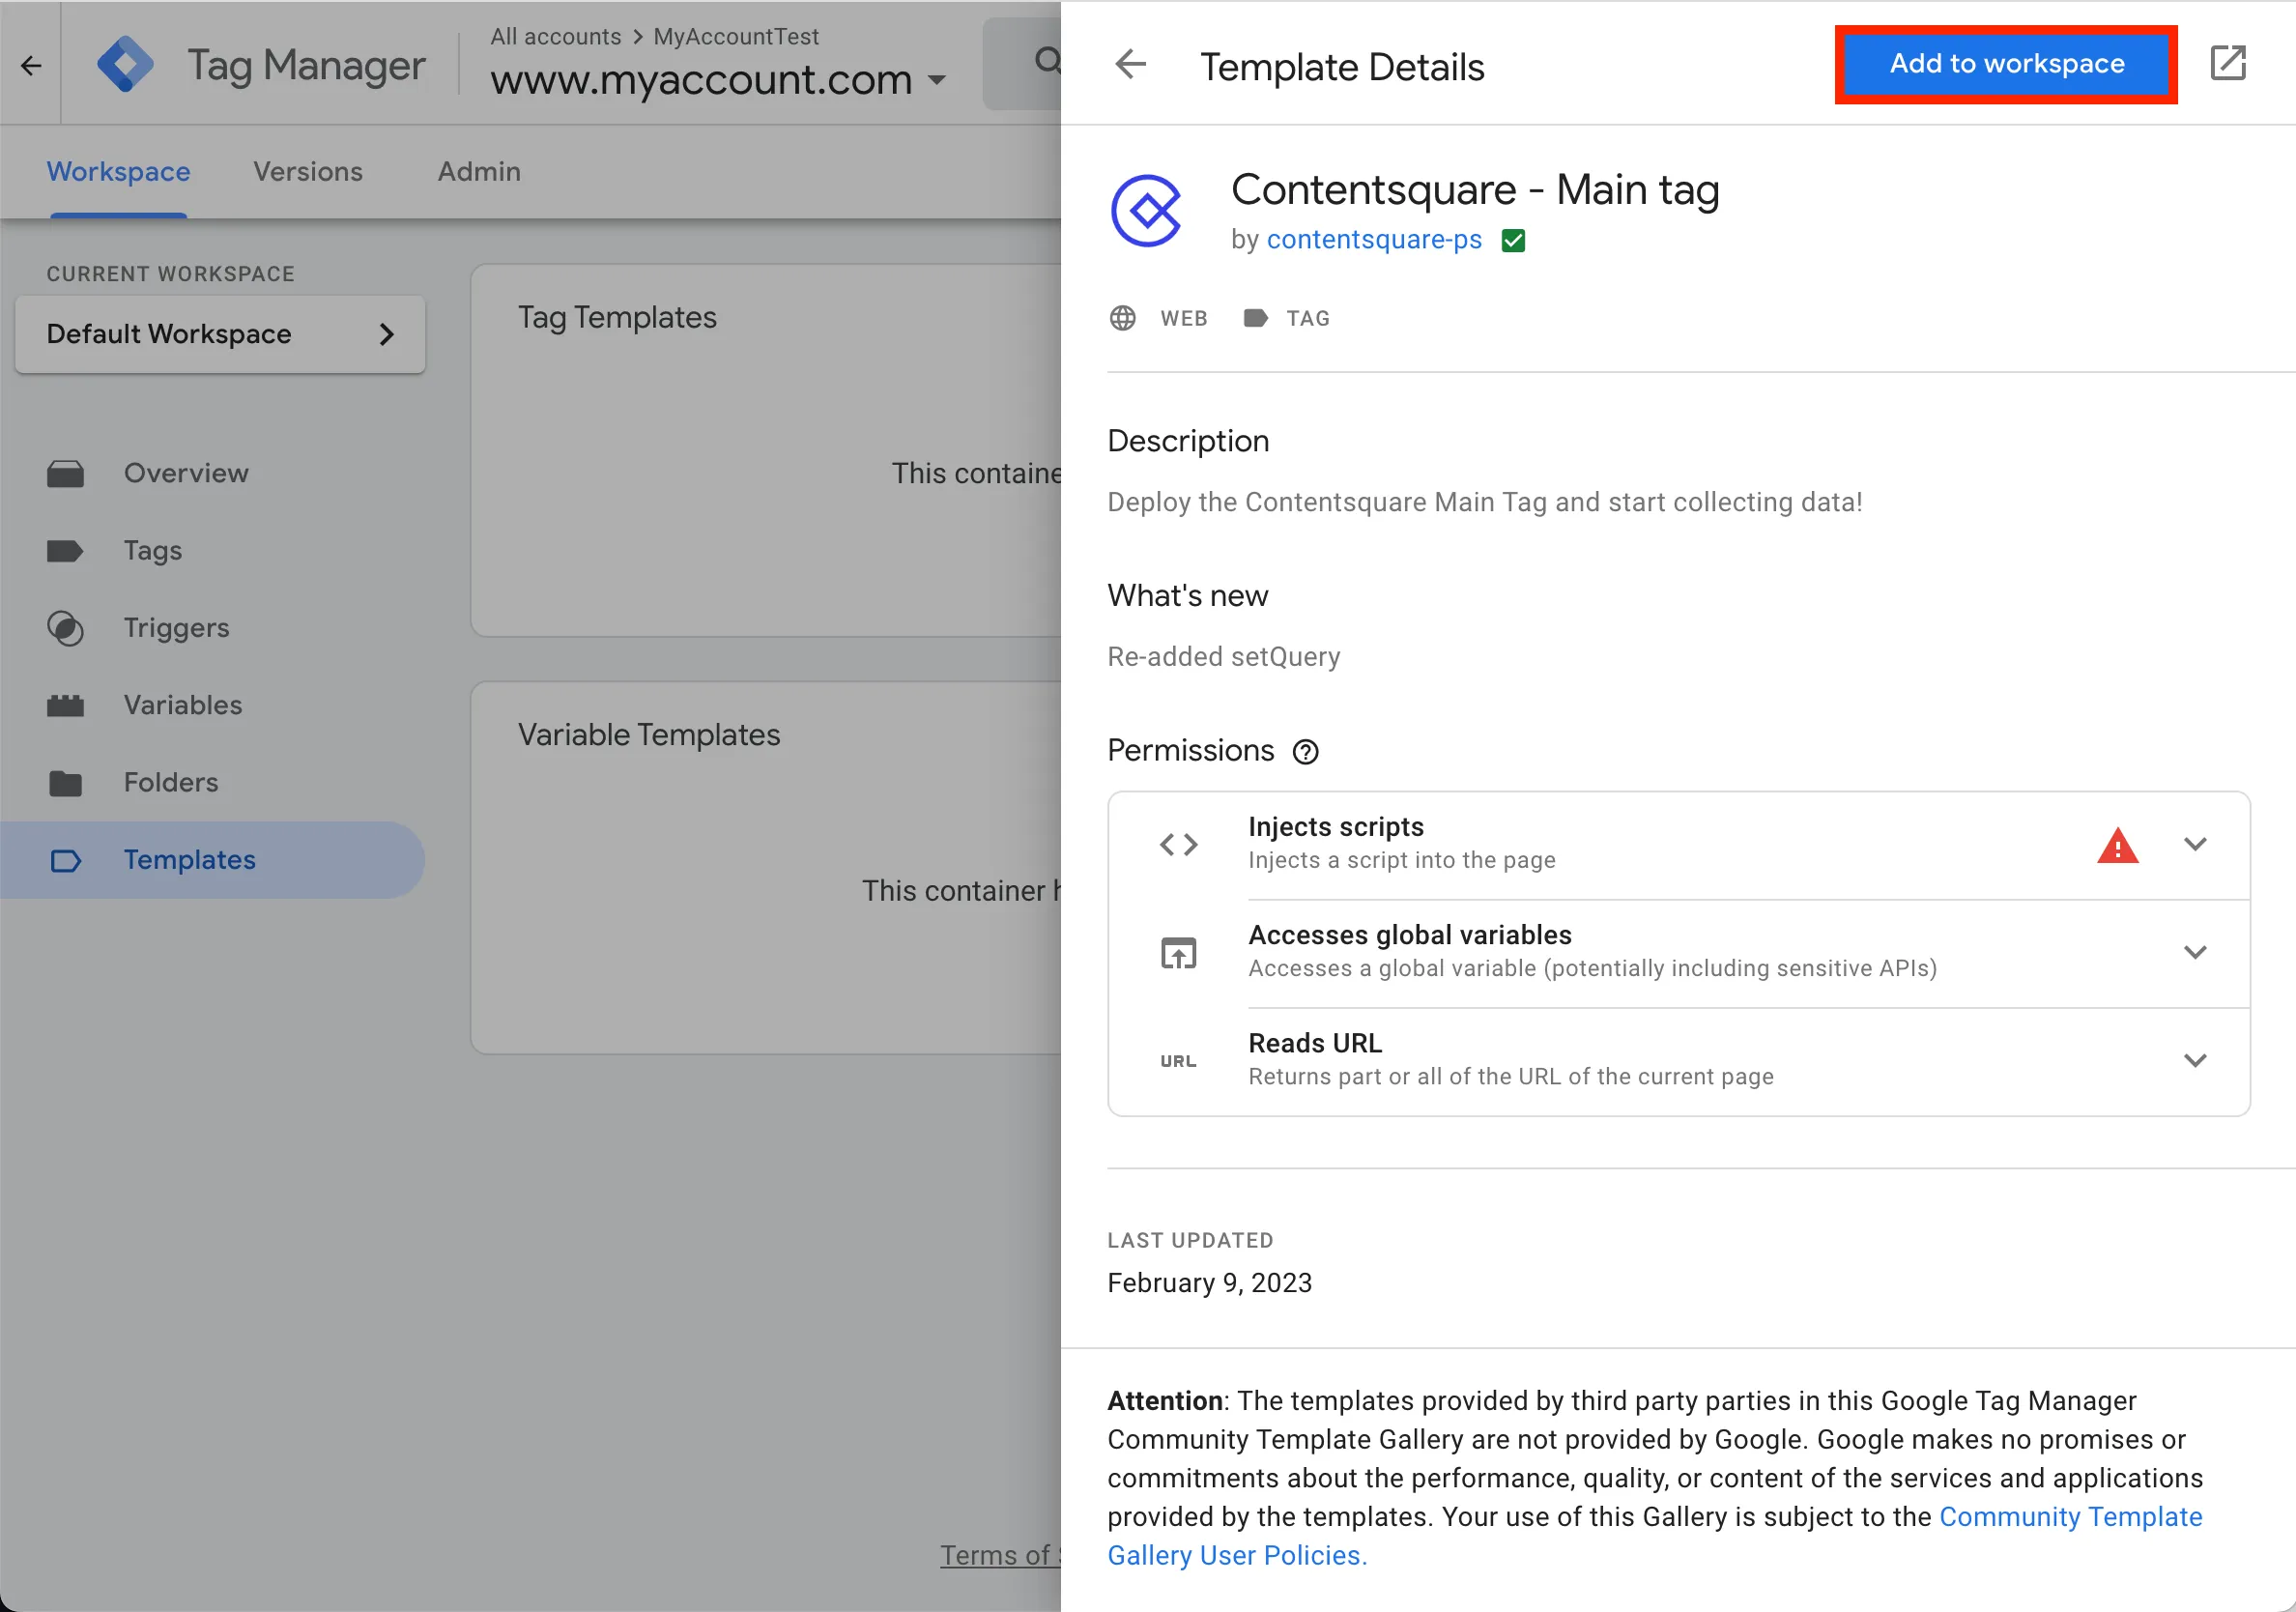
Type in
contentsquareand select the Contentsquare - Main tag option.
-
Click Add to workspace.
-
Confirm your choice by selecting Add

-
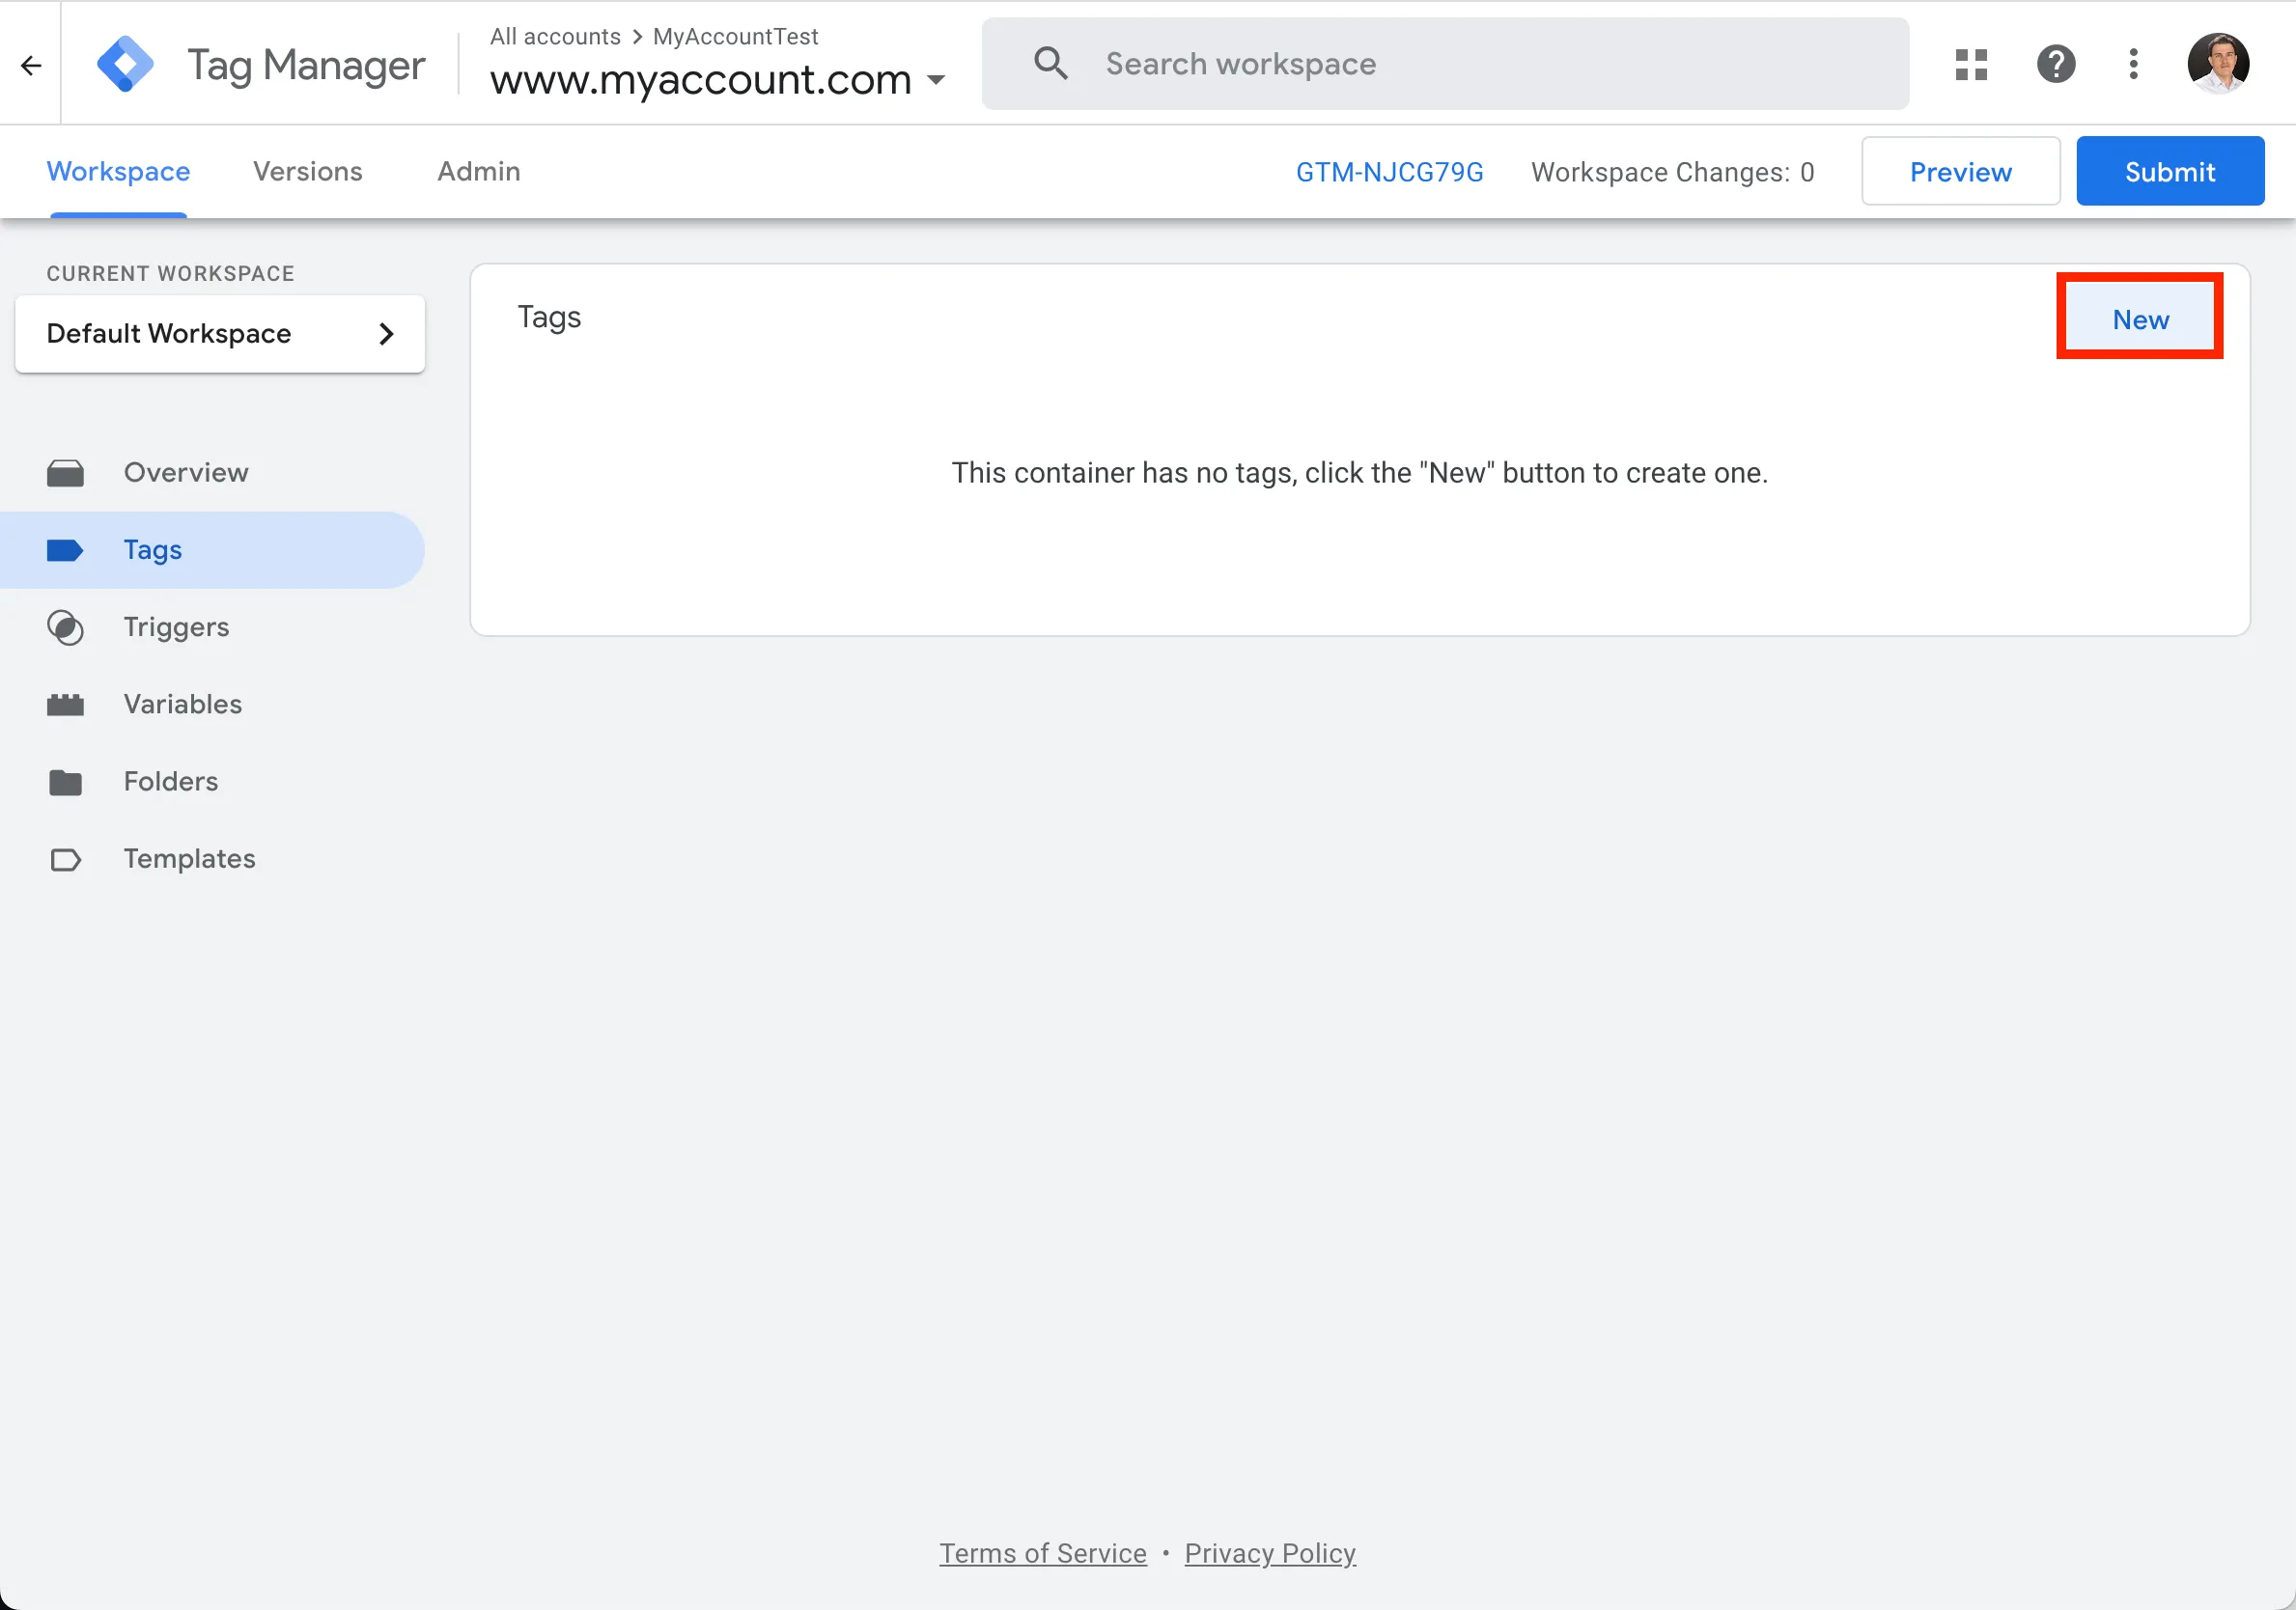
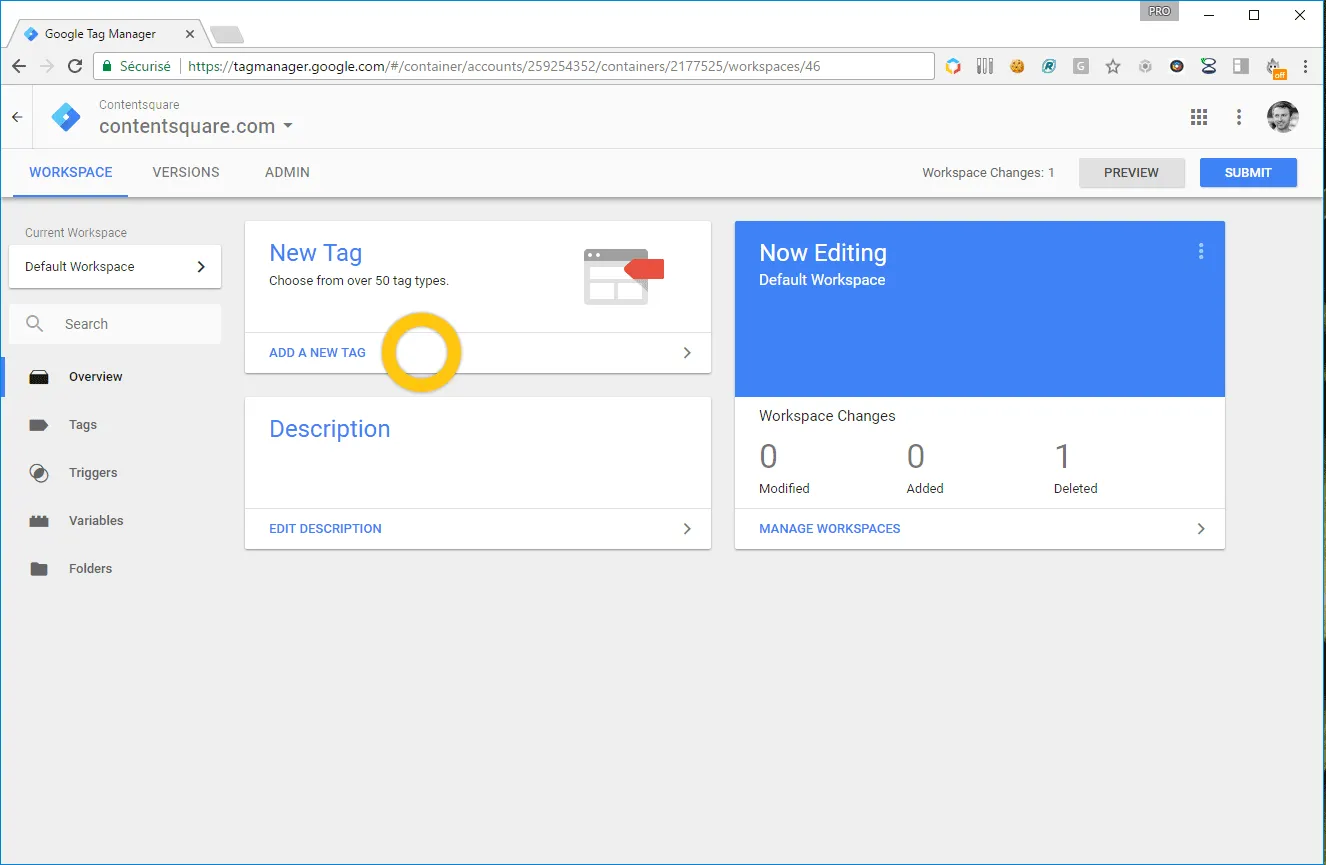
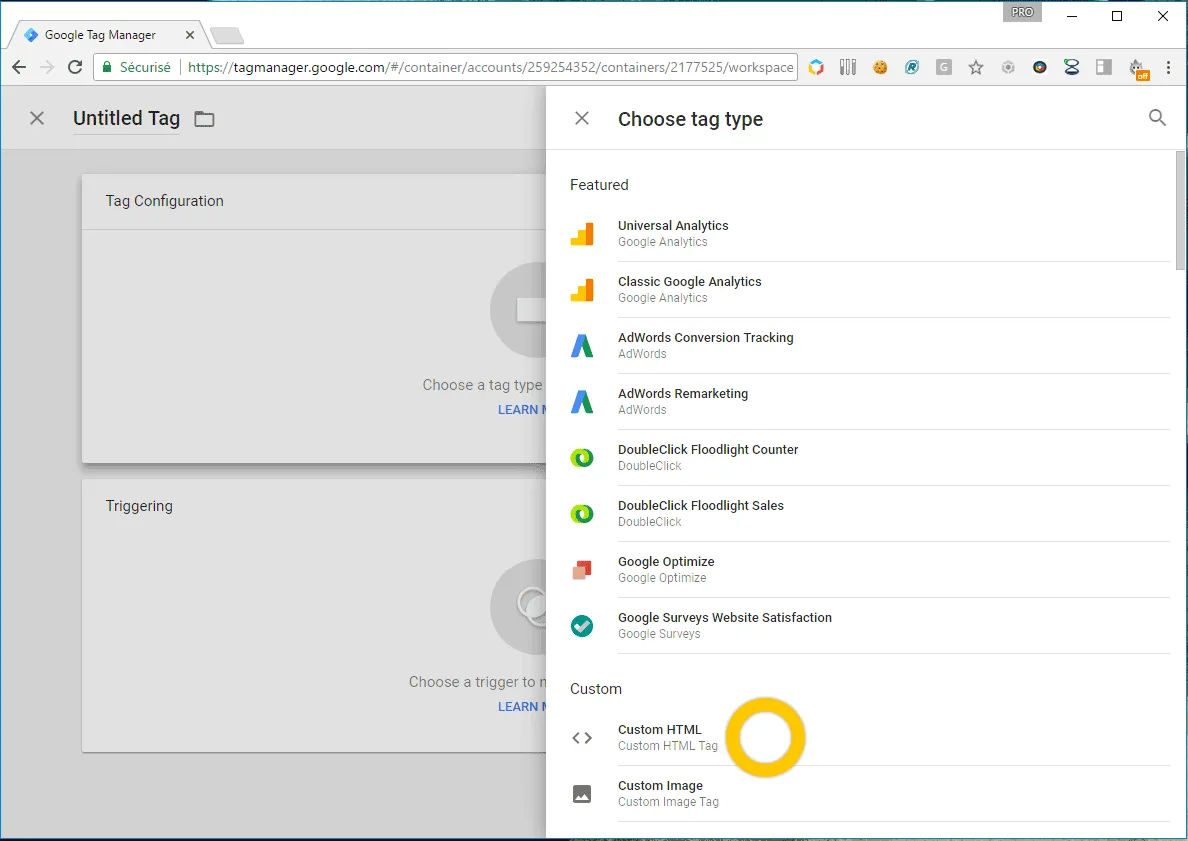
Go to the Tags section and click the New button to create a new tag.
-
Configure it by selecting the top-right button.
-
Search for
contentsquareand select the Contentsquare - Main tag template that you've previously added to your container.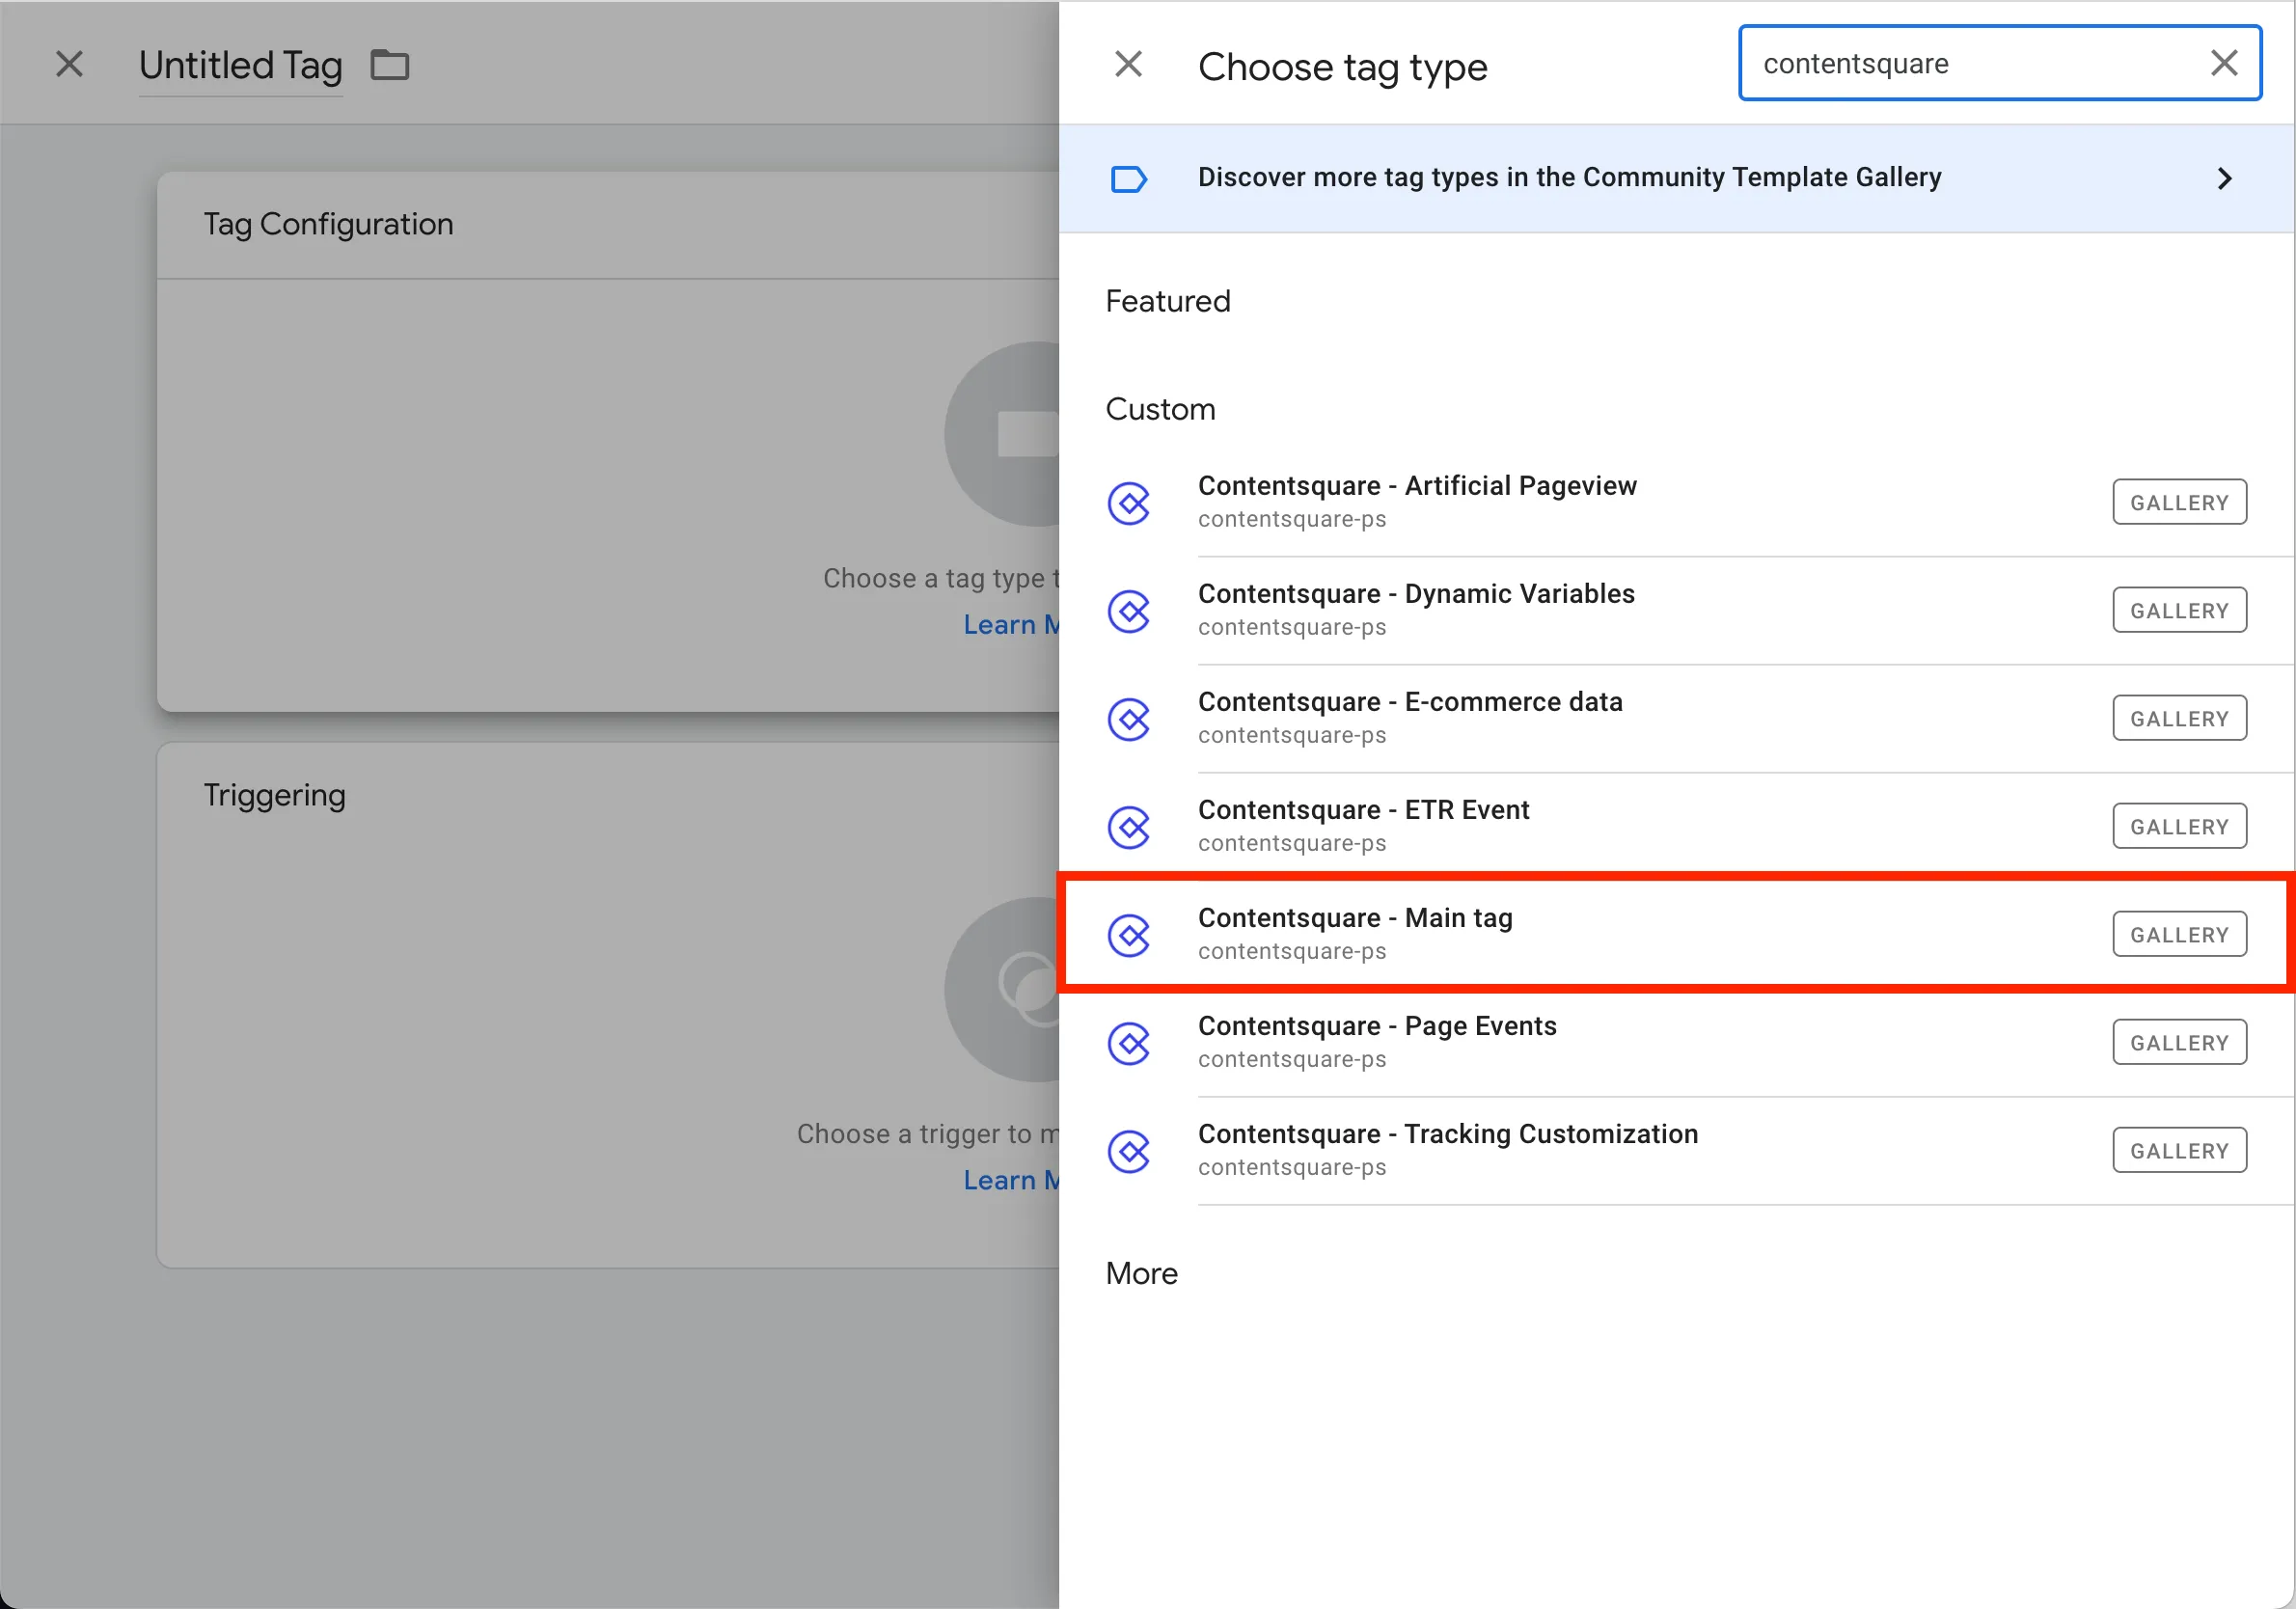
-
Give a title to the tag and input your Tag ID in the dedicated field. To configure Custom Variables, enter:
- The index, from 1 to 20 - unique numbers only.
- The name.
- The value itself, which will be taken from one of your GTM Variables.
- The scope — select
Page & Visit (2 & 3), orSingle Page App (nextPageOnly 4)if your website/part of it is a Single Page Application. Check with Contentsquare contact if unsure.
-
Select the trigger:
All PagesorDOM Ready(when data layer has been fully loaded). We suggest All Pages, as long as your selected variables will be populated by then.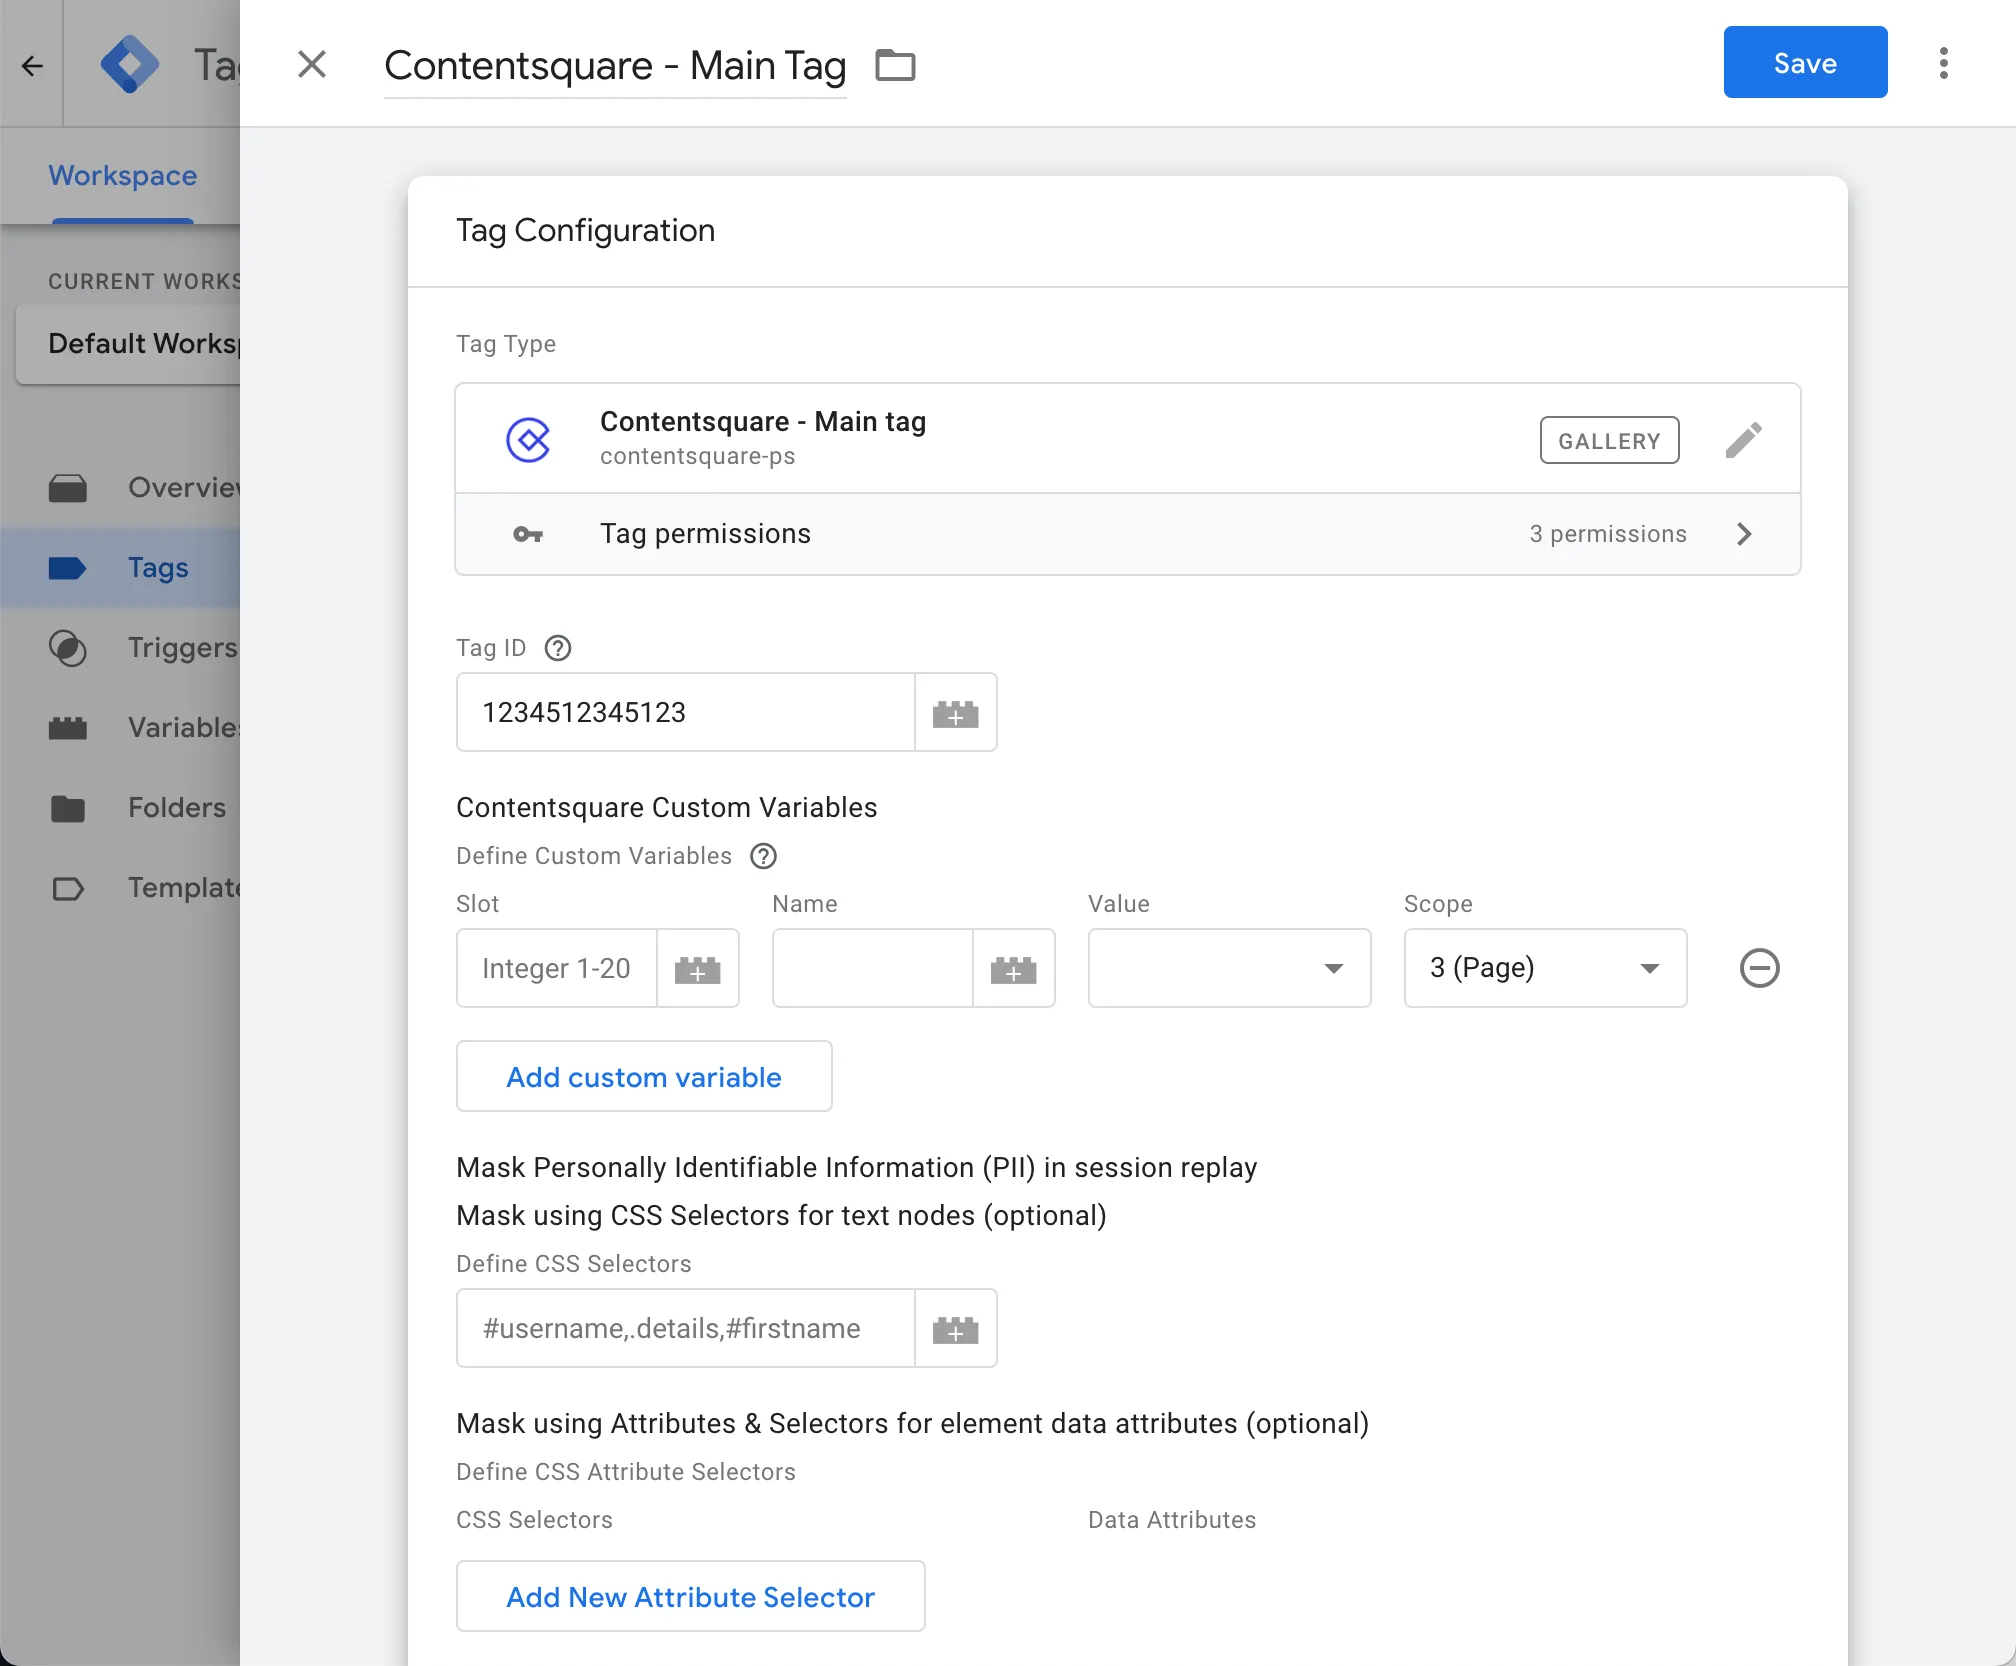
-
(Optional) Mask Personal Data within the GTM GUI.
Select the appropriate Personal Data masking method, depending on the type of personal information you're looking to mask:
- Define CSS Selectors for text nodes.
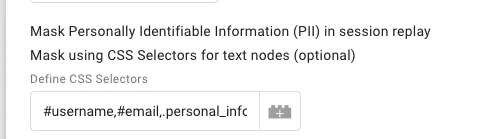
- CSS Selectors and Data Attributes for element attributes.
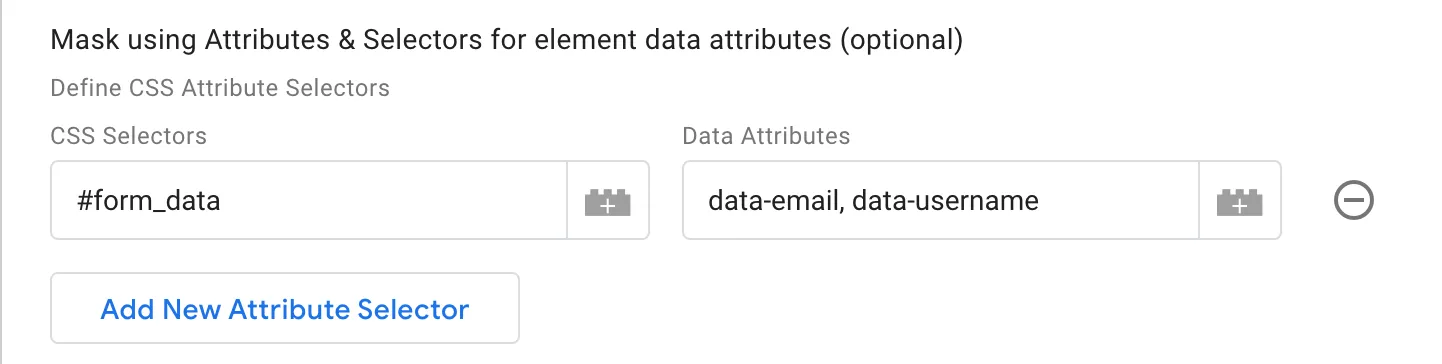
- Define CSS Selectors for text nodes.
-
Save your changes and go back to your container. You should now see both the template and the newly created tag.
Google Tag Manager (Custom HTML)
Section titled Google Tag Manager (Custom HTML)-
Add a new tag on your workspace.
-
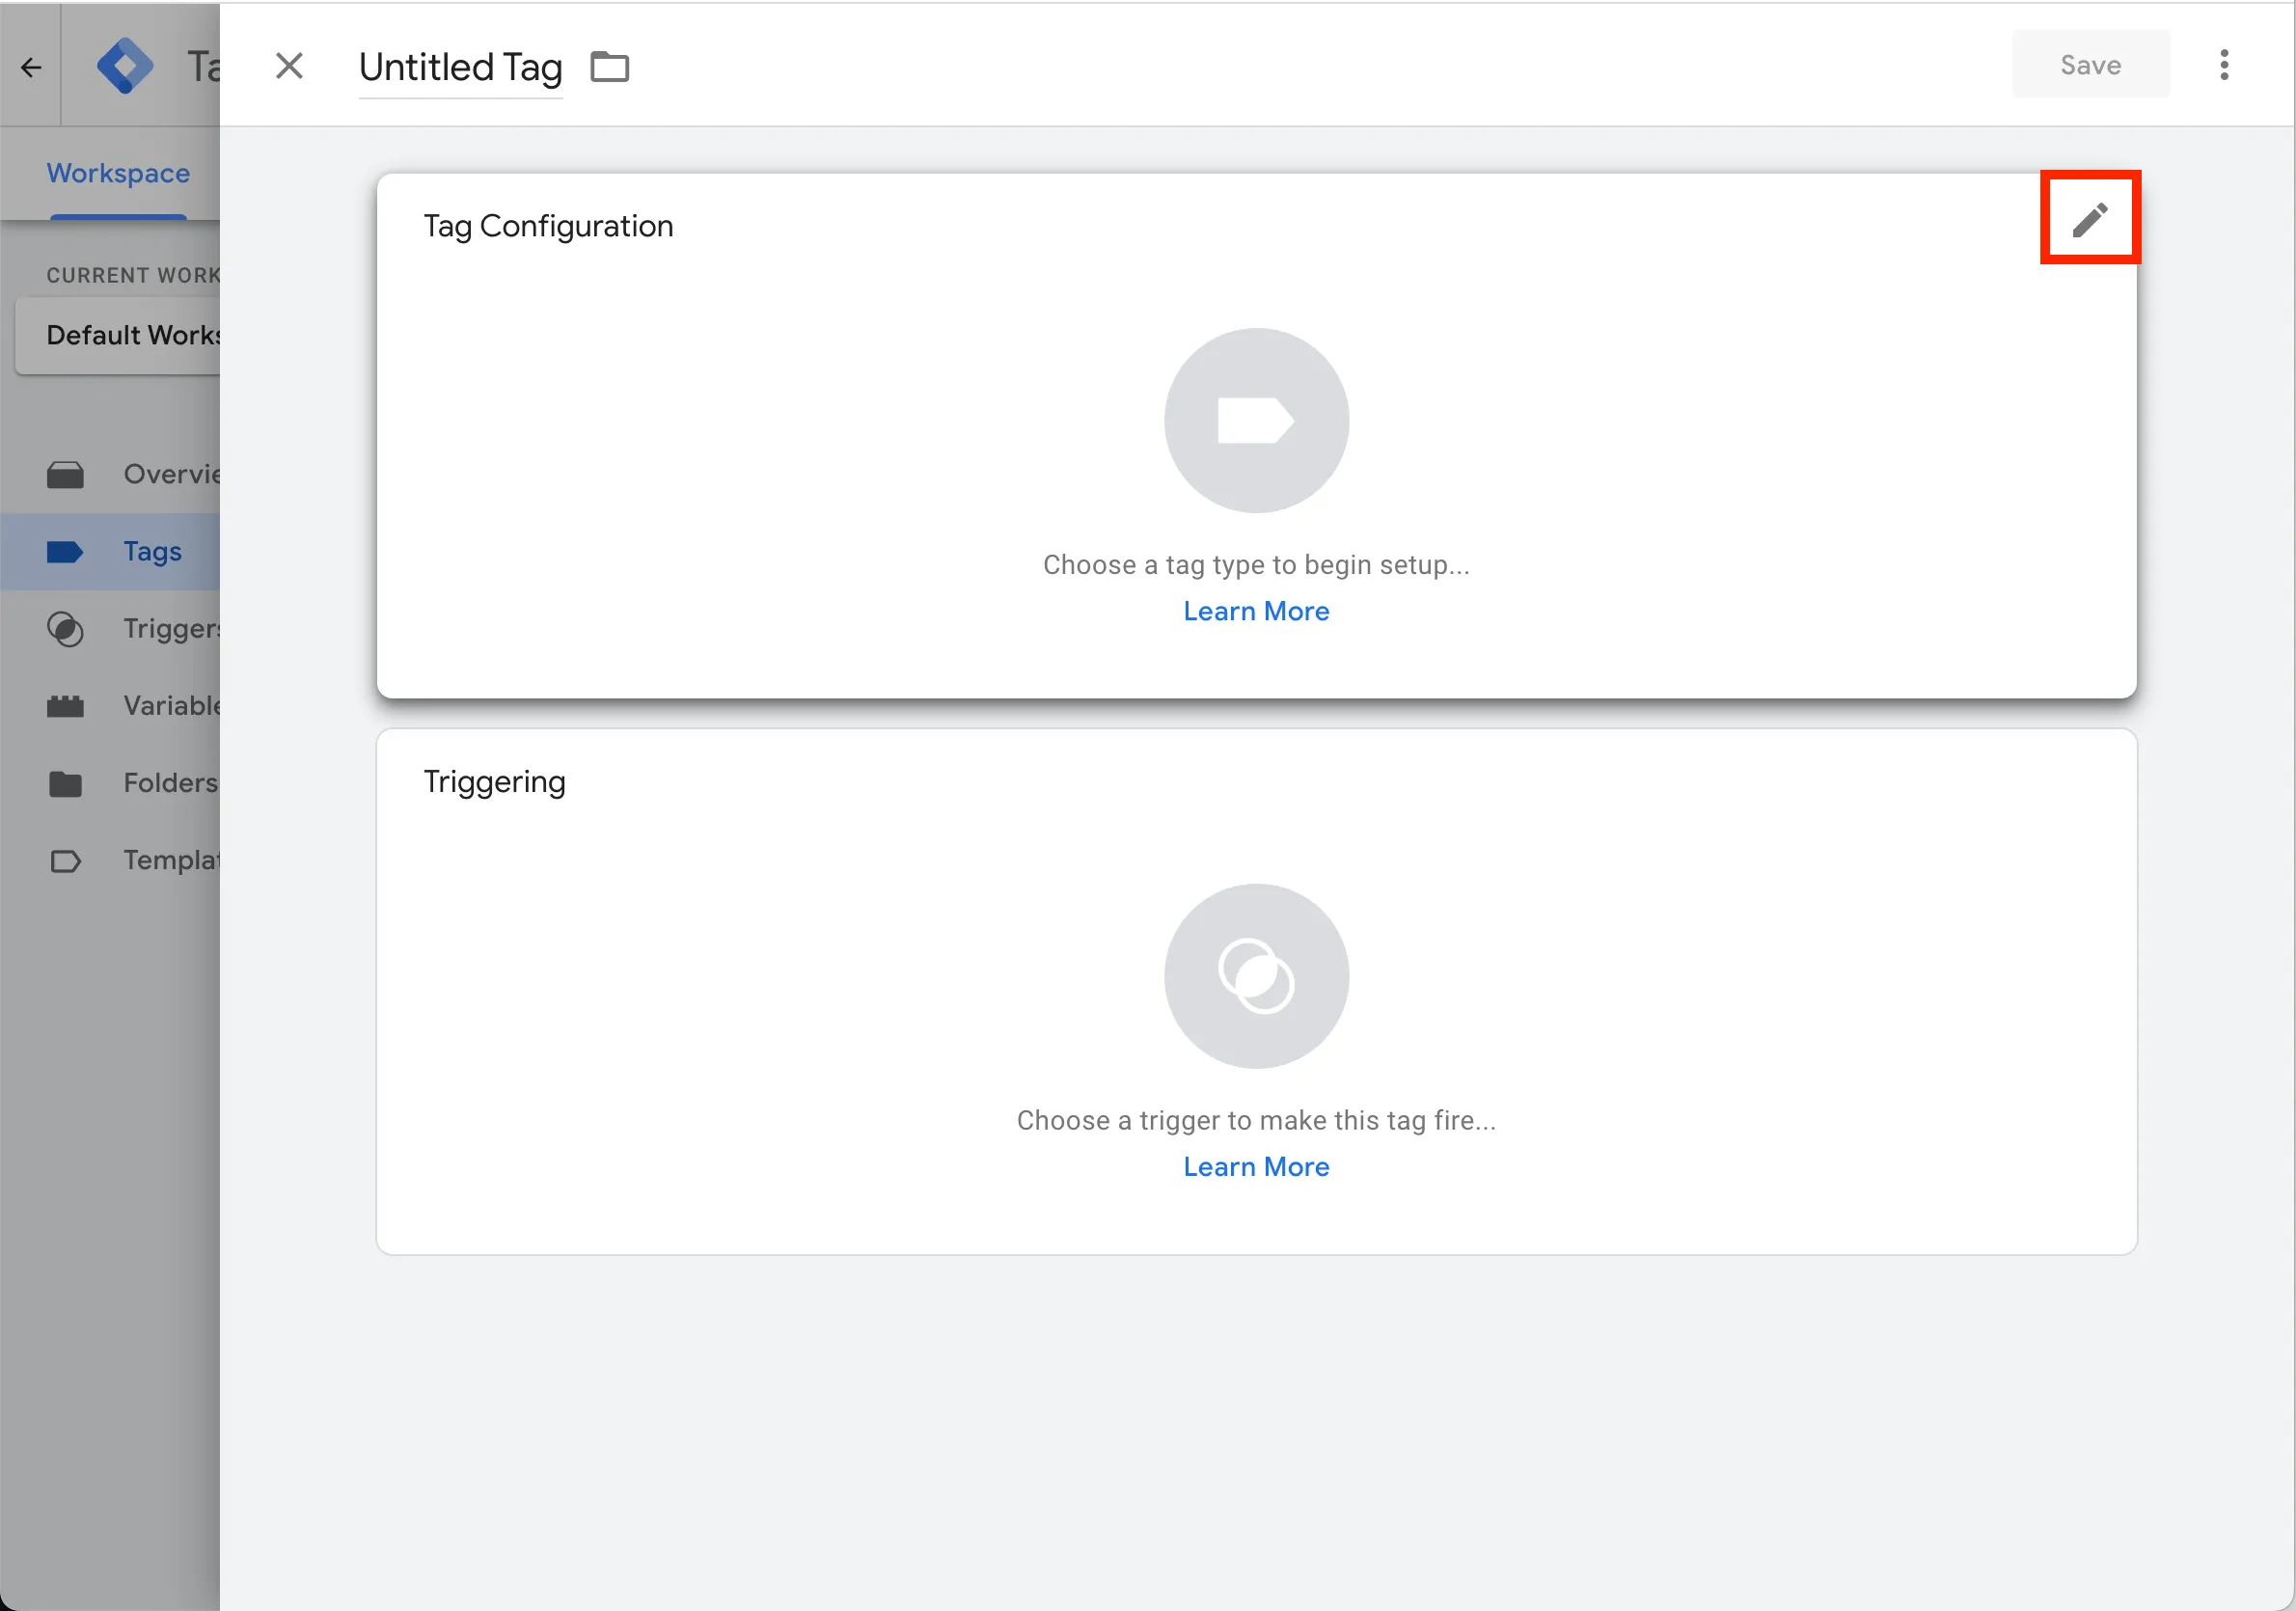
Select "Choose a tag type to begin setup...".

-
In the list, pick the "Custom HTML" tag.
-
Depending on your data layer availability, take a look at the following code examples and populate it with the information required:
-
Implementing the tag and pushing data layer variables to Contentsquare:
<script>(function () {window._uxa = window._uxa || [];try {window._uxa.push(['setCustomVariable', 1, 'Sample Variable', {{your-GTM-variable-here}}, 3]);} catch(e){}if (typeof CS_CONF === 'undefined') {window._uxa.push(['setPath', window.location.pathname+window.location.hash.replace('#','?__')]);var mt = document.createElement('script'); mt.type = 'text/javascript'; mt.async = true;mt.src = '//t.contentsquare.net/uxa/{{YOUR_TAG_ID}}.js';document.getElementsByTagName('head')[0].appendChild(mt);}else {window._uxa.push(['trackPageview', window.location.pathname+window.location.hash.replace('#','?__')]);}})();</script> -
Implementing the tag without pushing data layer variables to Contentsquare:
<script>(function () {window._uxa = window._uxa || [];if (typeof CS_CONF === "undefined") {window._uxa.push(["setPath",window.location.pathname + window.location.hash.replace("#", "?__")]);var mt = document.createElement("script");mt.type = "text/javascript";mt.async = true;mt.src = "//t.contentsquare.net/uxa/{{YOUR_TAG_ID}}.js";document.getElementsByTagName("head")[0].appendChild(mt);} else {window._uxa.push(["trackPageview",window.location.pathname + window.location.hash.replace("#", "?__")]);}})();</script>
-
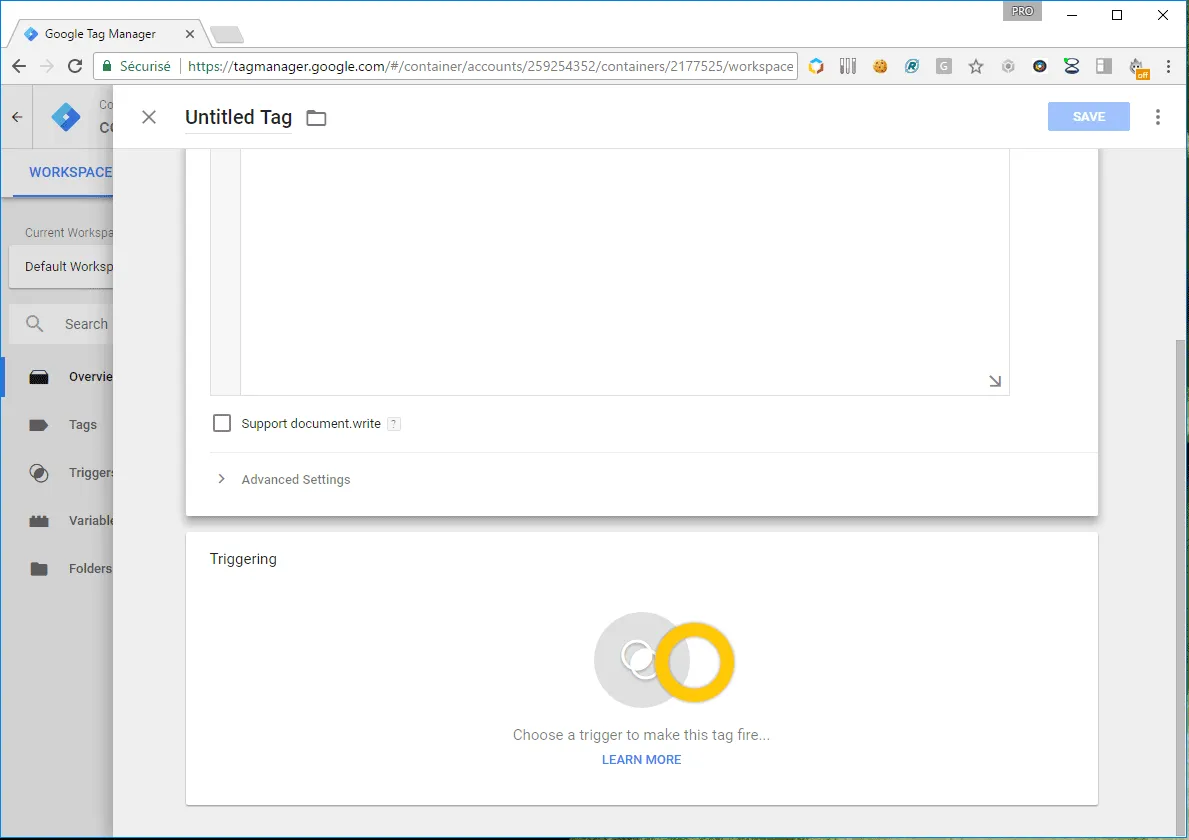
-
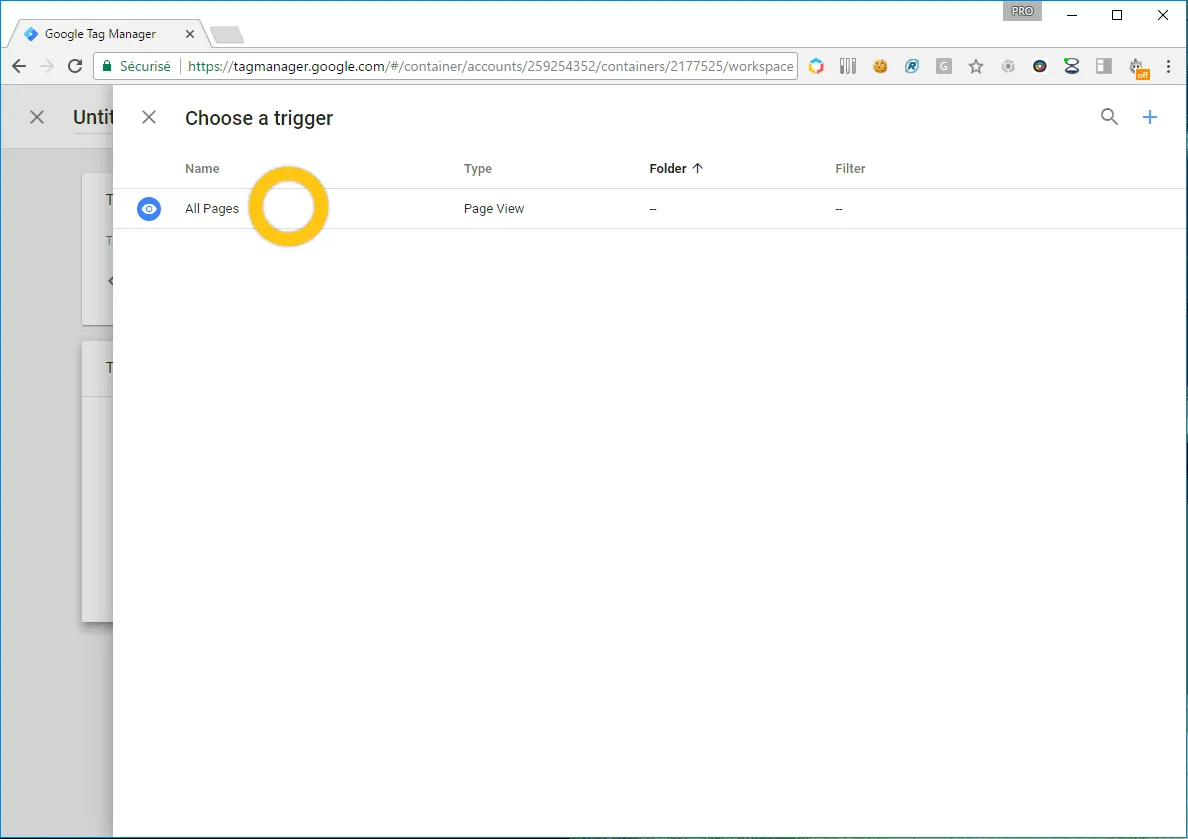
Select "Choose a trigger to make this tag fire...".
-
In the list, pick the "All pages" trigger, provided the Datalayer will have been loaded before firing our tag.
-
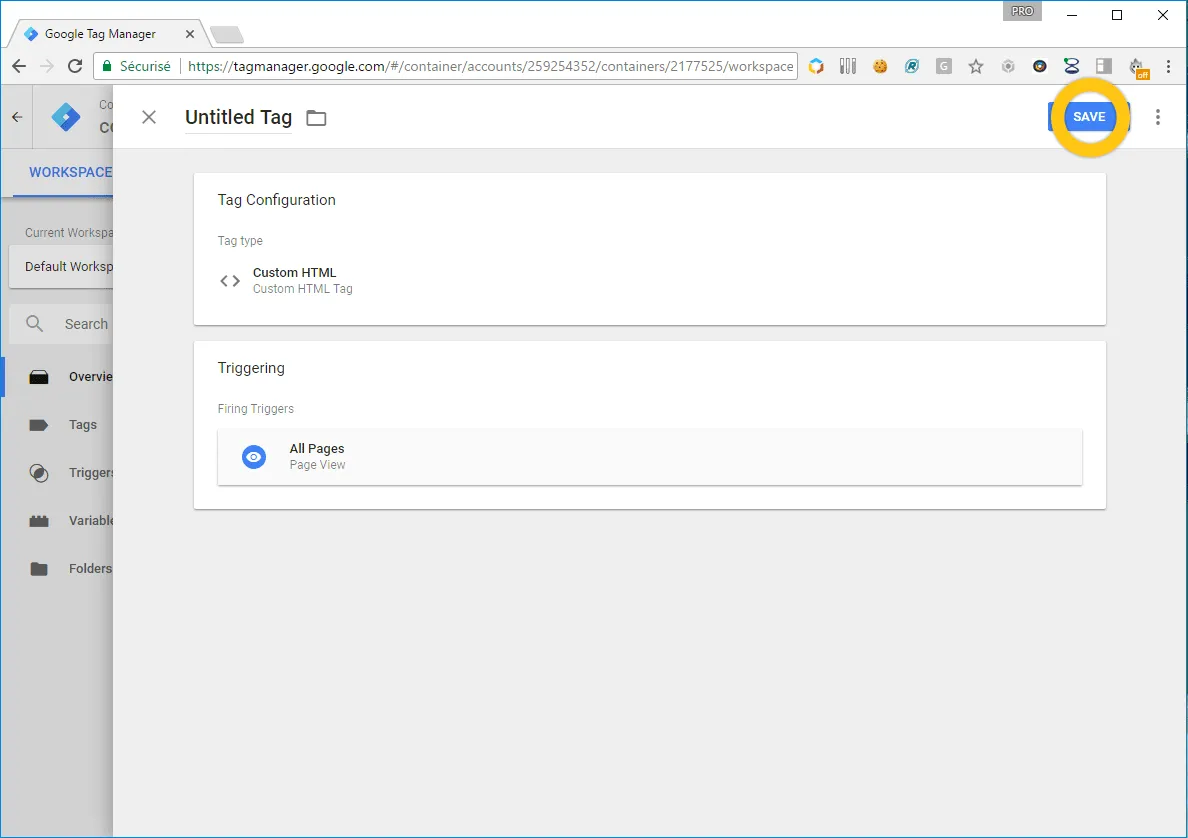
Name your tag (for instance Contentsquare Main Tag), then click "Save".
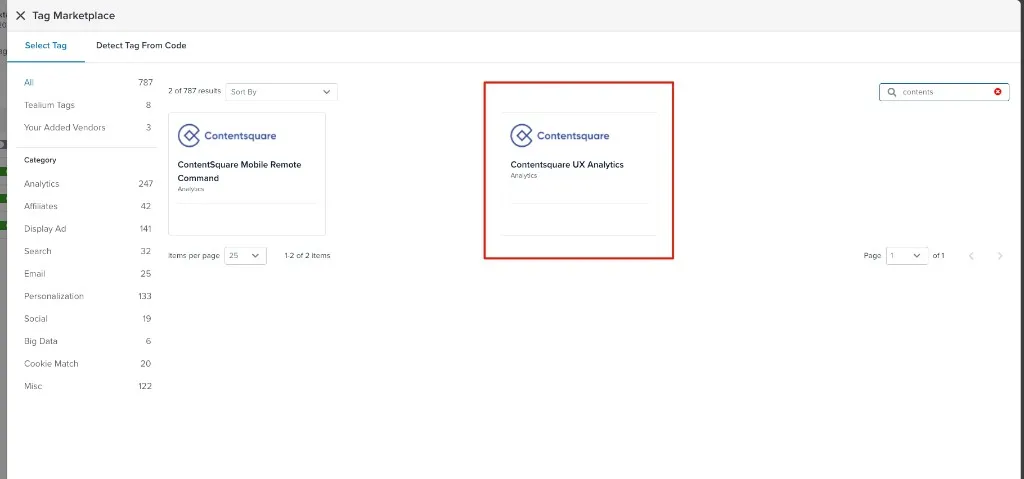
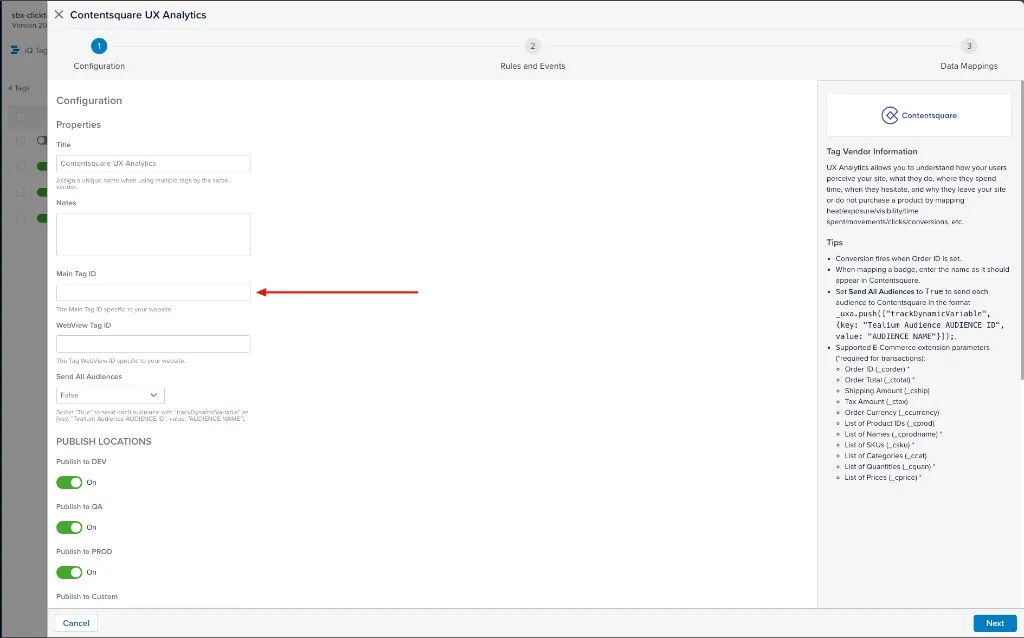
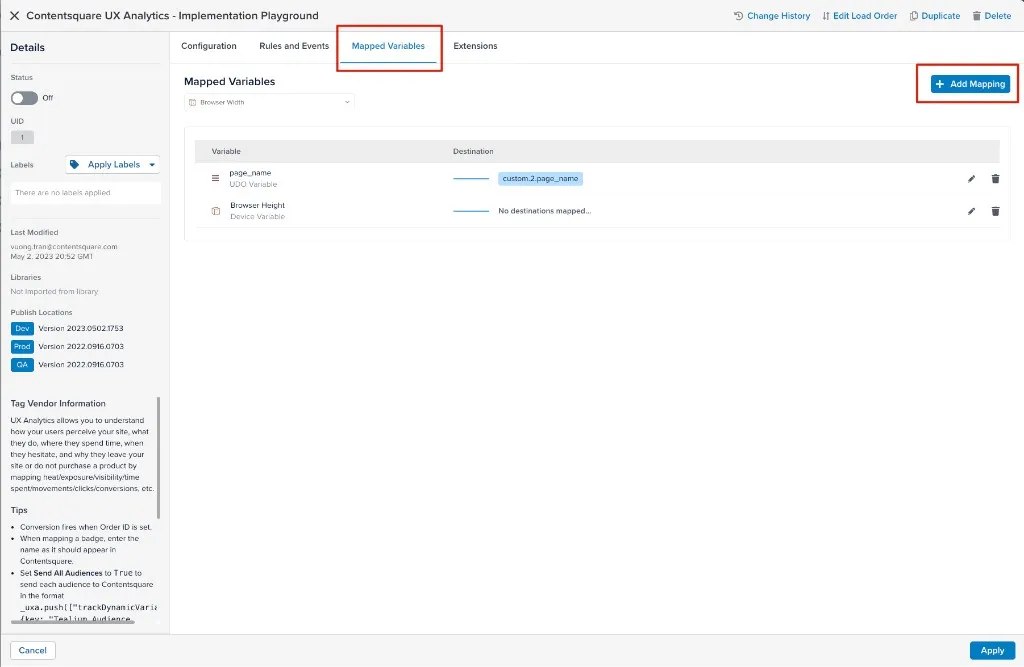
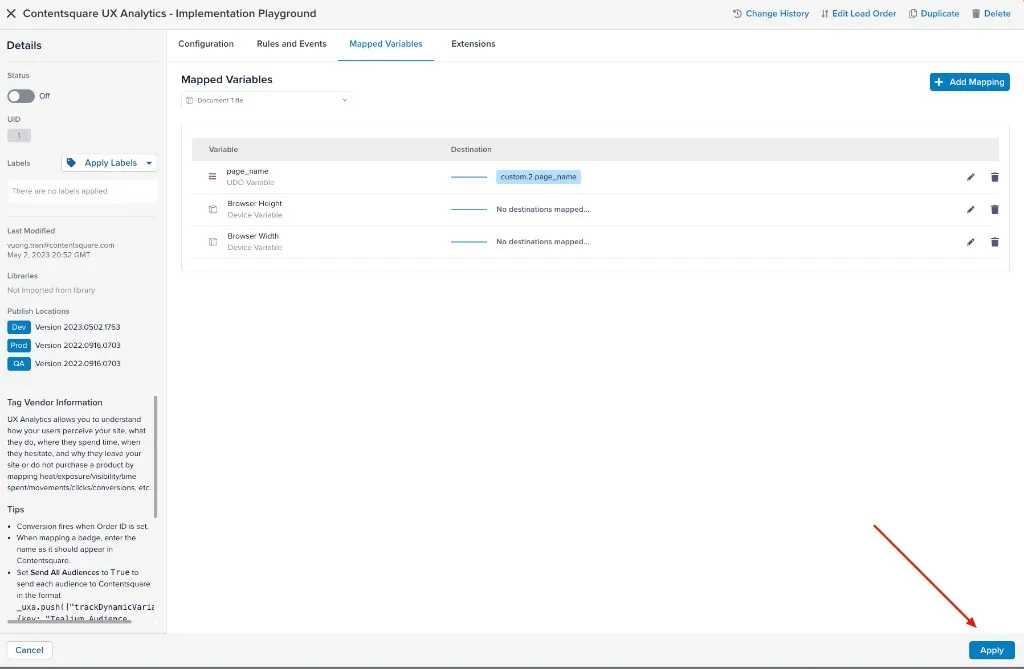
Tealium
Section titled Tealium-
Add a new tag to your containers by choosing "Contentsquare UX Analytics"
-
Add your "TAG ID" and click "next" twice, keeping the default configuration. If you do not have custom variables, click "Finish" and the installation is over.
-
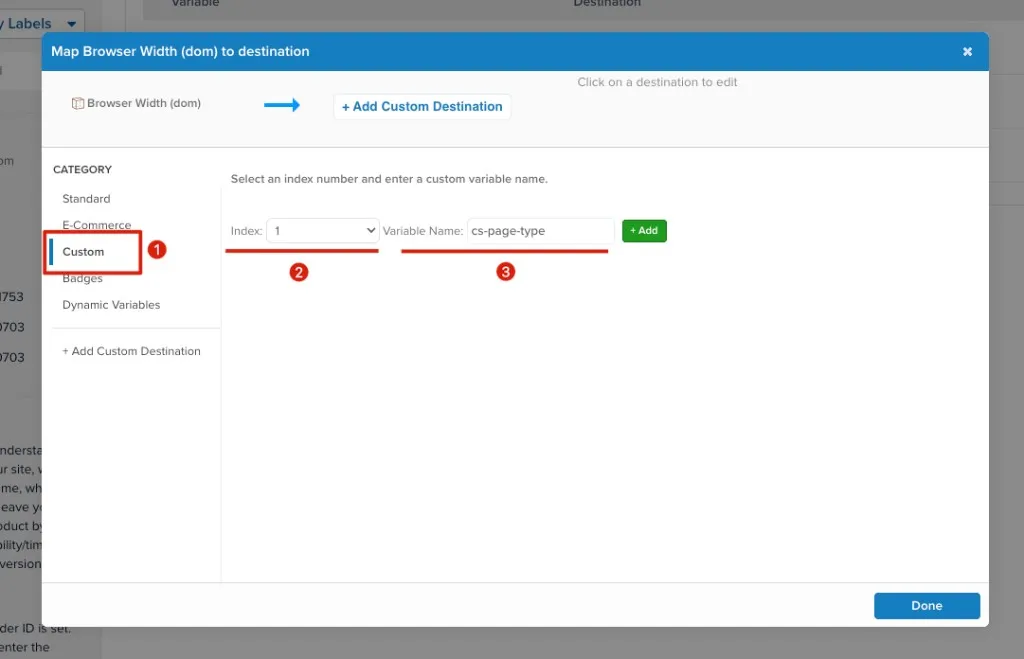
(Optional) Add custom variables:
- Choose a datalayer Variable in the UDO list and select Select Destination
- Select "Custom"
- Add a variable Name
- Click Add
- Click Close and the mapped variable will appear
-
Click "Apply" or repeat STEP 3 for additional variables.
Adobe Launch
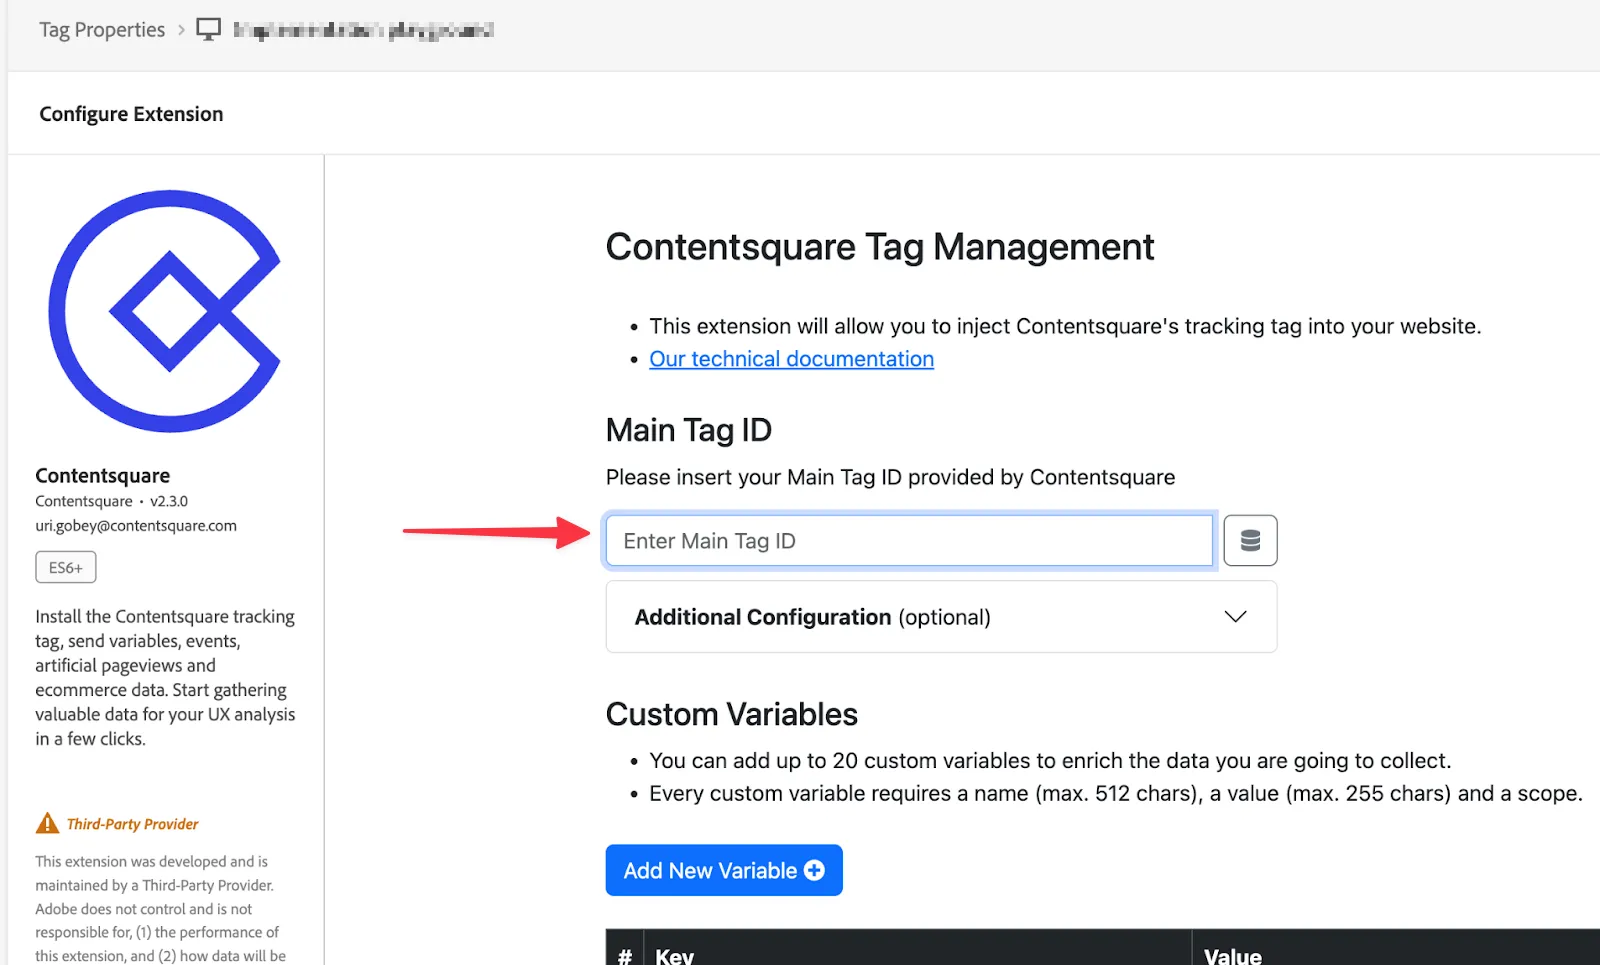
Section titled Adobe LaunchInstalling the Contentsquare extension
Section titled Installing the Contentsquare extension-
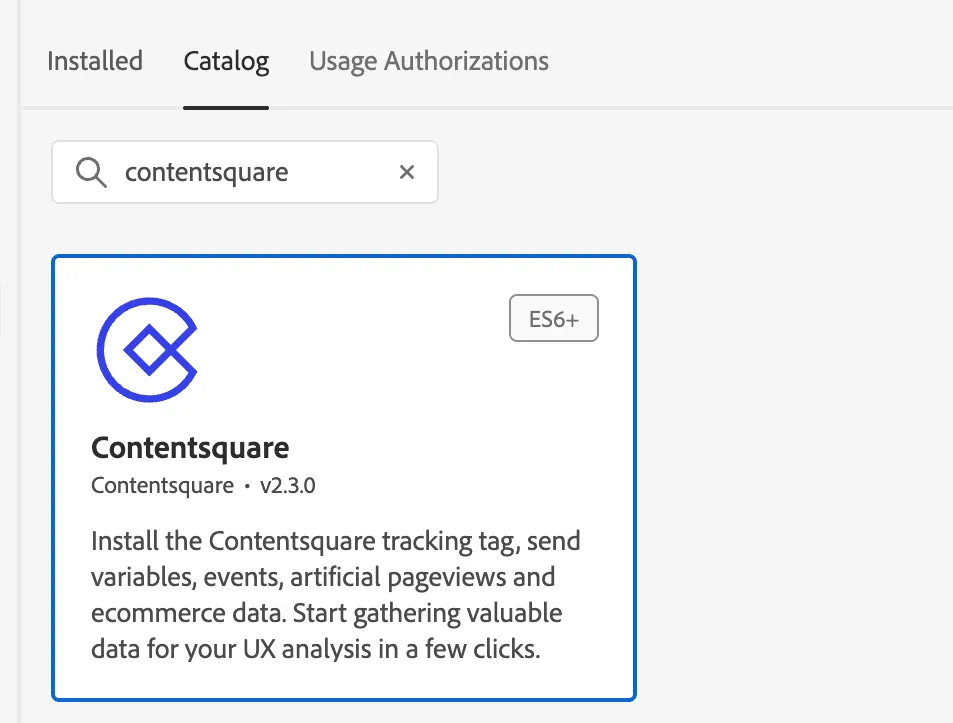
Search for Contentsquare within Extensions and select Install.
-
Enter your Tag ID (should be provided by your Contentsquare Implementation team).
If you want to disable the Contentsquare tag from being injected but still want to use other features, expand the Additional Configuration section and select the Disable tag injection checkbox.
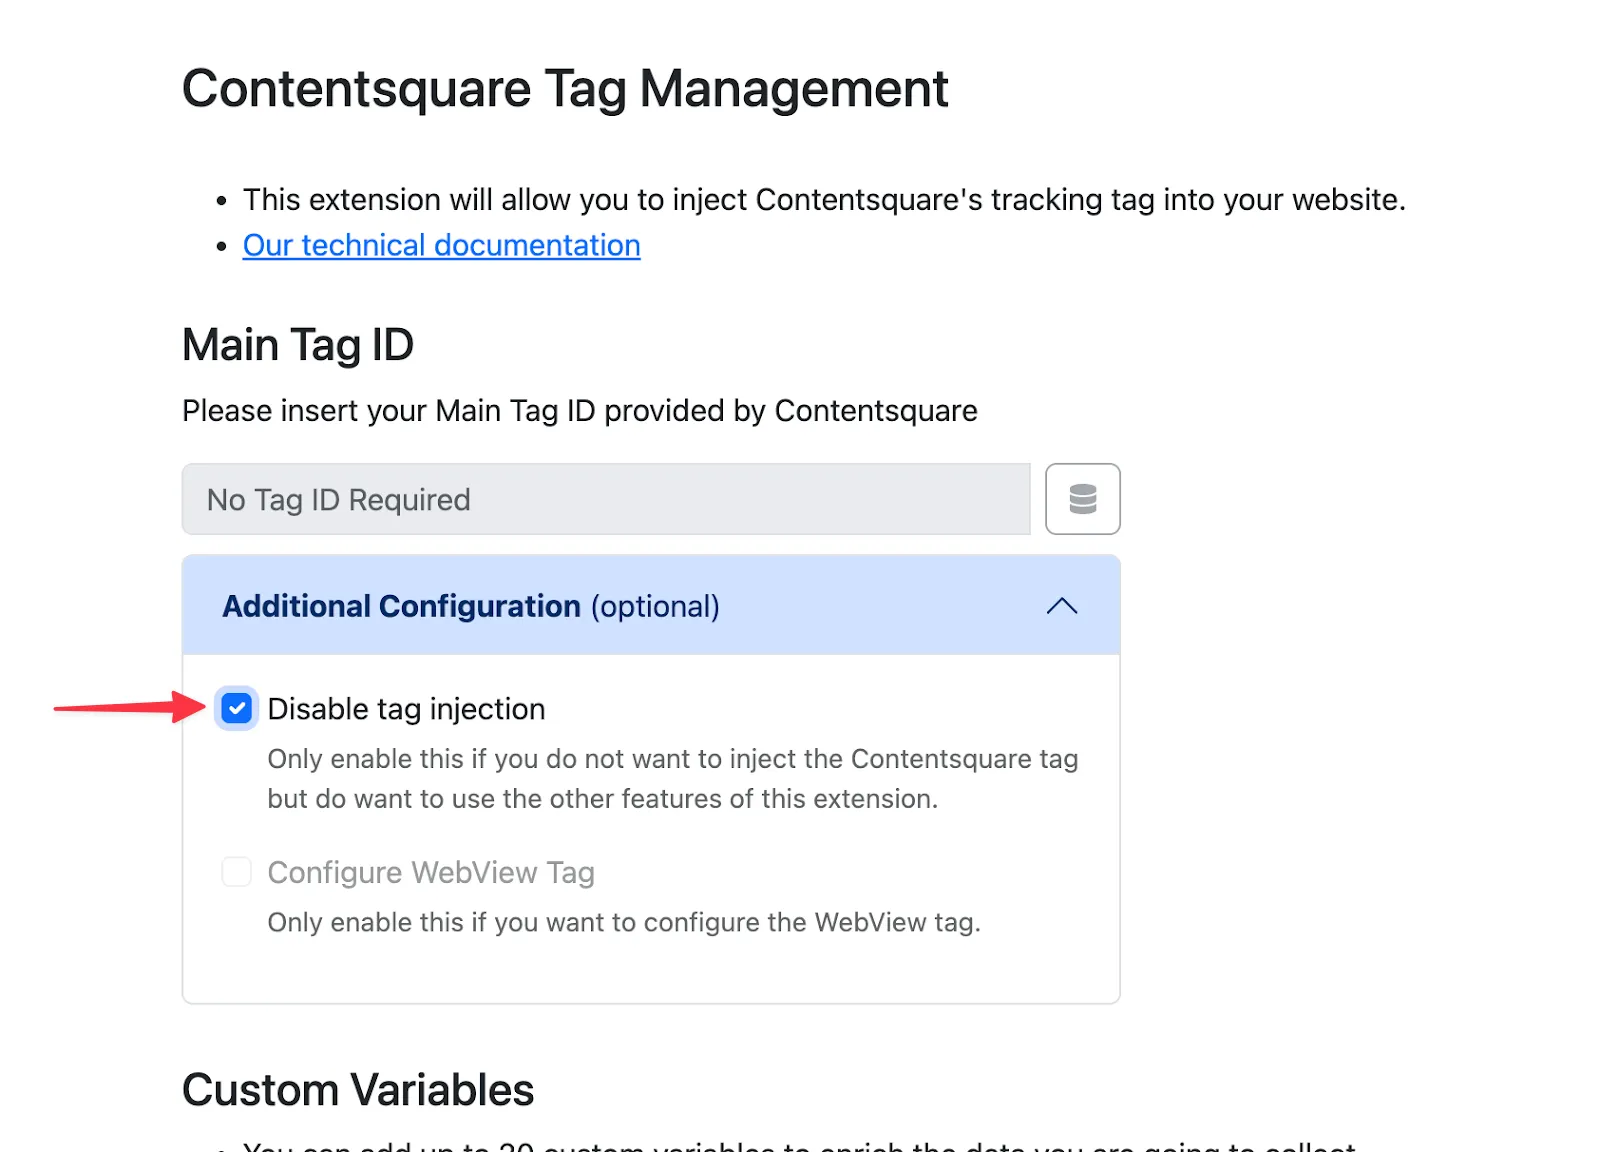
If you want to have your WebView tag automatically injected when in WebView mode, expand the Additional Configuration section, select the Configure WebView Tag checkbox and insert your WebView Tag ID (provided by Contentsquare).

-
To pass information to Contentsquare via custom variables, select Add New Variable and fill the following fields:
- The index, from 1 to 20 - unique numbers only.
- The name.
- The value itself, which will be taken from one of your GTM Variables.
- The scope — select
Page & Visit (2 & 3), orSingle Page App (nextPageOnly 4)if your website/part of it is a Single Page Application. Check with your Contentsquare contact if you're unsure.
Use Data Elements in the value fields, as they are the Launch built-in method of passing information between extensions.
-
(Optional) Select Add PII Masking.

-
Upon activating Personal Data Masking, select the appropriate masking method, depending on the type of personal information you're looking to mask:
-
Masking textual Personal Data using CSS selectors:
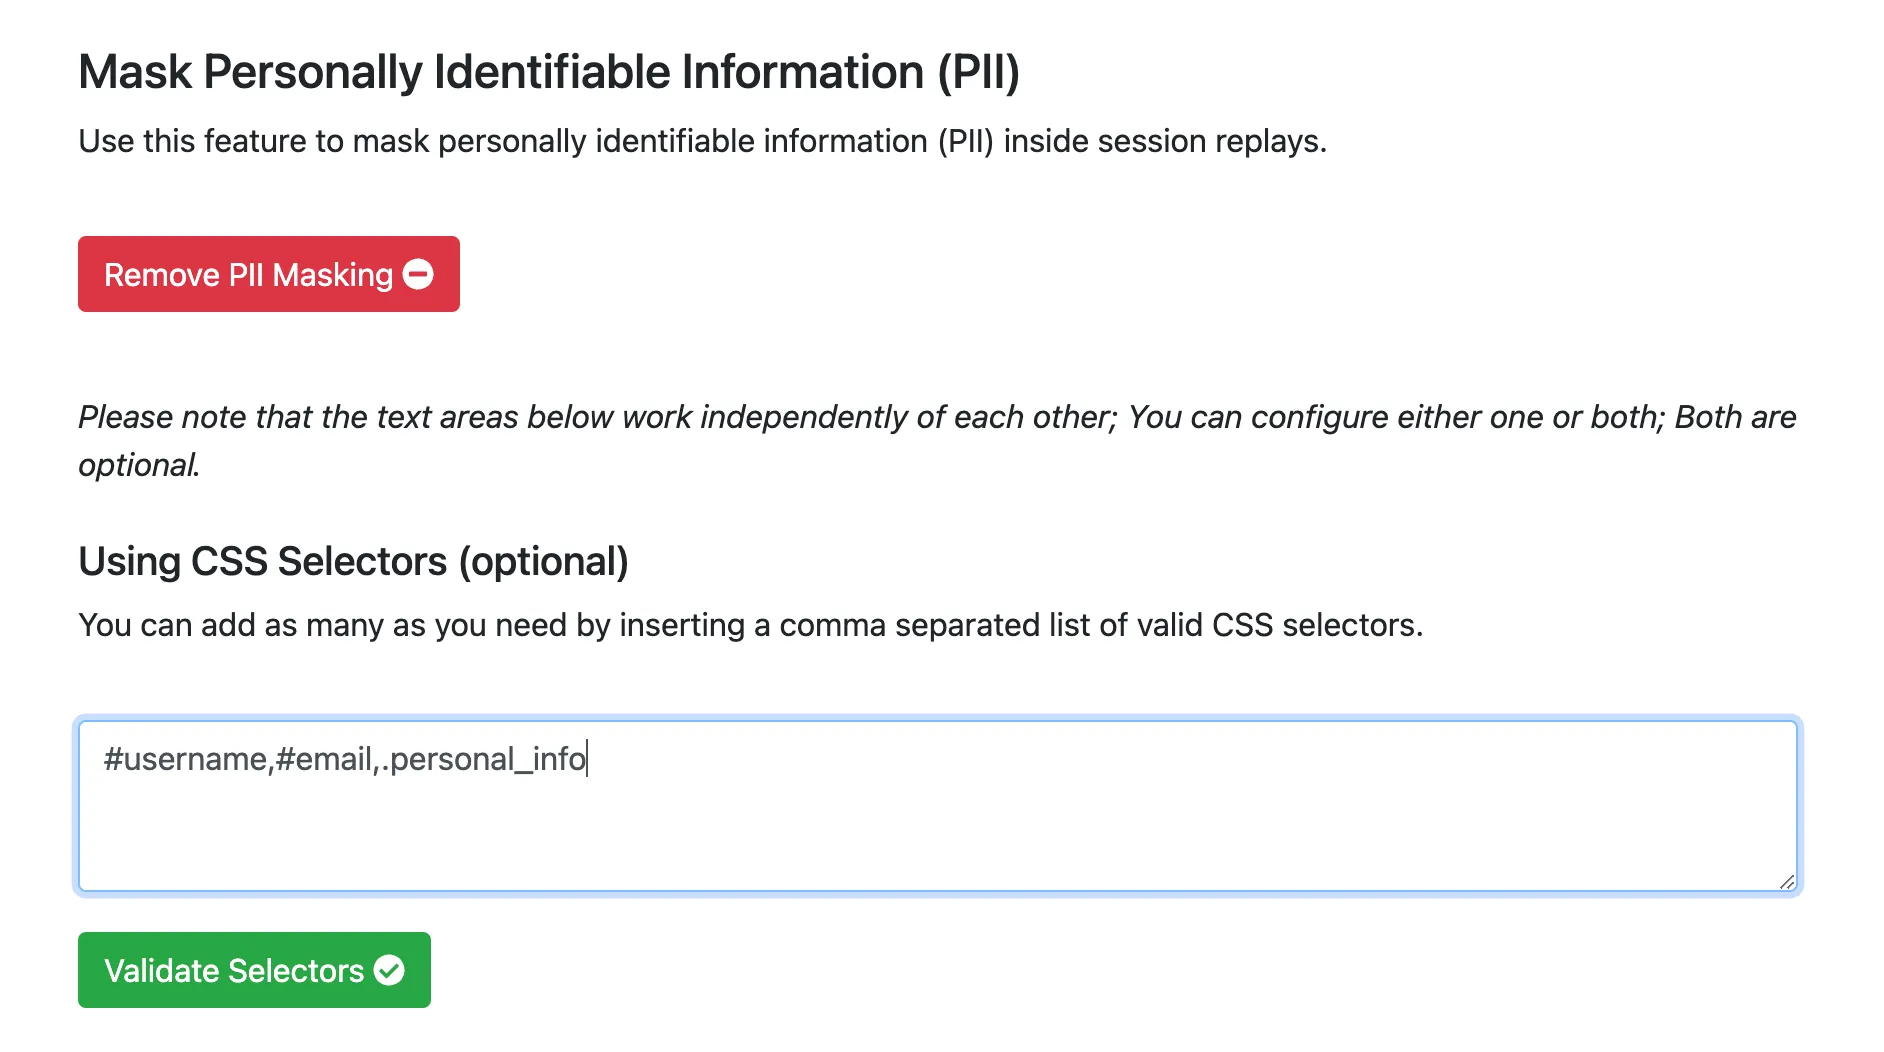 Make sure that your CSS selectors are valid.

-
If non-textual personal information needs to be masked, use the below text box and template:
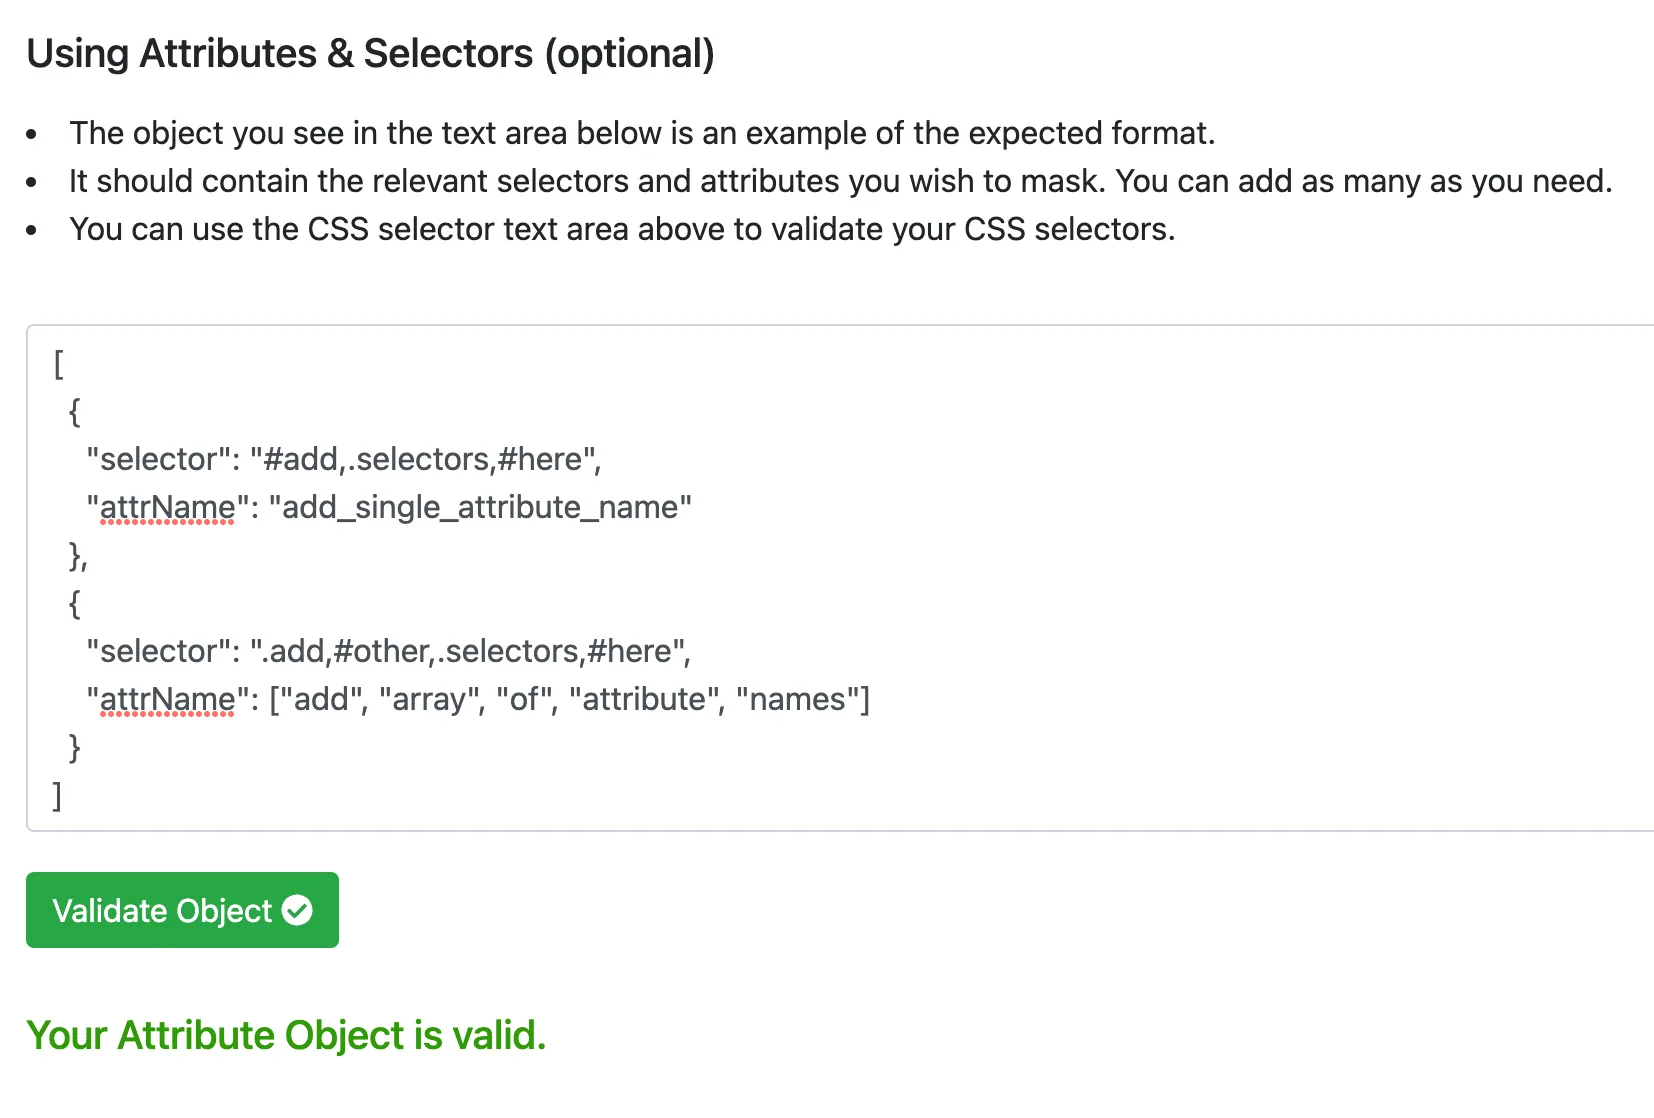
-
-
Save your changes to your working library and move to the next step.
Firing the Main Tag
Section titled Firing the Main TagNavigate to Rules, and open an existing rule or create a new one.
Event Configuration
Section titled Event ConfigurationDepending on your needs, select the event to be used from the Core extension.
Default implementation
Section titled Default implementationTake a look at some of the viable examples below:
Page Bottom
Section titled Page Bottom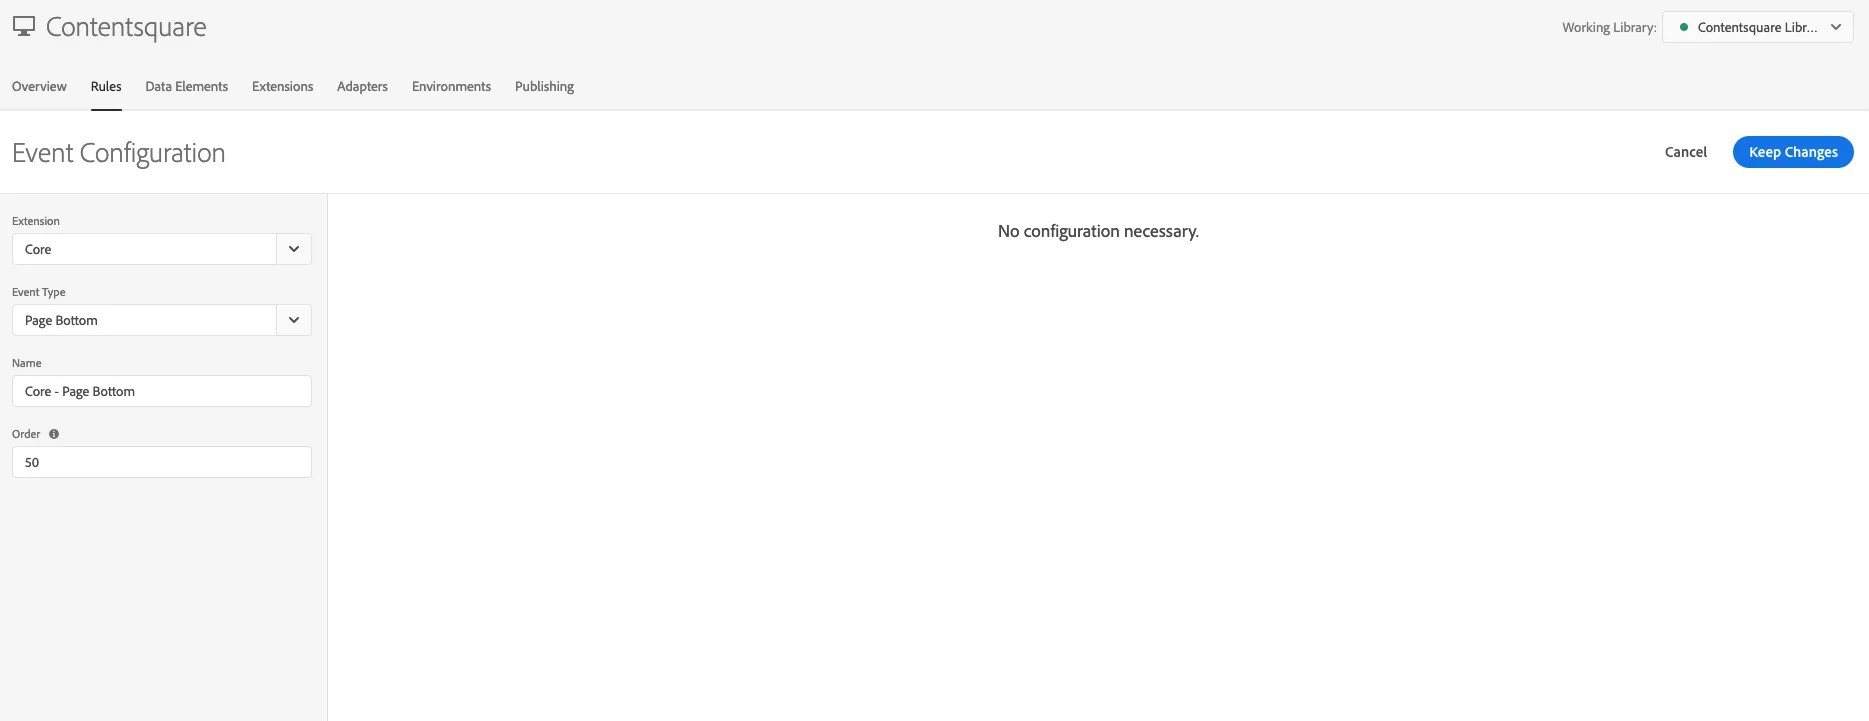
DOM ready
Section titled DOM ready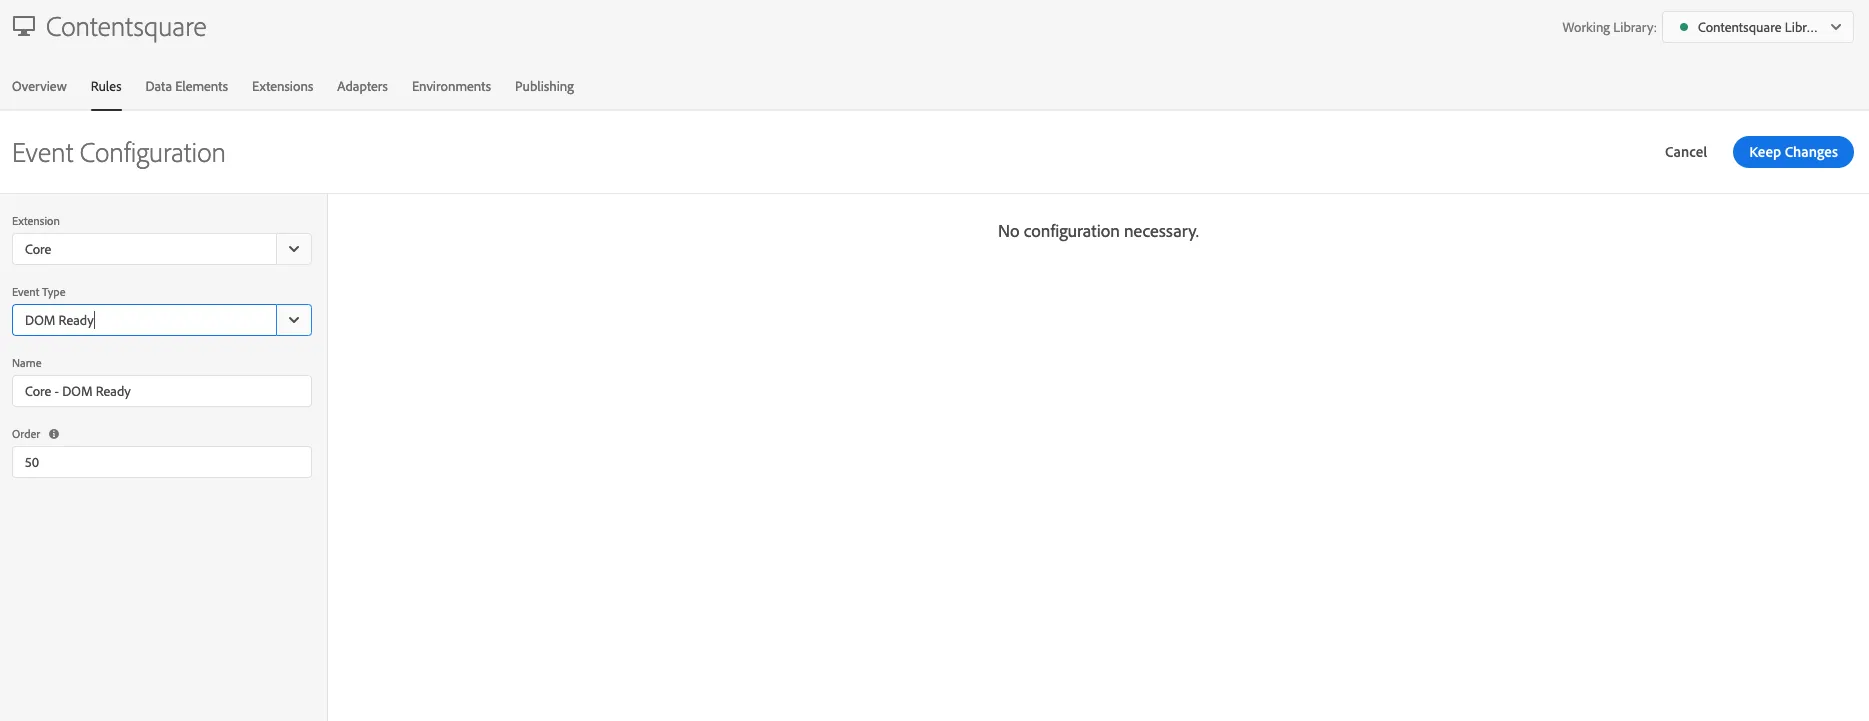
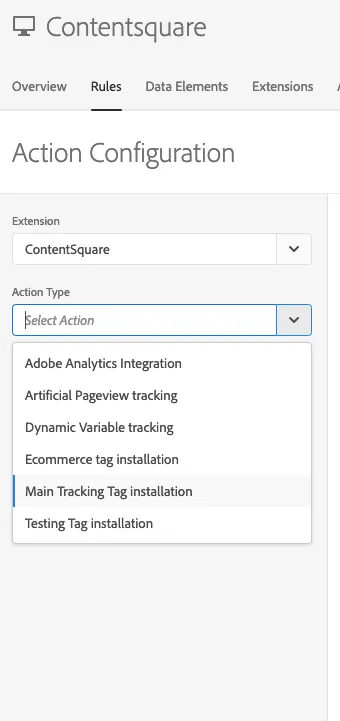
Action Configuration
Section titled Action ConfigurationSelect the Main Tracking Tag Installation action from the Contentsquare extension
If you don't need to further amend the path or the queries sent, you can leave the action as it is and press 'Keep Changes'
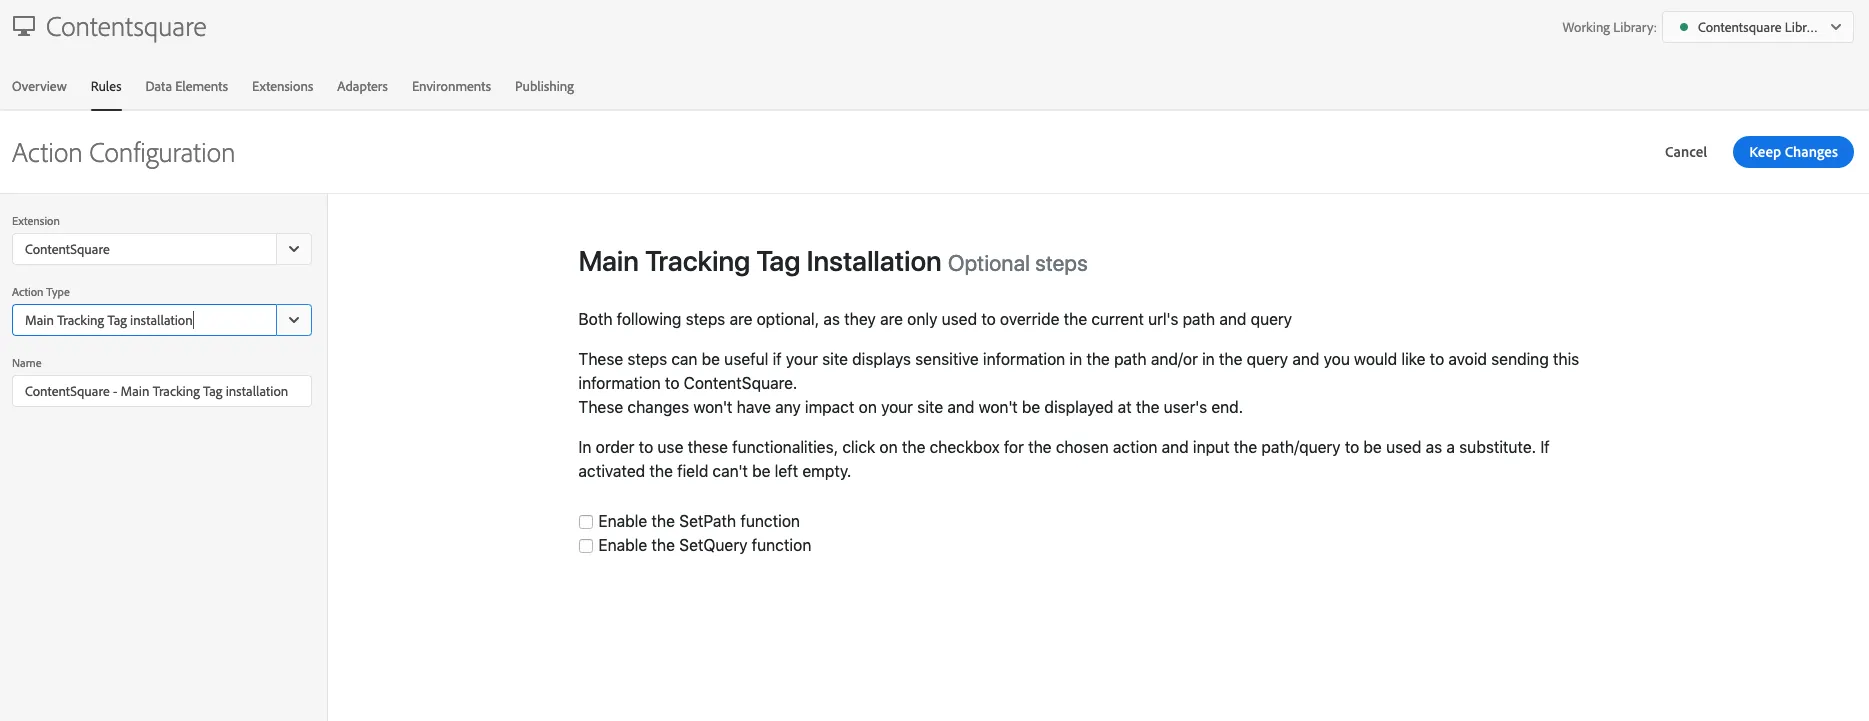
Should you need to override the path or the query, you can do so by selecting the element and writing the string to be used as a substitute. You can also create Data Elements and use them in these fields
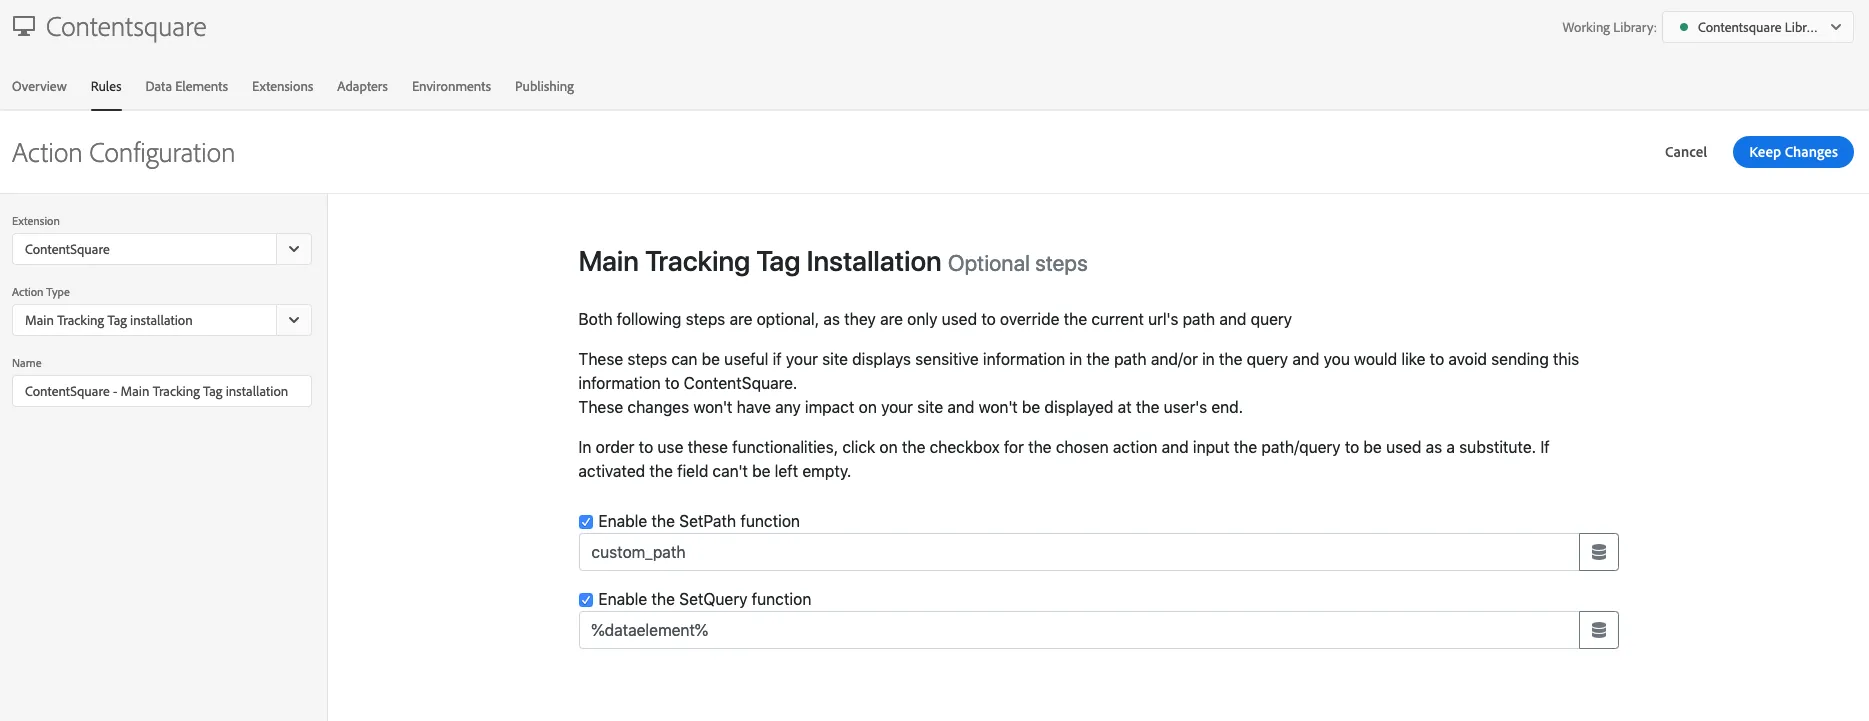
Once you're done, your new rule should look similar to the following
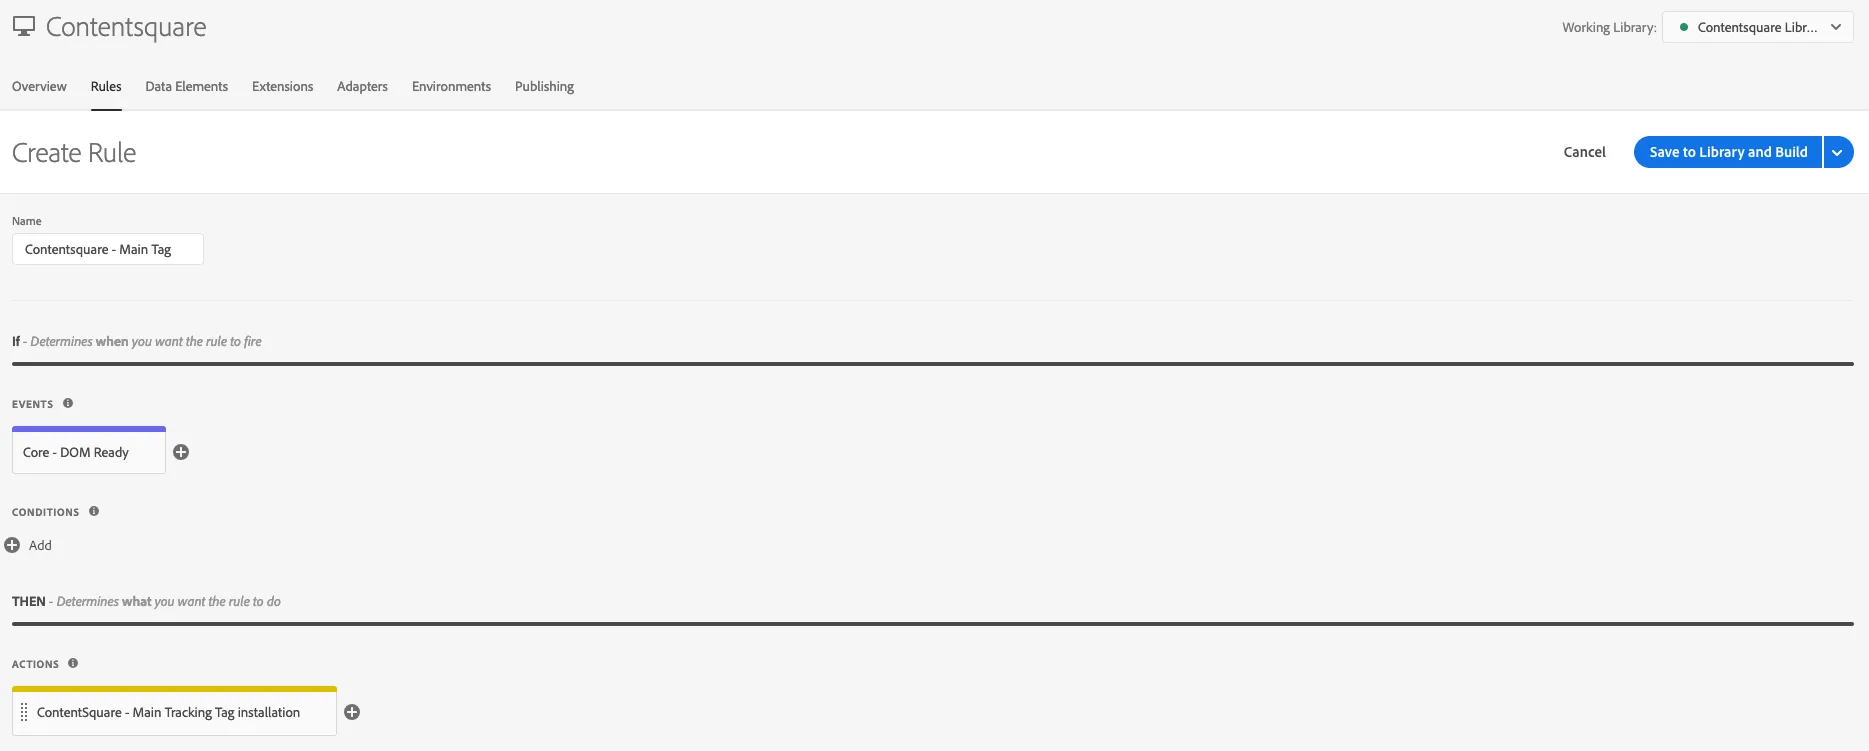
You can now press save and move on to the next rule.
Commanders Act
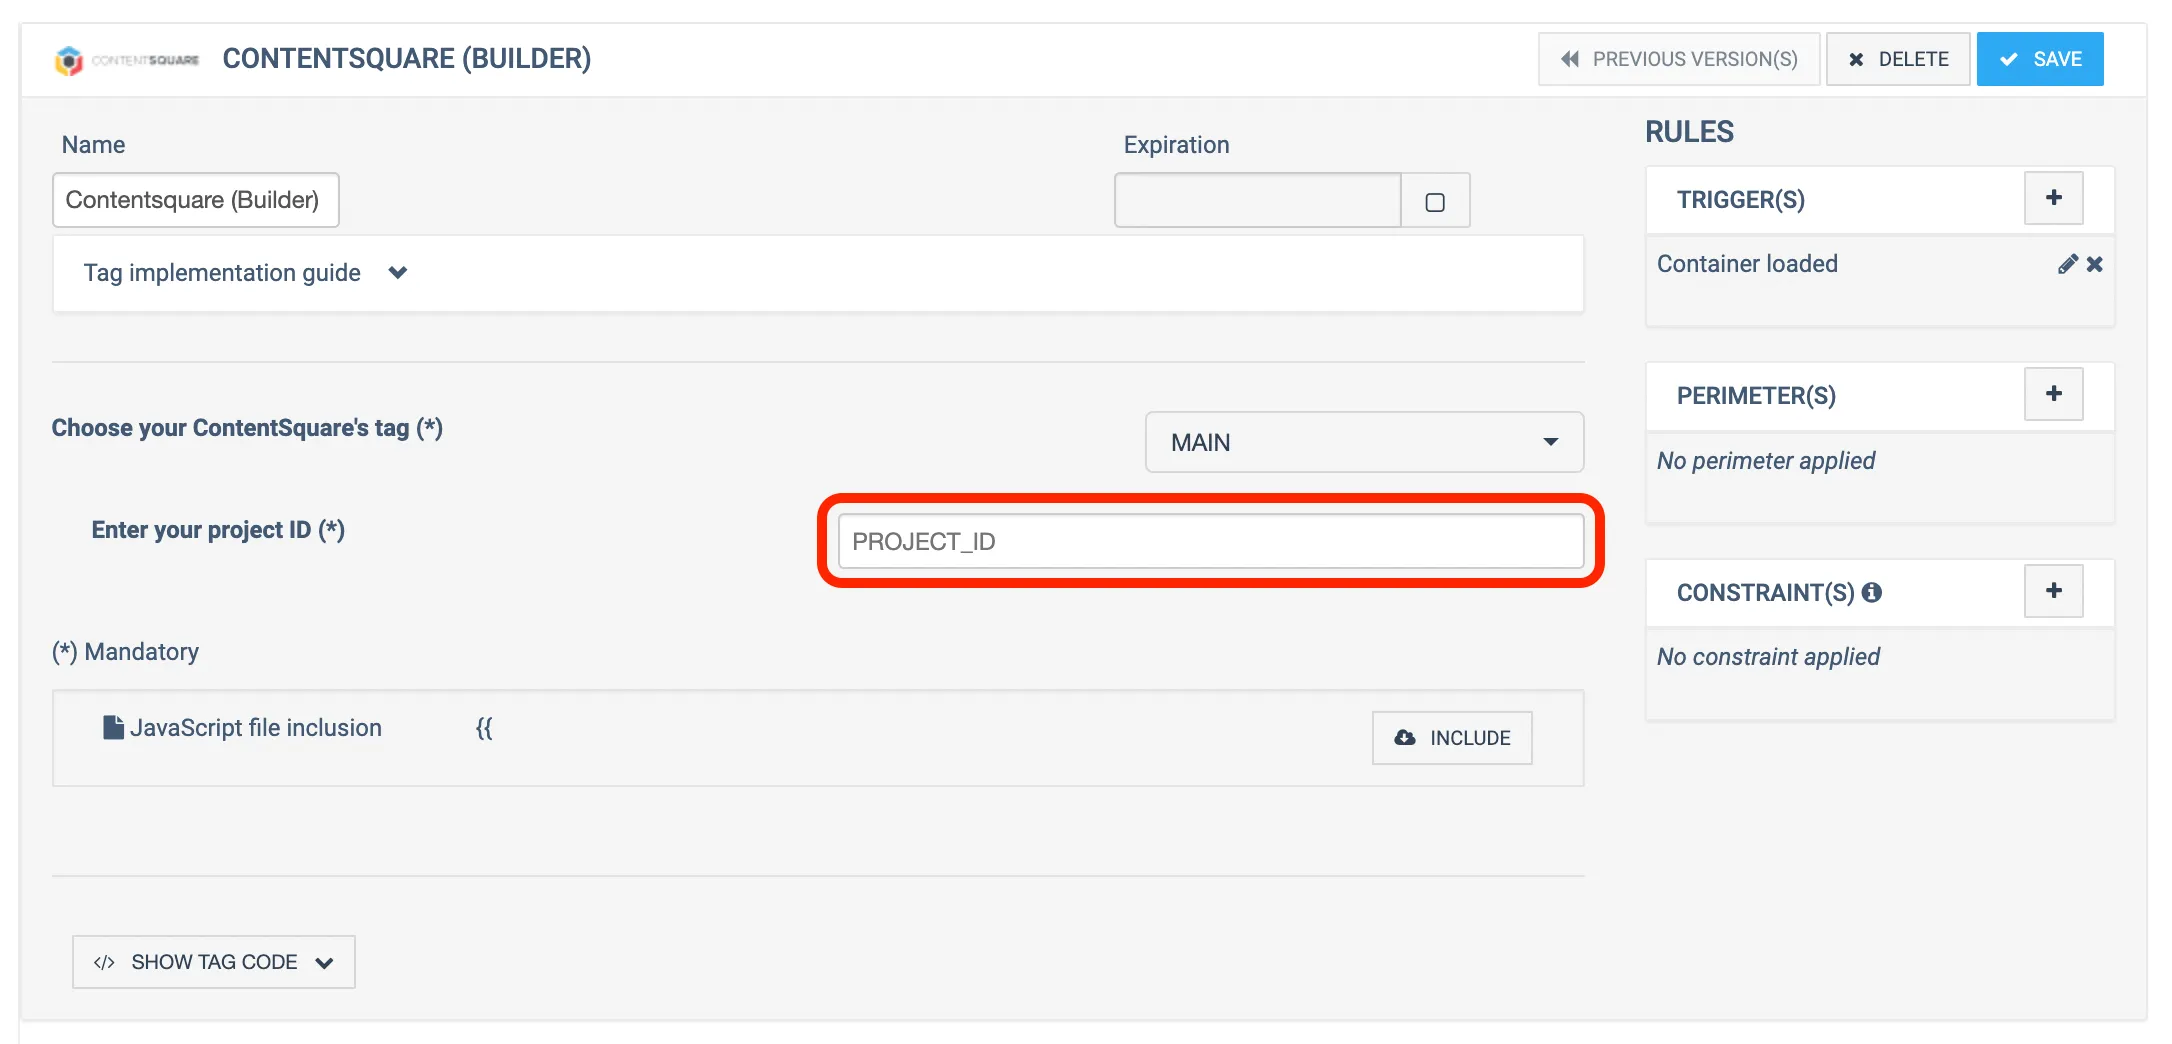
Section titled Commanders Act-
Add a new tag to your containers by choosing "Contentsquare - Tag Main (builder)".
-
Add your previously provided Tag ID.
-
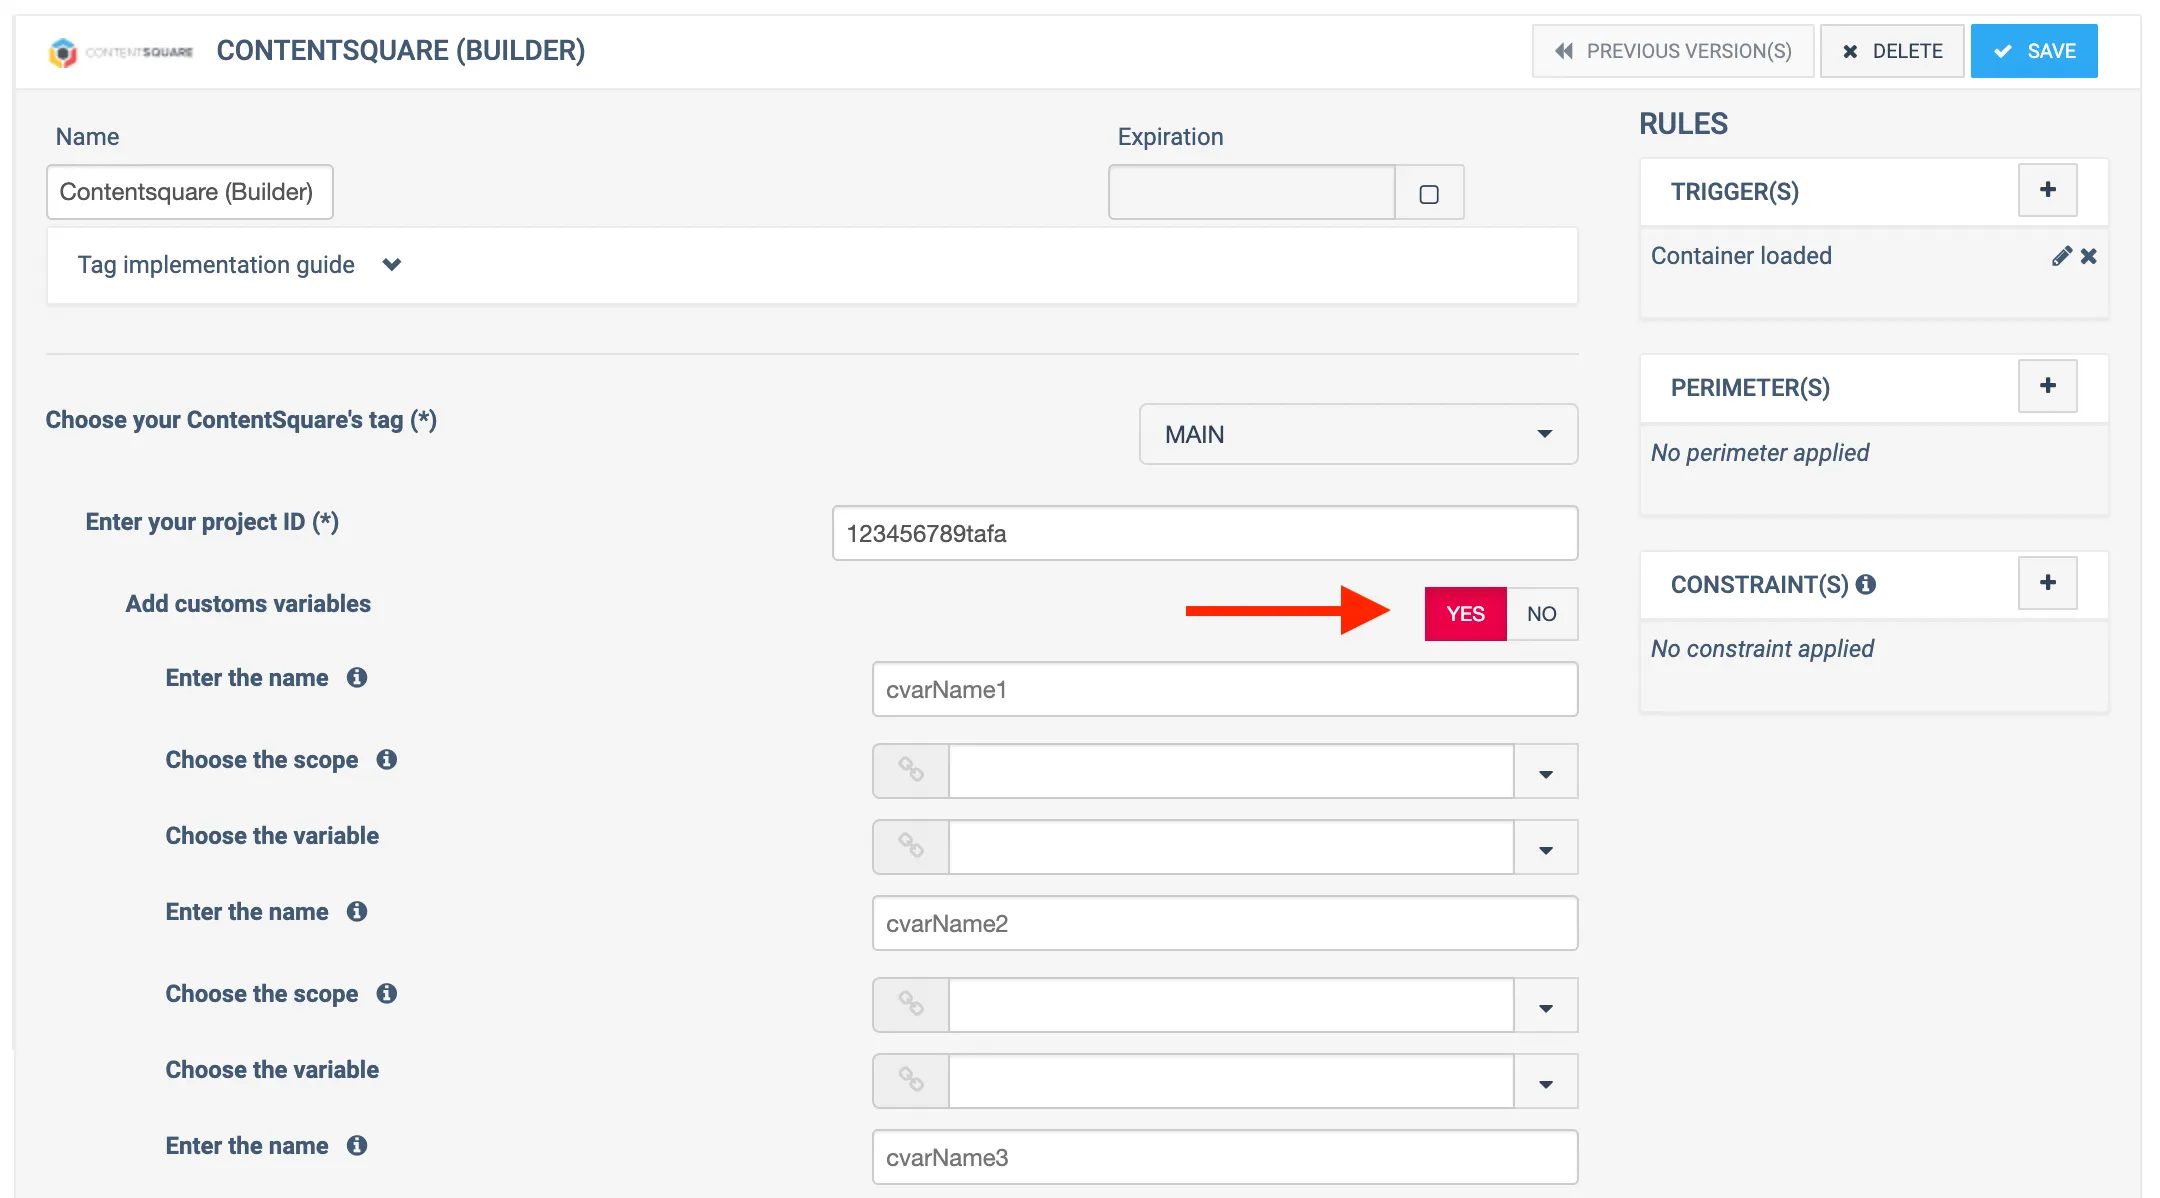
Add the desired Custom Variables:
- At "Add customs variables" select "yes"
- Fill all request variables by adding a name and pick the matching variable from the datalayer.
The Contentsquare Main Tag is ready to be deployed.
Shopify
Section titled ShopifyThe Contentsquare Shopify app is the recommended installation method for all Shopify stores. It ensures comprehensive coverage of your storefront (Home, Product, Collections, etc.) and offers exclusive features for Shopify Plus merchants.
Follow installation instructions which include how to migrate from a legacy setup.
Available features
Section titled Available featuresThe Contentsquare Shopify app enables the following features based on your Shopify plan:
| Shopify non-Plus plans | Shopify Plus plan | |
|---|---|---|
| On Storefront | ✅ All Contentsquare capabilities | ✅ All Contentsquare capabilities |
| On Checkout | • pageview tracking • e-commerce events | All non-Plus features + Session Replay + Zoning & Heatmaps |
See the Shopify pricing page ↗ for information about their plans.
E-commerce tracking
Section titled E-commerce trackingThe app automatically tracks e-commerce events at every step of the checkout process. This data is essential for building accurate mappings and segmenting your audience.
This works seamlessly for both single-page and multi-step checkout configurations.
Data collected:
orderID— Unique transaction identifieramount— Transaction totalcurrency— Transaction currency code
These data points become immediately available for segmentation and filtering in your Contentsquare workspace, for Contentsquare Pro and Enterprise plans.
Installation
Section titled InstallationStep 0: Remove legacy integration
Section titled Step 0: Remove legacy integration- Go to Settings > Customer events.
- Find the Contentsquare pixel and select Disconnect.
Step 1: Install and configure the Contentsquare Shopify app
Section titled Step 1: Install and configure the Contentsquare Shopify app-
Install the Contentsquare app ↗ from the Shopify App Store.
-
In Shopify, open the Contentsquare app and go to the Contentsquare data collection section.
-
In Data privacy contact, enter the email address of the Data Protection Officer (DPO) or the person responsible for handling privacy requests. Contentsquare uses this address to forward privacy requests received from your visitors.
-
In Connect to your Contentsquare projects, map each automatically detected domain to a Tag ID:
- Find each Tag ID in the Contentsquare Integration Catalog ↗ (search for Shopify).
- To send all of the store's domains to the same Contentsquare project, enter the same Tag ID for every domain.
- To split domains across several Contentsquare projects, enter the matching Tag ID for each domain.
- The same Shopify store can send data to several Contentsquare projects, and a single Contentsquare project can receive data from several Shopify stores or domains.
-
Click Save.
-
In the Verify your domain configuration dialog, review which domains will and will not be collected. Click Go back and fix to add missing Tag IDs, or Save anyway to confirm.
Step 2: Enable Contentsquare on storefront
Section titled Step 2: Enable Contentsquare on storefront- Click Add Contentsquare to storefront.
- In the Shopify theme editor, click Save.
Step 3: Enable Contentsquare on checkout
Section titled Step 3: Enable Contentsquare on checkout-
Ensure Page Masking (Automasking) is applied to all checkout pages:
- Information
- Shipping
- Payment
- Thank you
- Order status
See how to manage page masking for Free and Growth plans ↗ / Pro and Enterprise plans ↗
-
Click Enable data collection on checkout to capture pageviews on checkout pages. This also enables Session Replays, Heatmaps, and Zoning for Shopify Plus plans.
Advanced: Custom variables (Storefront)
Section titled Advanced: Custom variables (Storefront)To send custom variables to Contentsquare, define them before the main tracking tag loads.
Reference data from Liquid objects or tags:
<script type="text/javascript"> window._uxa = window._uxa || []; window._uxa.push(['setCustomVariable', 1, "Customer Segment", {{ customer.tags | json }}]); window._uxa.push(['setCustomVariable', 2, "Product Type", {{ product.type | json }}]); window._uxa.push(['setCustomVariable', 3, "Cart Items", {{ cart.item_count | json }}]);</script>See custom variables.
Advanced: Dynamic variables (Storefront)
Section titled Advanced: Dynamic variables (Storefront)Dynamic variables can be sent at any point during the pageview — they don't need to be defined before the Contentsquare tag loads.
Reference data from Liquid objects or tags:
<script type="text/javascript"> document.getElementById("AddToCart").addEventListener('click', function() { window._uxa = window._uxa || []; window._uxa.push(["setPath", "Added_to_cart_" + {{ custom_tag.value | json }}]); window._uxa.push(["trackPageview"]); window._uxa.push(["trackDynamicVariable", { key: "Added to cart", value: {{ custom_tag.value | json }} }]); });</script>See dynamic variables.
Legacy manual installation (deprecated)
Section titled Legacy manual installation (deprecated)Deprecated configuration (click to expand)
Base configuration
Section titled Base configuration-
Within the main menu, select Online Store > Themes, then click the Actions drop-down menu, and Edit Code.

-
Under
Layout, select the theme.liquid file. -
Within the code editor, scroll down to the closing
</head>tag. -
Copy the code below and replace
YOUR_TAG_IDwith your Contentsquare Tag ID:<!-- Contentsquare Tags Start --><script type="text/javascript">// Contentsquare Main Tracking Tag(function () {window._uxa = window._uxa || [];if (typeof CS_CONF === "undefined") {window._uxa.push(["setPath",window.location.pathname + window.location.hash.replace("#", "?__")]);var mt = document.createElement("script");mt.type = "text/javascript";mt.async = true;mt.src = "//t.contentsquare.net/uxa/{{YOUR_TAG_ID}}.js";document.getElementsByTagName("head")[0].appendChild(mt);} else {window._uxa.push(["trackPageview",window.location.pathname + window.location.hash.replace("#", "?__")]);}})();</script><!-- Contentsquare Tags End --> -
Paste the code above the closing
</head>tag.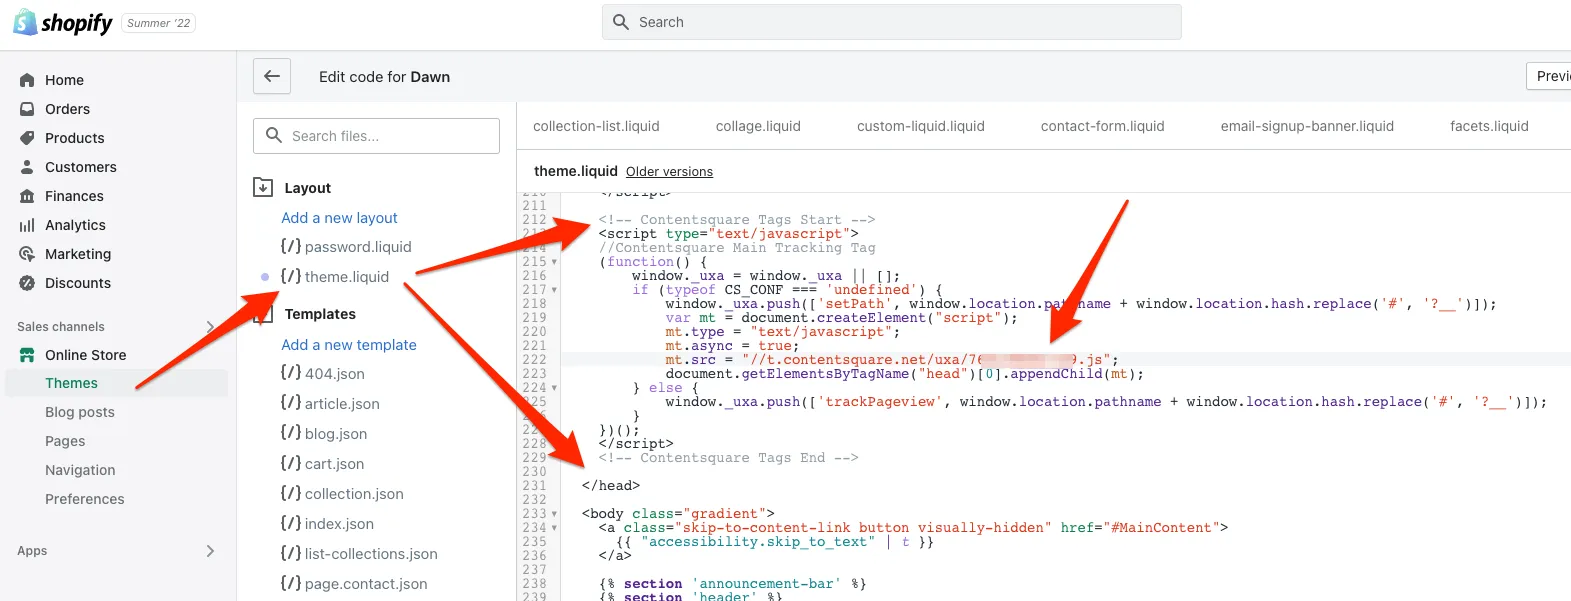
-
Click
Save.
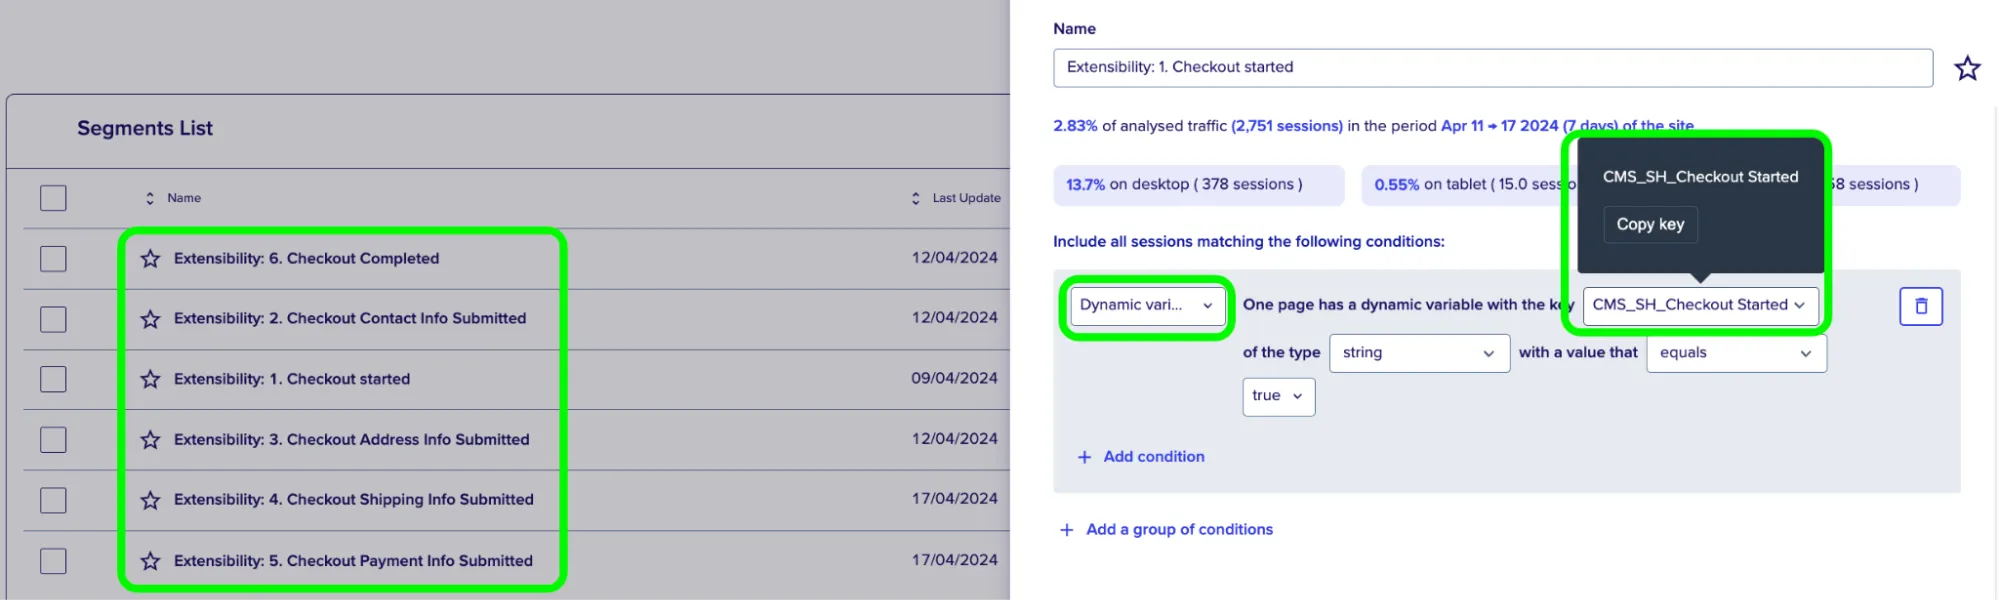
Track the Checkout flow with Contentsquare Custom Web Pixel (Legacy)
Section titled Track the Checkout flow with Contentsquare Custom Web Pixel (Legacy)Tracking the Checkout flow is done via a custom pixel to add to your Shopify checkout. This custom pixel allows for sending a pageview and a dynamic variable to Contentsquare within each step of the checkout, for mapping and segmentation purposes, and track e-commerce transactions, all in one script.
This solution works for both single page and multi-step checkout scenarios.
Events collected are:
checkout_startedcheckout_contact_info_submittedcheckout_address_info_submittedcheckout_shipping_info_submittedpayment_info_submittedcheckout_completed- Ecommerce data:
orderIDamountcurrency
Once collected, these events are available for segmentation and filtering:
Adding the custom pixel to your checkout
Section titled Adding the custom pixel to your checkout-
Select
Settingsin the Shopify admin section. -
Select
Customer eventsthenAdd custom pixel. -
Enter a name for the pixel such as
Contentsquare Checkout. -
Copy and paste the code below and replace
{{YOUR_TAG_ID}}with your Contentsquare Tag ID:/**Name: Shopify CS Integration*Version: 2.2.1*/const csTagID = "{{YOUR_TAG_ID}}";const csTypeVendorPrefix = "CMS_SH_";let submittedEvents = [];function sendToCS(csKey, csValue, csPV, eventContext) {csKey = csTypeVendorPrefix + csKey;setTimeout(function () {let setQuery;127 collapsed linesif (csPV && eventContext) {const hash = eventContext.window.location.hash;const query = eventContext.window.location.search;setQuery = "?" + csPV;if (hash) {setQuery = hash.replace("#", "?__") + csPV;} else {if (query) {setQuery = "?__" + csPV;}}_uxa.push(["trackPageview", eventContext.window.location.pathname + setQuery]);}_uxa.push(["trackDynamicVariable",{key: csKey,value: csValue,},]);}, 500);}function sendEcomCS(orderID, amount, currency) {_uxa.push(["ec:transaction:create",{id: orderID,revenue: amount,currency: currency,},]);_uxa.push(["ec:transaction:send"]);}analytics.subscribe("page_viewed", (event) => {if (event.context.window.location.pathname.indexOf("/checkouts") > -1 &&event.context.window.location.pathname.indexOf("/processing") === -1) {if (typeof CS_CONF === "undefined") {window._uxa = window._uxa || [];_uxa.push(["setPath",event.context.window.location.pathname +event.context.window.location.hash.replace("#", "?__"),]);const mt = document.createElement("script");mt.type = "text/javascript";mt.async = true;mt.src = "//t.contentsquare.net/uxa/" + csTagID + ".js";document.getElementsByTagName("head")[0].appendChild(mt);} else {_uxa.push(["trackPageview",event.context.window.location.pathname +event.context.window.location.hash.replace("#", "?__"),]);}}});analytics.subscribe("checkout_started", (event) => {if (!submittedEvents.includes(event.name)) {submittedEvents.push(event.name);sendToCS("Checkout Started", "true", event.name, event.context);}});analytics.subscribe("checkout_contact_info_submitted", (event) => {if (!submittedEvents.includes(event.name)) {submittedEvents.push(event.name);sendToCS("Checkout Contact Info Submitted", "true", event.name, event.context);}});analytics.subscribe("checkout_address_info_submitted", (event) => {if (!submittedEvents.includes(event.name)) {submittedEvents.push(event.name);sendToCS("Checkout Address Info Submitted", "true", event.name, event.context);}});analytics.subscribe("payment_info_submitted", (event) => {if (!submittedEvents.includes(event.name)) {submittedEvents.push(event.name);sendToCS("Payment Info Submitted", "true", event.name, event.context);}});analytics.subscribe("checkout_shipping_info_submitted", (event) => {if (!submittedEvents.includes(event.name)) {submittedEvents.push(event.name);sendToCS("Checkout Shipping Info Submitted", "true", event.name, event.context);}});analytics.subscribe("checkout_completed", (event) => {if (!submittedEvents.includes(event.name)) {submittedEvents.push(event.name);sendToCS("Checkout Completed", "true", event.name, event.context);const data = event.data || "";const checkout = data.checkout || "";const order = checkout.order || "";const orderID = order.id;const totalPrice = checkout.totalPrice || "";const amount = totalPrice.amount;const currency = totalPrice.currencyCode;if (typeof orderID != "undefined" &&typeof amount != "undefined" &&typeof currency != "undefined") {sendEcomCS(orderID, amount, currency);}}}); -
Select Save then Connect.
-
Test that pageviews are sent in the checkout. Make a transaction to test the e-commerce transaction is also sent as expected.
Sending custom variables
Section titled Sending custom variablesTo send custom variables to Contentsquare, define them before the Contentsquare main tag.
Modify the keys and values to your needs: you can get values from your Liquid Objects or Liquid Tags.
<script type="text/javascript">      window._uxa = window._uxa || [];      window._uxa.push(['setCustomVariable', 1, "Insert Custom Key 1", "Insert Custom Value: " + {{ custom_tag.value1 | json }}]);      window._uxa.push(['setCustomVariable', 2, "Insert Custom Key 2", "Insert Custom Value: " + {{ custom_tag.value2 | json }}]);      window._uxa.push(['setCustomVariable', 3, "Insert Custom Key 3", "Insert Custom Value: " + {{ custom_tag.value3 | json }}]);
      // Contentsquare Main Tracking Tag      (function () {          window._uxa = window._uxa || [];          if (typeof CS_CONF === 'undefined') {              window._uxa.push(['setPath', window.location.pathname+window.location.hash.replace('#','?__')]);              var mt = document.createElement('script'); mt.type = 'text/javascript'; mt.async = true;              mt.src = '//t.contentsquare.net/uxa/769238b6e1309.js';              document.getElementsByTagName('head')[0].appendChild(mt);          }          else {              window._uxa.push(['trackPageview', window.location.pathname+window.location.hash.replace('#','?__')]);          }  })();</script>
For more information, see the setCustomVariable command.
Sending dynamic variables
Section titled Sending dynamic variablesYou can send dynamic variables at any point in the pageview, they do not need to be set before the Contentsquare tag is loaded.
Modify the keys and values to your needs: you can get values from your Liquid Objects or Liquid Tags.
<script type="text/javascript">  // Contentsquare Send Artificial Pageviews  document.getElementById("AddToCart").addEventListener('click', function() {      window._uxa = window._uxa || [];      window._uxa.push(["setPath", "Added_to_cart_" + {{ custom_tag.value | json }}]);      window._uxa.push(["trackPageview"]);
      window._uxa = window._uxa || [];      window._uxa.push(["trackDynamicVariable", {key: "Added to cart", value: {{ custom_tag.value | json }}}]);  });</script>
For more information, see the trackDynamicVariable command.
Salesforce websites
Section titled Salesforce websitesStarting with Tracking Tag version 15.201.10, Contentsquare supports Salesforce websites:
- Lightning Web Components (LWC) are supported out of the box.
- Salesforce Experience Cloud websites built with Experience Builder are supported when the tag is implemented with the privileged script tag and the expected Salesforce security settings.
- This scope includes both Aura and Lightning Web Runtime (LWR) templates.
- No Salesforce app, plugin, or AppExchange package is required: the standard Contentsquare tracking script is all that is needed, deployed via HTML or a tag manager.
For Experience Builder websites, follow these guidelines:
-
Add Trusted URLs
In Salesforce Setup (gear icon > Setup), search for Trusted URLs and add two entries:
Contentsquare data collection
- API name:
Contentsquare.net - URL:
https://*.contentsquare.net - CSP Context: All
- Active: Selected
- CSP Directives:
connect-src (scripts),img-src (images),frame-src (iframe content)
Contentsquare platform
- API name:
Contentsquare.com - URL:
https://*.contentsquare.com - CSP Context: All
- Active: Selected
- CSP Directives:
connect-src (scripts),frame-src (iframe content)
- API name:
-
Configure CSP settings
In Experience Builder > Settings > Security & Privacy, set Security Level to Relaxed CSP: Permit Access to Inline Scripts and Allowed Hosts. Then under Trusted Sites for Scripts, click + Add Trusted Site, add Contentsquare (Name) and
https://t.contentsquare.net(URL). -
Add the privileged script wrapper
In Experience Builder > Settings > Advanced > Head Markup, place the following privileged script tag ↗. This is an empty wrapper required by Salesforce LWS to expose global variables through the shadow DOM — it does not load the tracking script itself:
<x-oasis-script hidden="true" exported-global-names="_uxa,CS_CONF,UXAnalytics"></x-oasis-script>_uxa: Required if you use Tag commands (for example, to mask sensitive data or track artificial pageviews).CS_CONF: Required if you use the Tracking Setup Assistant extension ↗.UXAnalytics: Prevents the tracking tag from initializing more than once.
-
Add the Contentsquare tracking tag
Add the standard Contentsquare tracking tag after the wrapper, either via your tag manager or directly in the same Head Markup field. The final Head Markup should look like this:
<x-oasis-script hidden="true" exported-global-names="_uxa,CS_CONF,UXAnalytics"></x-oasis-script><script type="text/javascript">(function () {window._uxa = window._uxa || [];if (typeof CS_CONF === "undefined") {window._uxa.push(["setPath",window.location.pathname + window.location.hash.replace("#", "?__")]);var mt = document.createElement("script");mt.type = "text/javascript";mt.async = true;mt.src = "//t.contentsquare.net/uxa/{{YOUR_TAG_ID}}.js";document.getElementsByTagName("head")[0].appendChild(mt);} else {window._uxa.push(["trackPageview",window.location.pathname + window.location.hash.replace("#", "?__")]);}})();</script>
Troubleshooting
Uncaught [object Object] error when saving Head Markup
The tracking script payload was pasted inside the <x-oasis-script> tag. Remove the payload. Only the empty wrapper should be in Head Markup. The tracking script belongs in your tag manager or as a separate <script> tag below the wrapper.
CSP errors blocking t.contentsquare.net or csxd.contentsquare.net
Double-check steps 1 and 2. Salesforce CDNs can take 5 to 10 minutes to propagate Trusted URL changes. Publish the site and do a hard refresh in an incognito window before investigating further.
Custom HTML
Section titled Custom HTMLTo set up the Tag on your website, add the following lines of code on every page you want to analyze, either at the end of the <body> tag, or via a Tag Management System - YOUR_TAG_ID is the unique ID of your Contentsquare tag.
<script type="text/javascript"> (function () { window._uxa = window._uxa || []; if (typeof CS_CONF === "undefined") { window._uxa.push([ "setPath", window.location.pathname + window.location.hash.replace("#", "?__") ]); var mt = document.createElement("script"); mt.type = "text/javascript"; mt.async = true; mt.src = "//t.contentsquare.net/uxa/{{YOUR_TAG_ID}}.js"; document.getElementsByTagName("head")[0].appendChild(mt); } else { window._uxa.push([ "trackPageview", window.location.pathname + window.location.hash.replace("#", "?__") ]); } })();</script>This code creates a function which will add an asynchronous call to a script and then run the function. This is a way to avoid other elements loading being blocked on the page. This reduces the impact of the tag on the website's performance.
To collect custom variables from your datalayer, take a look at the following code example:
<script> (function () { window._uxa = window._uxa || []; try { if (typeof dataLayer !== "undefined") { for (var i = 0; i < dataLayer.length; i++) { window._uxa.push([ "setCustomVariable", 1, "Sample Variable", dataLayer[i].sampleVariable, 3 ]); } } } catch (e) {} if (typeof CS_CONF === "undefined") { window._uxa.push([ "setPath", window.location.pathname + window.location.hash.replace("#", "?__") ]); var mt = document.createElement("script"); mt.type = "text/javascript"; mt.async = true; mt.src = "//t.contentsquare.net/uxa/{{YOUR_TAG_ID}}.js"; document.getElementsByTagName("head")[0].appendChild(mt); } else { window._uxa.push([ "trackPageview", window.location.pathname + window.location.hash.replace("#", "?__") ]); } })();</script>Position the tag before the closing </body> marker within each page of your website.
To have the most reliable traffic count without slowing down the display of the page, load the script as soon as the page is displayed (DOMContentLoaded event ↗).
Waiting for the whole page to load load event ↗ may impact the integrity of paths passed on and the amount of visits.
Do not forget to include all subdomains and the potential pages called by iFrames.
What it contains
Section titled What it containsThe tag contains:
- A
CS_CONFobject gathering configuration elements of your own account, such as used domain, inclusion percentages, etc. - The latest Tag version.
Checking the loading of the main tag
Section titled Checking the loading of the main tagUse the Contentsquare Tracking Setup Assistant Chrome Extension ↗ to confirm the main is loaded and that a first pageview is sent.
Advanced settings
Section titled Advanced settingsThe _uxa object
Section titled The _uxa objectThe tag is based on a window._uxa object which receives instructions from the push() function. It is thus possible to send instructions even before the library has finished loading by initializing the window._uxa variable via an array. We use the fact that arrays interpret the push() function natively.
This is why all instructions sent to the tag work the following way:
window._uxa = window._uxa || [];window._uxa.push(<INSTRUCTION>);The first line creates an array ([]) if the _uxa variable does not already exist. The second line adds an instruction to it.
If the library is already loaded, the instruction will be run immediately. If it has not loaded yet, the instruction will be run when the library has loaded. In both cases, this guarantees that the execution order of the commands will not generate an error.
CORS Request
Section titled CORS RequestYou can call the main tag with CORS requests (Cross-origin resource sharing, more on this here ↗). You just need to add crossorigin="anonymous" to the <script> tag of the main tag.
If there is a syntax error in the tag, an exception will be generated that can be caught by your site (with window.onerror for instance).
- Without
crossorigin="anonymous", you will catch a "Script error" message with no information on the initiator. - With
crossorigin="anonymous", the message will log the file generating the error. You can use it if you see errors on your website.
Self-hosting
Section titled Self-hostingIf you must self-host the tag, we advise you to set up automatic sync with http://t.contentsquare.net/uxa/{{YOUR_TAG_ID}}.js which always serves the latest version of the Tag.
Contentsquare does not serve specific pinned versions of the Tag to any public endpoints.
📬 Subscribe to the Tag Changelog to get notified of releases every month.