

Session Replay
Session Replay enables replaying real sessions to observe how users interact with your product, by capturing screen content - including text and images - as users navigate your mobile app. For more details, see Introduction to Session Replay for Apps ↗ in the Help Center.
Starter guide
Section titled Starter guidePrerequisites
Section titled PrerequisitesUpdate to latest SDK version
Section titled Update to latest SDK versionTo enable Session Replay in your app and get the most stable version, it is required to upgrade the SDK to its latest version.
Implement screen tracking
Section titled Implement screen trackingEnsure screen tracking is implemented, since Session Replay collection starts at the first screenview event. See Track screens.
Handle User consent
Section titled Handle User consentEnsure user consent is handled for Contentsquare data collection, especially if you're implementing the SDK for the first time. See Privacy section.
Moreover if you need to obtain a specific end-user's consent for Session Replay or to start Session Replay data collection only under certain conditions (in specific geolocations for instance), see Define when Session Replay starts
Configure Session Replay masking
Section titled Configure Session Replay maskingMasking behavior
Section titled Masking behaviorBy default, the Contentsquare SDK is configured to mask all content displayed on the user interface (UI) to prevent unnecessary data collection. For more details, see what a fully masked screen looks like in Masking mechanisms.
For testing purposes, use this setup:
- Either unmasking all the content by setting the default masking status to false.
- Or unmasking most content with the Text and Image unmasking configuration ↗ in your Console parameters.
For more granular control in deployment mode, you can use the Text and Image unmasking configuration ↗ in your Console parameters in combination with SDK public masking APIs to fine-tune exactly which elements remain masked.
Configure Event-Triggered Replays (optional)
Section titled Configure Event-Triggered Replays (optional)If Event-Triggered Replays is included in your contract, you can set up ETR events to enable specific screen and session collection in Session Replay. See Event-Triggered Replays (ETR).
Configure Webviews (optional)
Section titled Configure Webviews (optional)If your mobile app includes Webviews, specific implementation steps are required to ensure they are properly reflected in Session Replay:
- Implement Webview tracking
- Handle personal data within WebViews
Configure custom fonts (optional)
Section titled Configure custom fonts (optional)To ensure UIKit text elements are rendered in Session Replay exactly as they appear in your app, you can add fonts in otf, ttf, woff, or woff2 formats directly from the player. See Managing iOS Fonts In The Player ↗ in the Help Center documentation.
Test your setup
Section titled Test your setupEnable Session Replay on your device
Section titled Enable Session Replay on your deviceIf the Session Replay sampling rate is less than 100%, only a portion of sessions are collected. To ensure data collection on your device for testing and debugging purposes, you can force it from the In-app Features settings by following these steps:
- Enable in-app features
- Open in-app features settings with a long press on the screenshot button
- Under "Session Replay", toggle "Enable Session Replay" on
- Kill the app
- Start app, a new session is starting with Session Replay enabled
How do I know if Session Replay is enabled?
Section titled How do I know if Session Replay is enabled?There are 2 places where you can check if Session Replay is enabled:
In the logs: The log Session Recording is starting will confirm that Session Replay is enabled.
In in-app features settings: Below the "Enable "will start at next app start" (see below Access the replay), you will either see:
No replay link availablewhich means Session Replay is not running for the current sessionGet Replay linkwhich means Session Replay is running for the current session
Access the Replay
Section titled Access the ReplayThe session can be accessed by tapping on Get replay link button from the in-app features settings:
The replay will be available within 5 minutes. Only the "ended screen views" are processed (we know a screenview is ended when we start receiving data for the next screenview). This means that you will be able to replay your session up to the previous screenview if the session is still running.
Define when Session Replay starts
Section titled Define when Session Replay startsIf you need to ensure that Session Replay data is collected only under certain conditions — for example, only after receiving explicit user consent for Session Replay or in specific geolocations — follow these instructions:
Disable Automatic Session Replay Initialization
Section titled Disable Automatic Session Replay Initialization- Deactivate SDK autostart as explained in Disabling Automatic SDK Initialization
- Call
Contentsquare.configure(options:)beforestart().
The initialization of the SDK should look like this:
Contentsquare.configure(options: .init(isSessionReplayAutoStartEnabled: false))Contentsquare.start()Start Session Replay
Section titled Start Session ReplayOnce your app has determined that Session Replay can start—for example, via a reverse geocoding service or after receiving specific user consent for Session Replay— you can call Contentsquare.startSessionReplay() to start Session Replay.
To confirm that Session Replay data collection has started, look for the appearance of the following log:
CSLIB ℹ️ Info: Session Recording is startingPersonal Data Masking
Section titled Personal Data MaskingThe Session Replay feature replays every interaction of your users with your app. To respect the user's right to privacy, the Contentsquare SDK:
- Masks everything by default
- Allows you to control which part of the user interface is collected via our Masking rules
Masking mechanisms
Section titled Masking mechanismsMasking depends on the type of element:
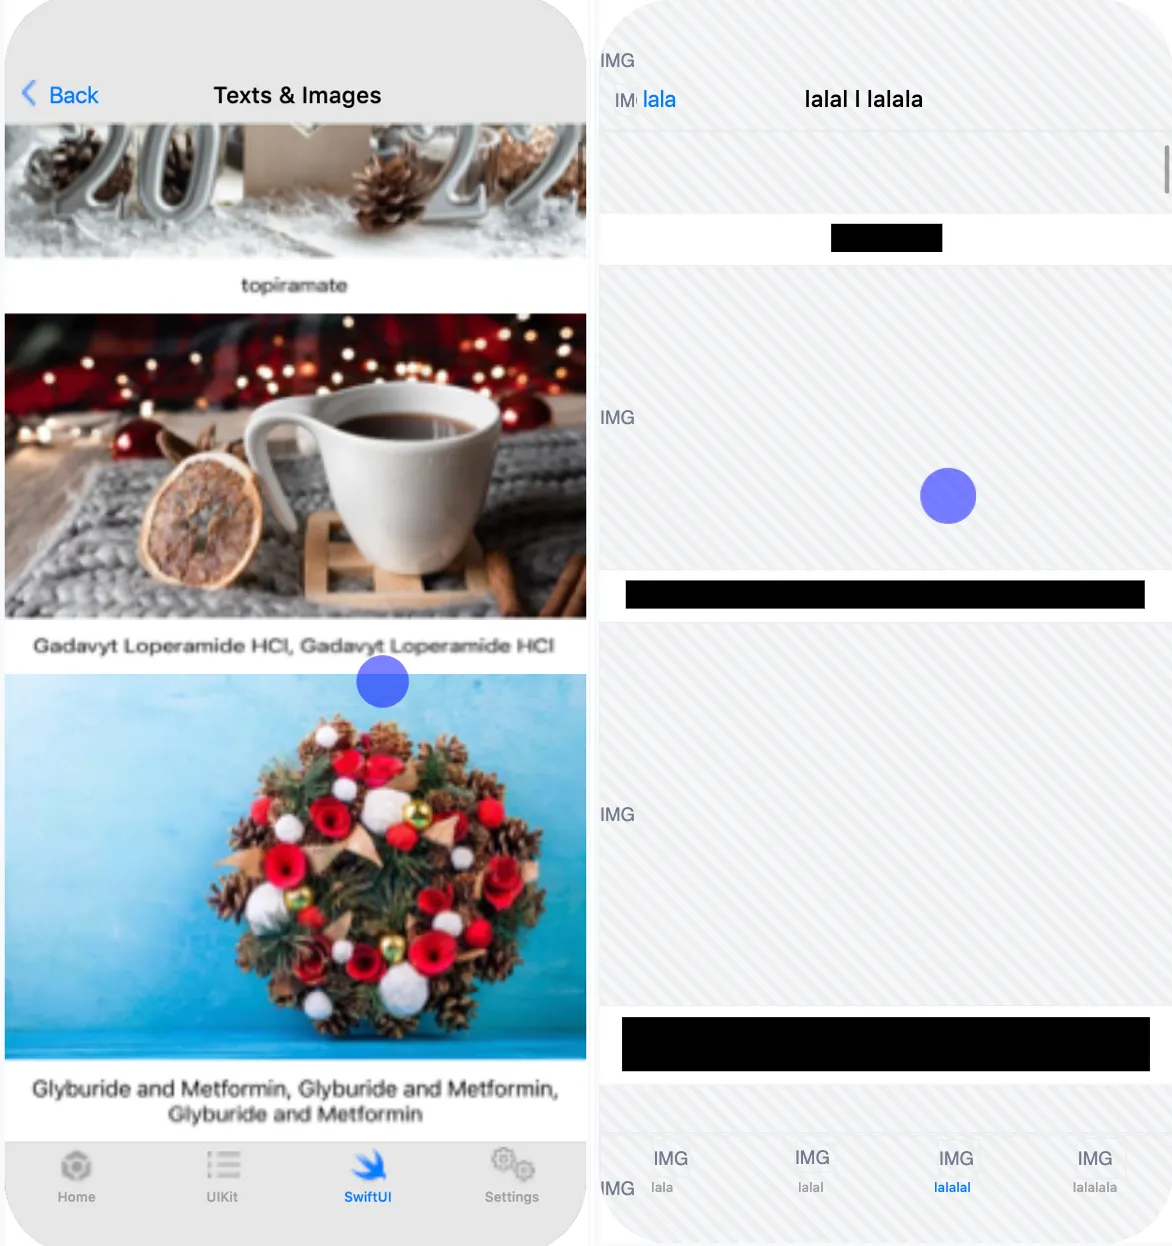
UIKit.UIImageandSwiftUI.Image: image isn't collected, a placeholder is sent instead of the content; the "IMG" placeholder will be displayed in the frame of the element.UIKit.UILabelandUIKit.UITextView: text is replaced by "la" repeated as many times as needed to equal the original character count. White characters are preserved. For instancethe lazy foxis collected aslal lala ala. All other visual properties are collected (text color, background color, alignment, etc.).UIKit.UITextField: same asUIKit.UILabelorUIKit.UITextViewunlessisSecureTextEntryis set totrue. In this case all characters, including whitespaces are replaced with "•".SwiftUI.Text: element is replaced by a black rectangle.- For all other types: no specific data is collected but all visual properties are collected: size, background color, corner radius, etc.
If you think a specific element can reveal personal data from one of these properties mask it using one of the methods presented below.
An efficient way to check how a view is rendered in the Session Replay is to navigate to the desired view with the CS SDK running then use the quick replay link.
Original vs Replay fully masked
Section titled Original vs Replay fully masked
Masking rules
Section titled Masking rulesMasking rules can be applied in two ways:
-
Through remote masking configuration in the CSQ Console (for admin users): this is managed directly in the Console and takes effect for all sessions as soon as the app is restarted or brought to the foreground. See How to customize masking rules from the Data Masking tab ↗ in the Help Center.
-
Using public masking APIs in the SDK (for mobile application developers): these APIs require developer implementation and will be applied only after the mobile app has gone through its release cycle.
The SDK determines whether views, images, and texts are masked according to the following rules, ranked from highest to lowest priority. Once a rule is triggered, the state is set, and subsequent rules are not applied.
General rules
Section titled General rules| Rules (highest to lowest priority) | Configured via |
|---|---|
| 1. The app or SDK version is fully masked | Data Masking tab in the CSQ Console ↗ |
| 2. Remote Text or Image masking is defined | Data Masking tab in the CSQ Console ↗ |
| 3. An instance is specifically masked or unmasked | API |
| 4. A parent is specifically masked or unmasked | API |
| 5. A type is masked or unmasked | API |
| 6. A parent type is masked or unmasked | API |
| 7. Remote Text or Image unmasking is defined | Data Masking tab in the CSQ Console ↗ |
| 8. Otherwise the default masking state is applied | API |
Text input fields rules
Section titled Text input fields rulesUIKit.UITextField, UIKit.UITextView and SwiftUI.TextField text inputs follow specific rules as the risk of leaking personal data is higher with these elements:
| Rules (highest to lowest priority) | Configured via |
|---|---|
| 1. The app or SDK version is fully masked | Data Masking tab in the CSQ Console ↗ |
| 2. Remote Text inputs masking is defined | Data Masking tab in the CSQ Console ↗ |
| 3. An instance is specifically masked or unmasked | API |
| 4. A type is masked or unmasked | API |
| 5. Otherwise a text input field remains masked | default |
Public masking APIs
Section titled Public masking APIsDefault masking
Section titled Default maskingAll iOS views and subclasses of UIView are fully masked by default.
The SDK provides an API to change the default masking state:
/// Change the masking state of all types of views./// - Parameter mask: true restores the default masking state./// false unmasks every type of views.static func setDefaultMasking(_ mask: Bool)Masking/Un-masking by instance
Section titled Masking/Un-masking by instanceUse mask(view:) and unmask(view:) methods to deal with a specific instance. Masking is applied recursively to all subviews unless specified otherwise (cf. Masking and Unmasking behaviors on a parent view).
Following the previous example on un-masking UIButtons: you are in default masking, the UIButton are unmasked but a screen shows a button, myButton, that contains sensitive information. You can mask it with mask(view: myButton).
Mask or unmask a SwiftUI View instance by using the following view modifier. Masking is applied recursively to all subviews unless specified otherwise (cf. Masking and Unmasking behaviors on a parent view).
@ViewBuilderfunc csMasking(_ shouldMask: Bool) -> some ViewMasking/Un-masking by type
Section titled Masking/Un-masking by typeAlthough the SDK allows masking elements by type for convenience but it isn't the recommended masking mechanism because it impacts all screens of your application.
Use this when you have a specific class for presenting user information or for displaying the user profile picture to make sure it always stays masked, for instance.
Use mask(viewsOfType:) and unmask(viewsOfType:) methods if you want to handle a specific type, whether system or custom.
Example: un-masking UIButtons:
If default masking is set to true, and you don't want any button to be masked, call unmask(viewsOfType: UIButton.self): to specify that all instances of UIButton and its subclasses should not be masked.
Mask or un-mask by type using the following methods:
/// Masks or unmasks all text elements.////// The text elements are `Text` for SwiftUI and `UILabel` for UIKitstatic func maskTexts(_ mask: Bool)/// Masks or unmasks all image elements.////// The image elements are `Image` for SwiftUI and `UIImageView` for UIKit.static func maskImages(_ mask: Bool)/// Masks or unmasks all text input elements.////// The text input elements are `TextField`, `SecureField`, `TextEditor` for SwiftUI/// and `UITextField`, `UITextView` for UIKit.///static func maskTextInputs(_ mask: Bool)Masking and Unmasking behaviors on a parent view
Section titled Masking and Unmasking behaviors on a parent viewUIKit
Section titled UIKitMasking is applied recursively to all children unless a specific rule has been applied to one of them. In this case, this rule also applies recursively.
Examples
Consider the following structure:
(parent view) ------------------------ | "Parent Label" | | | | (child view) | | -------------------- | | | "Child Label" | | | | | | | -------------------- | | | ------------------------Here's how the masking rules applied affect the parent and child labels:
| Rules applied | Parent Label | Child Label |
|---|---|---|
| No rule applied | Masked | Masked |
| Parent view unmasked | Unmasked | Unmasked |
| Parent view unmasked and child view masked | Unmasked | Masked |
| Default masking = false | Unmasked | Unmasked |
| Default masking = false and parent view masked | Masked | Masked |
See Masking rules.
Unmasking an instance when its type is masked
If you've masked UILabel types specifically or are in default masking, call unmask(view: myLabel) so that all UILabel instances are masked except myLabel.
Mask an instance when its type is unmasked
If you've unmasked the UILabel type specifically or are using default masking, call mask(view: myLabel) so that no UILabel is masked except myLabel.
Implementation recommendations
Section titled Implementation recommendationsMasking operations should always be performed before the target view is added to the window to avoid any Personal Data leak.
For instance, you can set up masking in the didFinishLaunching
callback of your app or if you need to change masking behavior while your app is launched: this
can be done in loadView, viewDidLoad or viewWillAppear if you use a ViewController.
Masking operations should be done as early as possible.
For masking by type, in the setup of your app for instance.
For masking by instance, in the body of your View by calling
the csMasking modifier.
Keeping track of what is masked
Section titled Keeping track of what is maskedThe SDK doesn't provide a list of what is currently masked, if you need to keep track, you probably will have to write your specific wrapper.
Masking operations performance impact
Section titled Masking operations performance impactRepeating the same operation has little to no impact. For example, you can call unmask(viewsOfType: UIButton.self) multiple times without impacting the SDK or your app performance.
Event-Triggered Replays (ETR)
Section titled Event-Triggered Replays (ETR)Event-Triggered Replays (ETR) is an add-on feature that allows you to selectively collect specific screens or sessions for Session Replay, based on predefined custom events. Once configured, ETR events can be used to filter specific replays, or view these events as they happen in the player event stream.
To enable ETR, contact your CSM or Implementation Manager. For more information, see Event-Triggered Replays ↗ in the Help Center.
Trigger Replay for the Session
Section titled Trigger Replay for the SessionUse the following function to trigger Session Replay for the entire current session, with the parameter name as "ETR event".
Contentsquare.triggerReplayForCurrentSession(name: name)Trigger Replay for the Screen
Section titled Trigger Replay for the ScreenUse the following function to trigger Session Replay for the entire current screen, with the parameter name as "ETR event".
Contentsquare.triggerReplayForCurrentScreen(name: name)Advanced features for Experience Monitoring
Section titled Advanced features for Experience MonitoringSend user identifier
Section titled Send user identifierContentsquare provides the ability to search for sessions associated with a specific visitor, based on an identifier: email, phone number, customer ID… As these values are typically personal data, from the moment the SDK is collecting the User Identifier, we immediately encode the value using a hashing algorithm so that the information is hidden and can never be accessed.
Use the following code to send a user identifier:
Contentsquare.sendUserIdentifier("any_identifier")When called, the SDK will log:
CSLIB ℹ️ Info: User identifier hashed sent {value}Sending a user identifier for each session
Section titled Sending a user identifier for each sessionYou may want to send the user identifier for each session. While triggering the user identifier at app launch will cover most cases, it will not be enough. A session can start when the app is put in foreground, after staying in background for more than 30 minutes. See Session definition section for more information.
That is why we also recommend sending the user identifier every time the app enters foreground.
You can use didBecomeActiveNotification notification ↗ and sceneDidBecomeActive(_:) callback ↗ to detect foreground and trigger a sendUserIdentifier().
Limitations
Section titled Limitations- User identifier max length is 100 characters (if the limit is exceeded, the user identifier will not be handled and you will see an error message in the Console/Logcat)
- Only the first 15 user identifiers per view will be processed on server side
- The SDK will trim and lowercase user identifier
- User identifier event are not visible in Log visualizer
Integrations
Section titled IntegrationsContentsquare provides the ability to retrieve the link of the replay to be attached to other vendors such as Voice of Customer or Crash reporting tools.
Get current replay Link
Section titled Get current replay LinkGenerate a link to the replay of the current session. This link can be pushed to any internal or 3rd-party tool as a custom property/variable. For instance, you can add the replay link to:
- Each user request sent to your customer service tool
- Each user voting in your Voice of Customer tool
- Each user session in your App Performance, Observability tool
- ...
You can register to replay link creation and updates using the following API:
Contentsquare.onSessionReplayLinkChange { link in self.currentCSReplayLink = link}When you call this API, the SDK logs:
CSLIB ℹ️ Info: Callback for SessionReplay link update is registered.To unregister the current callback, pass nil as the argument:
Contentsquare.onSessionReplayLinkChange(nil)When you call this API, the SDK logs:
CSLIB ℹ️ Info: Callback for SessionReplay link update is unregistered.When a new link is available, the SDK logs:
CSLIB ℹ️ Info: SessionReplay link updated: https://app.contentsquare.com/quick-playback/index.html?pid={projectId}&uu={userId}&sn={sessionNumber}&recordingType=csIf you have a Contentsquare account, you can use this link to directly watch your current Session Replay on the Contentsquare Platform.
The replay will be available within 5 minutes. Only the "ended screen views" are processed (we know a screenview is ended when we start receiving data for the next screenview). This means that you will be able to replay the session up to the previous screenview if the session is still running.
How Session Replay works
Section titled How Session Replay worksInitialization
Section titled InitializationSessions can be collected for Session Replay if the Session Replay feature has been enabled for your project and the session matches the collection criteria.
The following conditions will have an impact on which sessions will be collected:
- User consent: The users have given their consent (if required)
- Collection rate: The session is being drawn for collection (see Collection Rate below)
- Compatibility: The OS version is supported.
- App version: The app version is not part of the block list (see App version block list below)
When Session Replay is turned off, no content specific to Session Replay is collected whatsoever. The standard Contentsquare analytics tracking remains unaffected by this.
Collection rate
Section titled Collection rateSession Replay collection is based on a percentage of the total sessions. By default Session Replay collection is disabled.
During the early access phase, the percentage or collected sessions will be set to 1% at the beginning. It will then be adjusted according to:
- The traffic on your app
- The volume of collected sessions set in the contract
Compatibility
Section titled CompatibilitySee Compatibility.
App version block list
Section titled App version block listContentsquare team can add versions of your app in the block list to make sure Session Replay does not start on these versions. This is done when a problem is discovered on a specific version of your app, such as a Personal Data for which the masking was forgotten. This allows to keep Session Replay to work on the other app versions (especially the new ones with the fix).
Data Collection
Section titled Data CollectionThe SDK monitors the application lifecycle events and the view hierarchy, and generates Session Replay data from the behavior of the app, the content of the screen and the interaction of the user. These events are then locally stored, and eventually sent to our servers in batches. We then aggregate that data to create usable visual information into our Web Application, which you use to gather insights.
Quality levels
Section titled Quality levelsSession Replay has three quality levels available: High, Medium, Low. Quality level is defined by the frame rate and the image quality. The quality level is defined independently for Wi-Fi and Cellular Network. The default level for both is Medium. For more information on network data consumption see: Performance Impact section.
Quality level examples
Section titled Quality level examplesSelect the image to open it in full size and GIF format.

Network and Storage
Section titled Network and StorageBy default, Session Replay data can be sent over cellular network. If the particular context of your app or users requires a very limited impact on cellular data consumption, sending data over cellular network can be completely disabled. Once disabled, data will be sent when the device is using Wi-Fi.
Reach out to your Contentsquare contact that will make the adjustment in the project configuration.
Storage
Section titled StorageBefore being sent, data is stored in local files on disk up to 30MB on iOS and 20MB on Android. If the limit is reached, Session Replay is stopped. It will restart at the next app launch once the SDK is able to send the data.
Requests
Section titled RequestsThe maximum request size is 1Mbyte.
Requests are sent:
- Every 10 seconds
- At app hide
- When Replay Link API is called
Performance impact
Section titled Performance impactWe always strive to be non-intrusive, and transparent to the developers of the client app. We apply this rule on the performance as well. These are the technical specifics we can share on performance, if you have any questions feel free to reach out to us.
Performance impact mitigation
Section titled Performance impact mitigationMost operations related to Session Collection are performed on background threads, for the impact on the main thread to be minimal. To make sure of this, we run performance tests on testing applications, using XCTMetric and Hitch Time Ratio measures.
We also set up mechanisms that stop the Session Collection if we detect the feature is using too much memory.
We defined our network strategy to have the lesser impact on CPU and battery of the users devices. We measure these impacts, using Apple Dev Tools, for each release of our SDK.
Session Collection will also stop if we use up to 30Mbytes of local storage.
You can reduce the quality level if you want to favor performance impact over quality.
Performance test results
Section titled Performance test resultsThe following performance results were obtained under the following conditions:
| Condition | Value |
|---|---|
| Device model | iPhone 7 |
| iOS version | 15.7.8 |
| Test App built using Xcode version | 14.3.1 |
| Test App built with Swift version | 5.8 |
| Quality level | High |
| Default Masking State | Disabled |
We conducted the tests using a default Master-Detail app built using ad hoc distribution with no app thinning and with Swift symbols stripped. In the app, the SDK was making calls to the public APIs, running, and collecting data in its default state.
| Property | Value |
|---|---|
| Max CPU overhead | <10% |
| Max RAM usage | <5MB |
| Session Replay data transmitted over network during 1 minute of use | |
| - with "High quality" level | <2Mbytes |
| - with "Medium quality" level | <1Mbytes |
| - with "Low quality" level | <900Kbytes |
Known limitations
Section titled Known limitationsColor
Section titled ColorInit UIColor with Color ↗ doesn't work in dark mode.
Workaround: Use UIColor.init(named:) ↗.
Maps can potentially contain Personal Data and are therefore replaced by a placeholder with no ability to un-mask them.
NSAttributedString handling
Section titled NSAttributedString handlingThe extracted text doesn't support the expansion, obliqueness, paragraphStyle and textEffect attributes.
Multiline labels
Section titled Multiline labelsUIKit labels configured for multiple lines may overflow their bounding box, depending on the font and text length. A longer text increases the risks of causing an overlap with elements below (e.g.: other text, or image).
Multiple windows
Section titled Multiple windowsMulti-window is not supported.
System elements capture
Section titled System elements captureSystem elements are not collected. For instance, we do not collect:
UIImagePickerControllerSKStoreReviewController- All
AVFoundationcomponents such as:AVPlayerViewControllerfor videosAVCaptureVideoPreviewLayerfor camera
System elements masking
Section titled System elements maskingBottom line is that masking/unmasking any element is possible only if you have a reference or you know the type of the element that you want to mask.
Since the access to the instance/type of Alert and Menu components is not documented in Apple documentation ↗, developers cannot directly mask/unmask these components or parts of them with CS public masking APIs. However, there are workarounds to mask/unmask them, as described below.
Alerts
Section titled AlertsUIKit
Section titled UIKitA possible workaround to fully mask a UIKit Alert is to pass the UIAlertController view property to the mask(view:) and unmask(view:) APIs.
SwiftUI
Section titled SwiftUISwiftUI Alerts cannot be specifically masked or unmasked.
If the default masking is false and you want to mask an alert, a possible workaround is to mask all the app by changing the default masking to true when the alert appears and back to false when it disappears.
Menus
Section titled MenusMenus cannot be specifically masked or unmasked.
If the default masking is false and you want to mask a menu, a possible workaround is to mask all the app by changing the default masking to true when the menu appears and back to false when it disappears.
System images
Section titled System imagesImage(systemName: "pencil")On iOS 17.0 and later, system images are considered as text within the masking rules. Any system-provided images used in your app's UI is subject to the same privacy and masking regulations as text content.
Animations
Section titled AnimationsAnimations lasting longer than 35 ms may be partially rendered in the replay, potentially resulting in a broken or incomplete layout for the rest of the animation. This does not affect the rest of the session, and the app will render correctly again on the next user interaction or detected animation.
iOS 26 rendering
Section titled iOS 26 renderingRendering limitation of apps compiled with Xcode 26 and running on iOS 26 include:
- Some SwiftUI button backgrounds are not displayed correctly
- Liquid Glass design and transparency effects are not faithfully rendered
Apple Pay button
Section titled Apple Pay buttonThe Apple Pay button is not rendered in the replay and appears as blank space.
Troubleshooting
Section titled TroubleshootingRequests are not sent from an iOS simulator
Section titled Requests are not sent from an iOS simulatorIf you struggle to watch a replay collected on an emulator/simulator, it may be due to some network constraints applied on your computer (VPN, company network restrictions, etc.). Check your configuration or use a real device.
See Requests are failing for more information about our endpoints and requests.
Very long session on an iOS simulator
Section titled Very long session on an iOS simulatorIf you leave the simulator/emulator running with the app in foreground, the session will not end, even if you are inactive. This can lead to artificially long sessions (several hours). To better emulate actual user behavior, put the app in background or kill it.
Uncaught exception due to NSAttributedString
Section titled Uncaught exception due to NSAttributedStringIf the following exception is encountered: NSInvalidArgumentException: -[__NSCFType CGColor]: unrecognized selector sent to instance,
It is probably due to an Objective-C bridging issue in Foundation, which makes it possible to pass CGColor instances as values for the foregroundColor and strikeThroughColor attributes of a NSAttributedString.
While a UILabel with such an attributed string will be displayed correctly, its textColor attribute will have the wrong type, and the SDK won't be able to handle it, causing a crash in Session Replay.
Because of this, it is important to ensure that actual UIColor instances are passed as values, as per the official documentation ↗.