

Getting Started
Welcome to the SDK implementation guide!
This guide is designed to help you seamlessly integrate our SDK into your application. By following the outlined steps, you'll be able to collect and analyze data from your app, within just a few minutes.
Install the SDK
Section titled Install the SDKOur iOS SDK is shipped as a .xcframework which you need to add as a dependency of your project.
See Compatibility for more information.
Include the SDK
Section titled Include the SDKThe SDK requires Xcode 16.0 or later, if you are using older versions of Xcode reach out to your Contentsquare contact for more information.
-
In Xcode, add the following link via
File > Add Packages…:https://github.com/ContentSquare/CS_iOS_SDK.git -
To ensure the library can start properly you will need to add
-ObjCas a linker flag underBuild Settings>Linking>Other Linker Flags.
Our SDK can be linked dynamically or statically:
Dynamic linking
Section titled Dynamic linkingDynamic linking is the default behavior with use_frameworks!. Add the following line to your Podfile:
pod 'CS_iOS_SDK'Static linking
Section titled Static linkingIf you specify static linking in your Podfile with use_frameworks! :linkage => :static, follow these steps:
-
Add the following line to your Podfile:
Podfile pod 'CS_iOS_SDK_STATIC' -
To ensure the library can start properly you will need to add
-ObjCas a linker flag underBuild Settings>Linking>Other Linker Flags.
Known Issues
Section titled Known Issues-
Updating
IPHONEOS_DEPLOYMENT_TARGETin yourpost_installmay have the following error.dyld[47592]: Symbol not found: __ZN5swift34swift50override_conformsToProtocolEPKNS_14TargetMetadataINS_9InProcessEEEPKNS_24TargetProtocolDescriptorIS1_EEPFPKNS_18TargetWitnessTableIS1_EES4_S8_EReferenced from: XxxxWorkaround: Skip updating IPHONEOS_DEPLOYMENT_TARGET for SwiftProtobuf by following these steps.
-
Update your
post_installto:Podfile post_install do |installer|installer.pods_project.targets.each do |target|# Skip updating IPHONEOS_DEPLOYMENT_TARGET for SwiftProtobufnext if target.to_s == 'SwiftProtobuf'target.build_configurations.each do |config|config.build_settings['IPHONEOS_DEPLOYMENT_TARGET'] = 'XX.X'endendend -
Rerun
pod install. -
Clean Builder Folder.
-
Rebuild.
-
Our SDK can be linked dynamically or statically:
Dynamic linking
Section titled Dynamic linkingGet the manual integration framework
Section titled Get the manual integration framework- Go to the iOS SDK GitHub repository ↗.
- Find the newest version available (unless instructed otherwise by your CS contact).
- Under
Assetsyou should be able to findContentsquareModuleDynamicManually.xcframework.zip, download the file.
Include the framework
Section titled Include the framework- Unzip
ContentsquareModuleDynamicManually.xcframework.zipand you should see a folder namedContentsquareModulecontaining:ContentsquareModule.xcframeworkCSSwiftProtobuf.xcframeworkCSCrashReporter.xcframework
- Copy
ContentsquareModuleto any folder in your project. - In your
target->General->Frameworks, Libraries and Embedded Content, addContentsquareModule.xcframework,CSSwiftProtobuf.xcframeworkandCSCrashReporter.xcframeworkby clicking "+" -> "Add Other..." -> "Add Files...". - Clean build folder and run.
Static linking
Section titled Static linkingGet the manual integration framework
Section titled Get the manual integration framework- Go to the iOS SDK GitHub repository ↗.
- Find the newest version available (unless instructed otherwise by your CS contact).
- Under
Assetsyou should be able to findContentsquareModuleStaticManually.xcframework.zip, download the file.
Include the framework
Section titled Include the framework- Unzip
ContentsquareModuleStaticManually.xcframework.zipand you should see a folder namedContentsquareModulecontaining:ContentsquareModule.xcframeworkResources/ContentsquareBundle.bundleCSSwiftProtobuf.xcframeworkCSCrashReporter.xcframework
- Copy
ContentsquareModuleto any folder in your project. - In your
target->General->Frameworks, Libraries and Embedded Content, addContentsquareModule.xcframework,CSSwiftProtobuf.xcframeworkandCSCrashReporter.xcframeworkby clicking "+" -> "Add Other..." -> "Add Files...". - Add
ContentsquareBundle.bundleto your target, make sure it has been added to yourtarget->Build Phases->Copy Bundle Resources. - To ensure the library can start properly you will need to add
-ObjCas a linker flag underBuild Settings>Linking>Other Linker Flags. - Clean build folder and run.
The SDK autostarts when your application launches, requiring no manual initialization.
Validate SDK integration
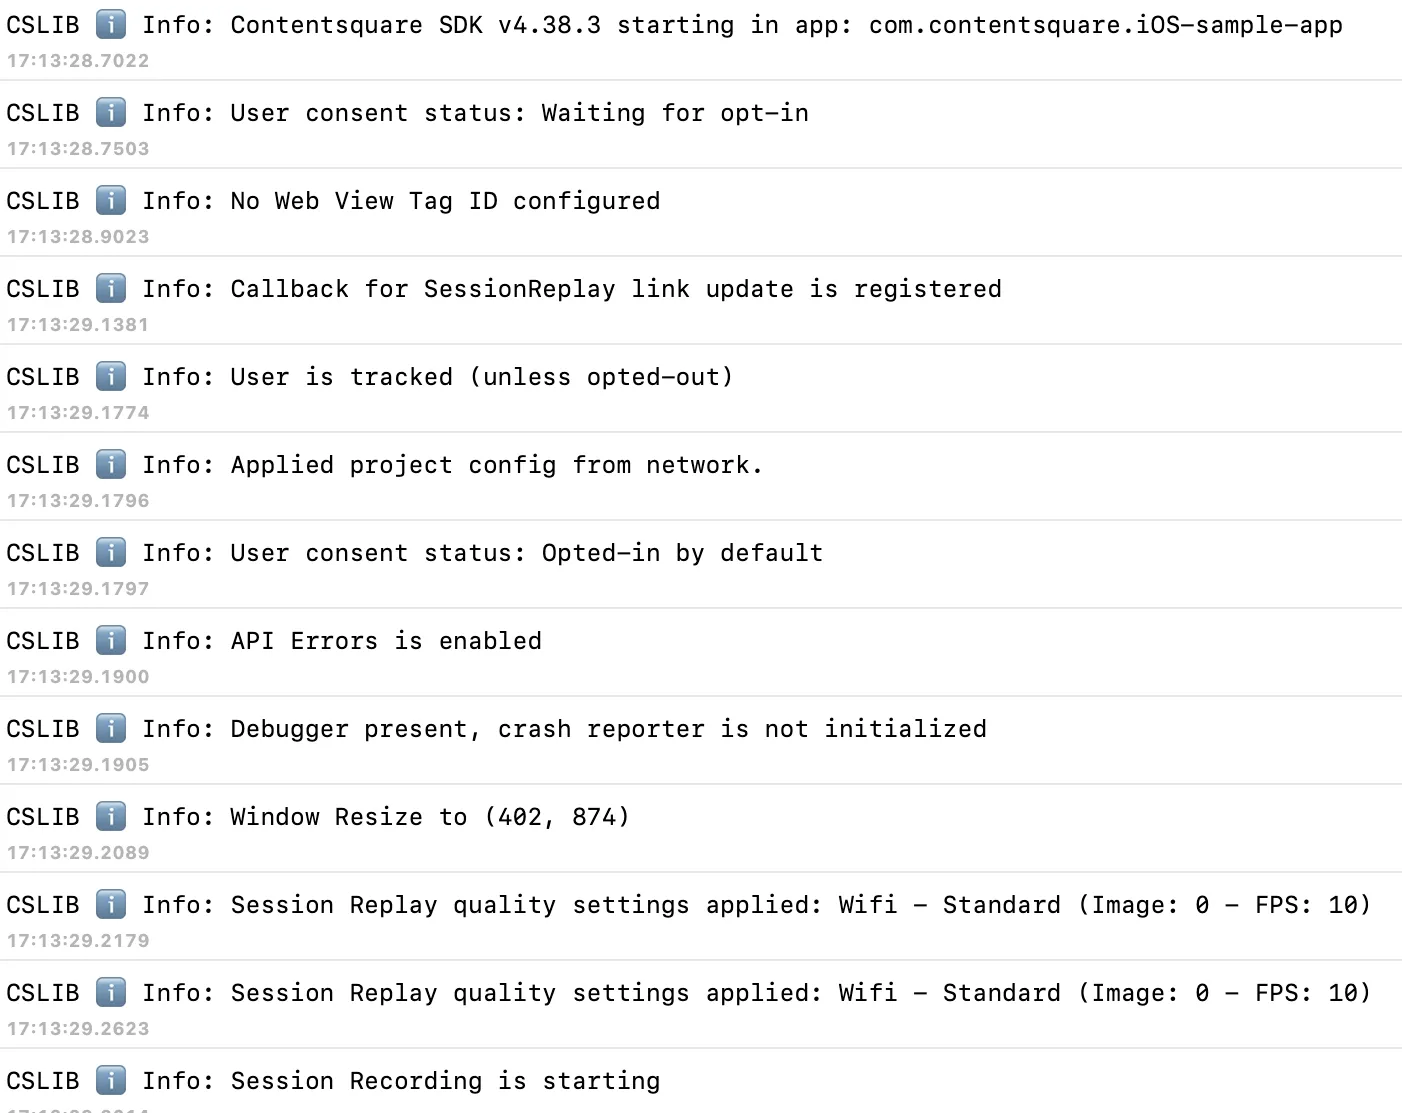
Section titled Validate SDK integrationStart your application, and check logs for this output:
CSLIB ℹ️ Info: Contentsquare SDK v4.50.0 starting in app: com.example.testappCheck the logs
Section titled Check the logsContentsquare provides logging capabilities that allow you to inspect the raw event data logged by your app in Xcode, the macOS Console app, or on the Contentsquare platform.
To view all logs, you must enable in-app features: logging is linked to in-app features being enabled or disabled.
Viewing logs in Xcode or the Console app
Section titled Viewing logs in Xcode or the Console appTo view SDK logs:
-
If using an actual device, make sure it is plugged to your Mac or is on the same Wi-Fi network.
-
Start the macOS Console app or Xcode.
If using the Console app, make sure that info messages are included: Choose Action > Include Info Messages ↗.
-
Filter logs by
CSLIB
Implement in-app features
Section titled Implement in-app featuresIn-app features are essential for your implementation, as it includes key functionalities like screenshot creation and replay configuration.
To allow Contentsquare users to enable in-app features:
1. Add the custom URL scheme in your app Info
Section titled 1. Add the custom URL scheme in your app InfoYou have to allow your app to be opened via a custom URL scheme which can be done using one of the following methods:
Xcode
Section titled Xcode- Open your project settings
- Select the app target
- Select the
Infosettings - Scroll to
URL Types - Set the URL scheme to
cs-$(PRODUCT_BUNDLE_IDENTIFIER)
Text editor
Section titled Text editor-
Open the
Info.plistof your project -
Add the following snippet:
Info.plist <key>CFBundleURLTypes</key><array><dict><key>CFBundleURLSchemes</key><array><string>cs-$(PRODUCT_BUNDLE_IDENTIFIER)</string></array></dict></array>
2. Call the SDK when the app is launched via a deeplink
Section titled 2. Call the SDK when the app is launched via a deeplinkDepending on the project, there are multiple ways to handle the deeplink opening. Choose the method matching your project structure:
In your AppDelegate class, complete or implement the function application(app, open url:, options:) with: Contentsquare.handle(url: url)
In your WindowSceneDelegate class, you need to:
-
Update
func scene(_ scene: UIScene, willConnectTo session: UISceneSession, options connectionOptions: UIScene.ConnectionOptions)with:if let url = connectionOptions.urlContexts.first?.url {Contentsquare.handle(url: url)} -
Complete or implement
func scene(_ scene: UIScene, openURLContexts URLContexts: Set<UIOpenURLContext>)with:if let url = URLContexts.first?.url {Contentsquare.handle(url: url)}
In the body of your main App struct, add the onOpenURL modifier and call the Contentsquare SDK to handle the URL:
@mainstruct MyApp: App { var body: some Scene { WindowGroup { MyView() .onOpenURL { url in Contentsquare.handle(url: url) } } }}Enable in-app features
Section titled Enable in-app featuresOn a device: scan the QR code
Section titled On a device: scan the QR codeIn Contentsquare, select the Mobile icon in the menu top bar and scan the QR code with your phone.
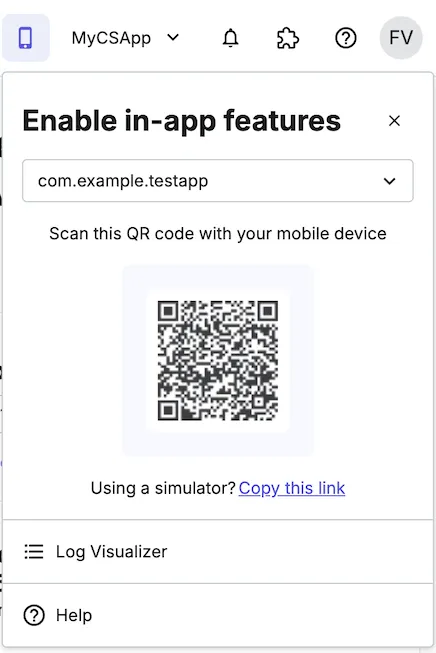
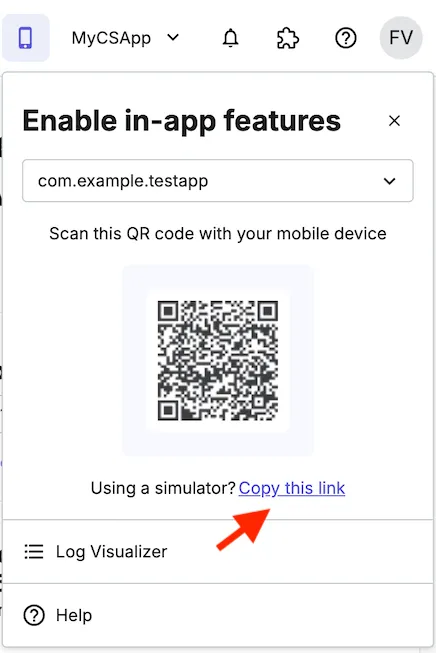
On a simulator: with the custom link
Section titled On a simulator: with the custom linkIf you are using a simulator, use the custom link to enable in-app features.
In Contentsquare, select the Mobile icon in the menu top bar then select your Bundle ID, and select "Copy this link". Paste it in Safari on your simulator to trigger the in-app features.
On a simulator: with the Terminal
Section titled On a simulator: with the TerminalIn a Terminal console, open a URL in your current simulator with the following command (replacing CUSTOM_LINK with yours):
xcrun simctl openurl booted "CUSTOM_LINK"Contentsquare Log Visualizer
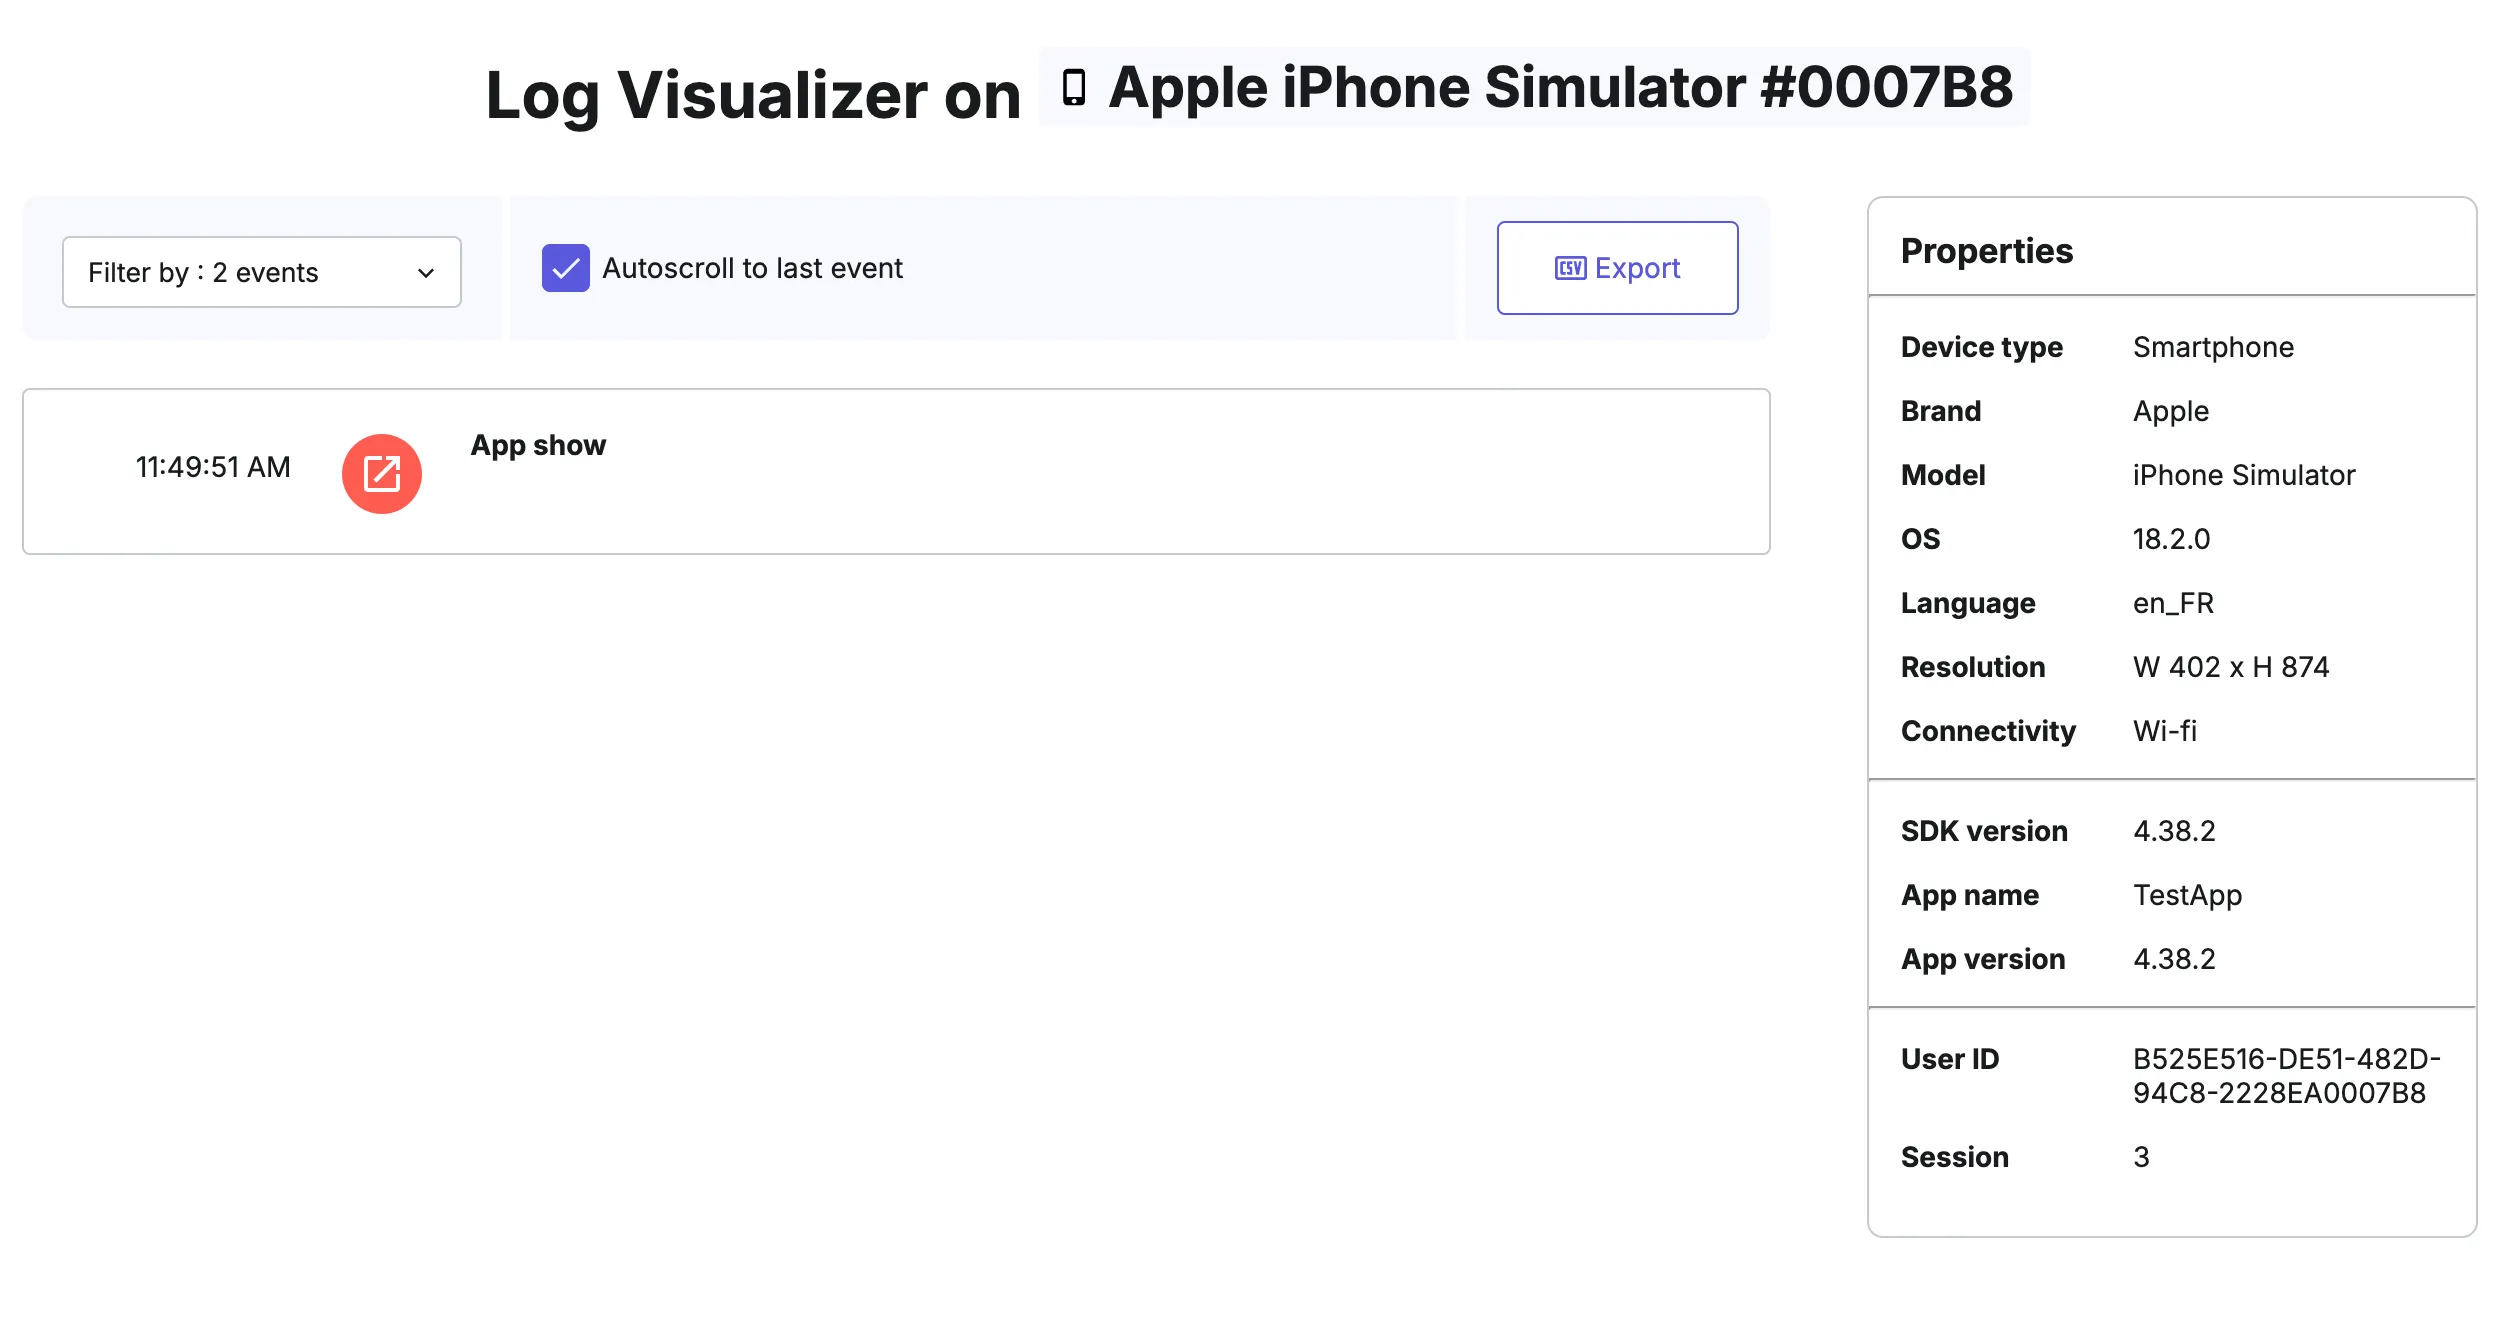
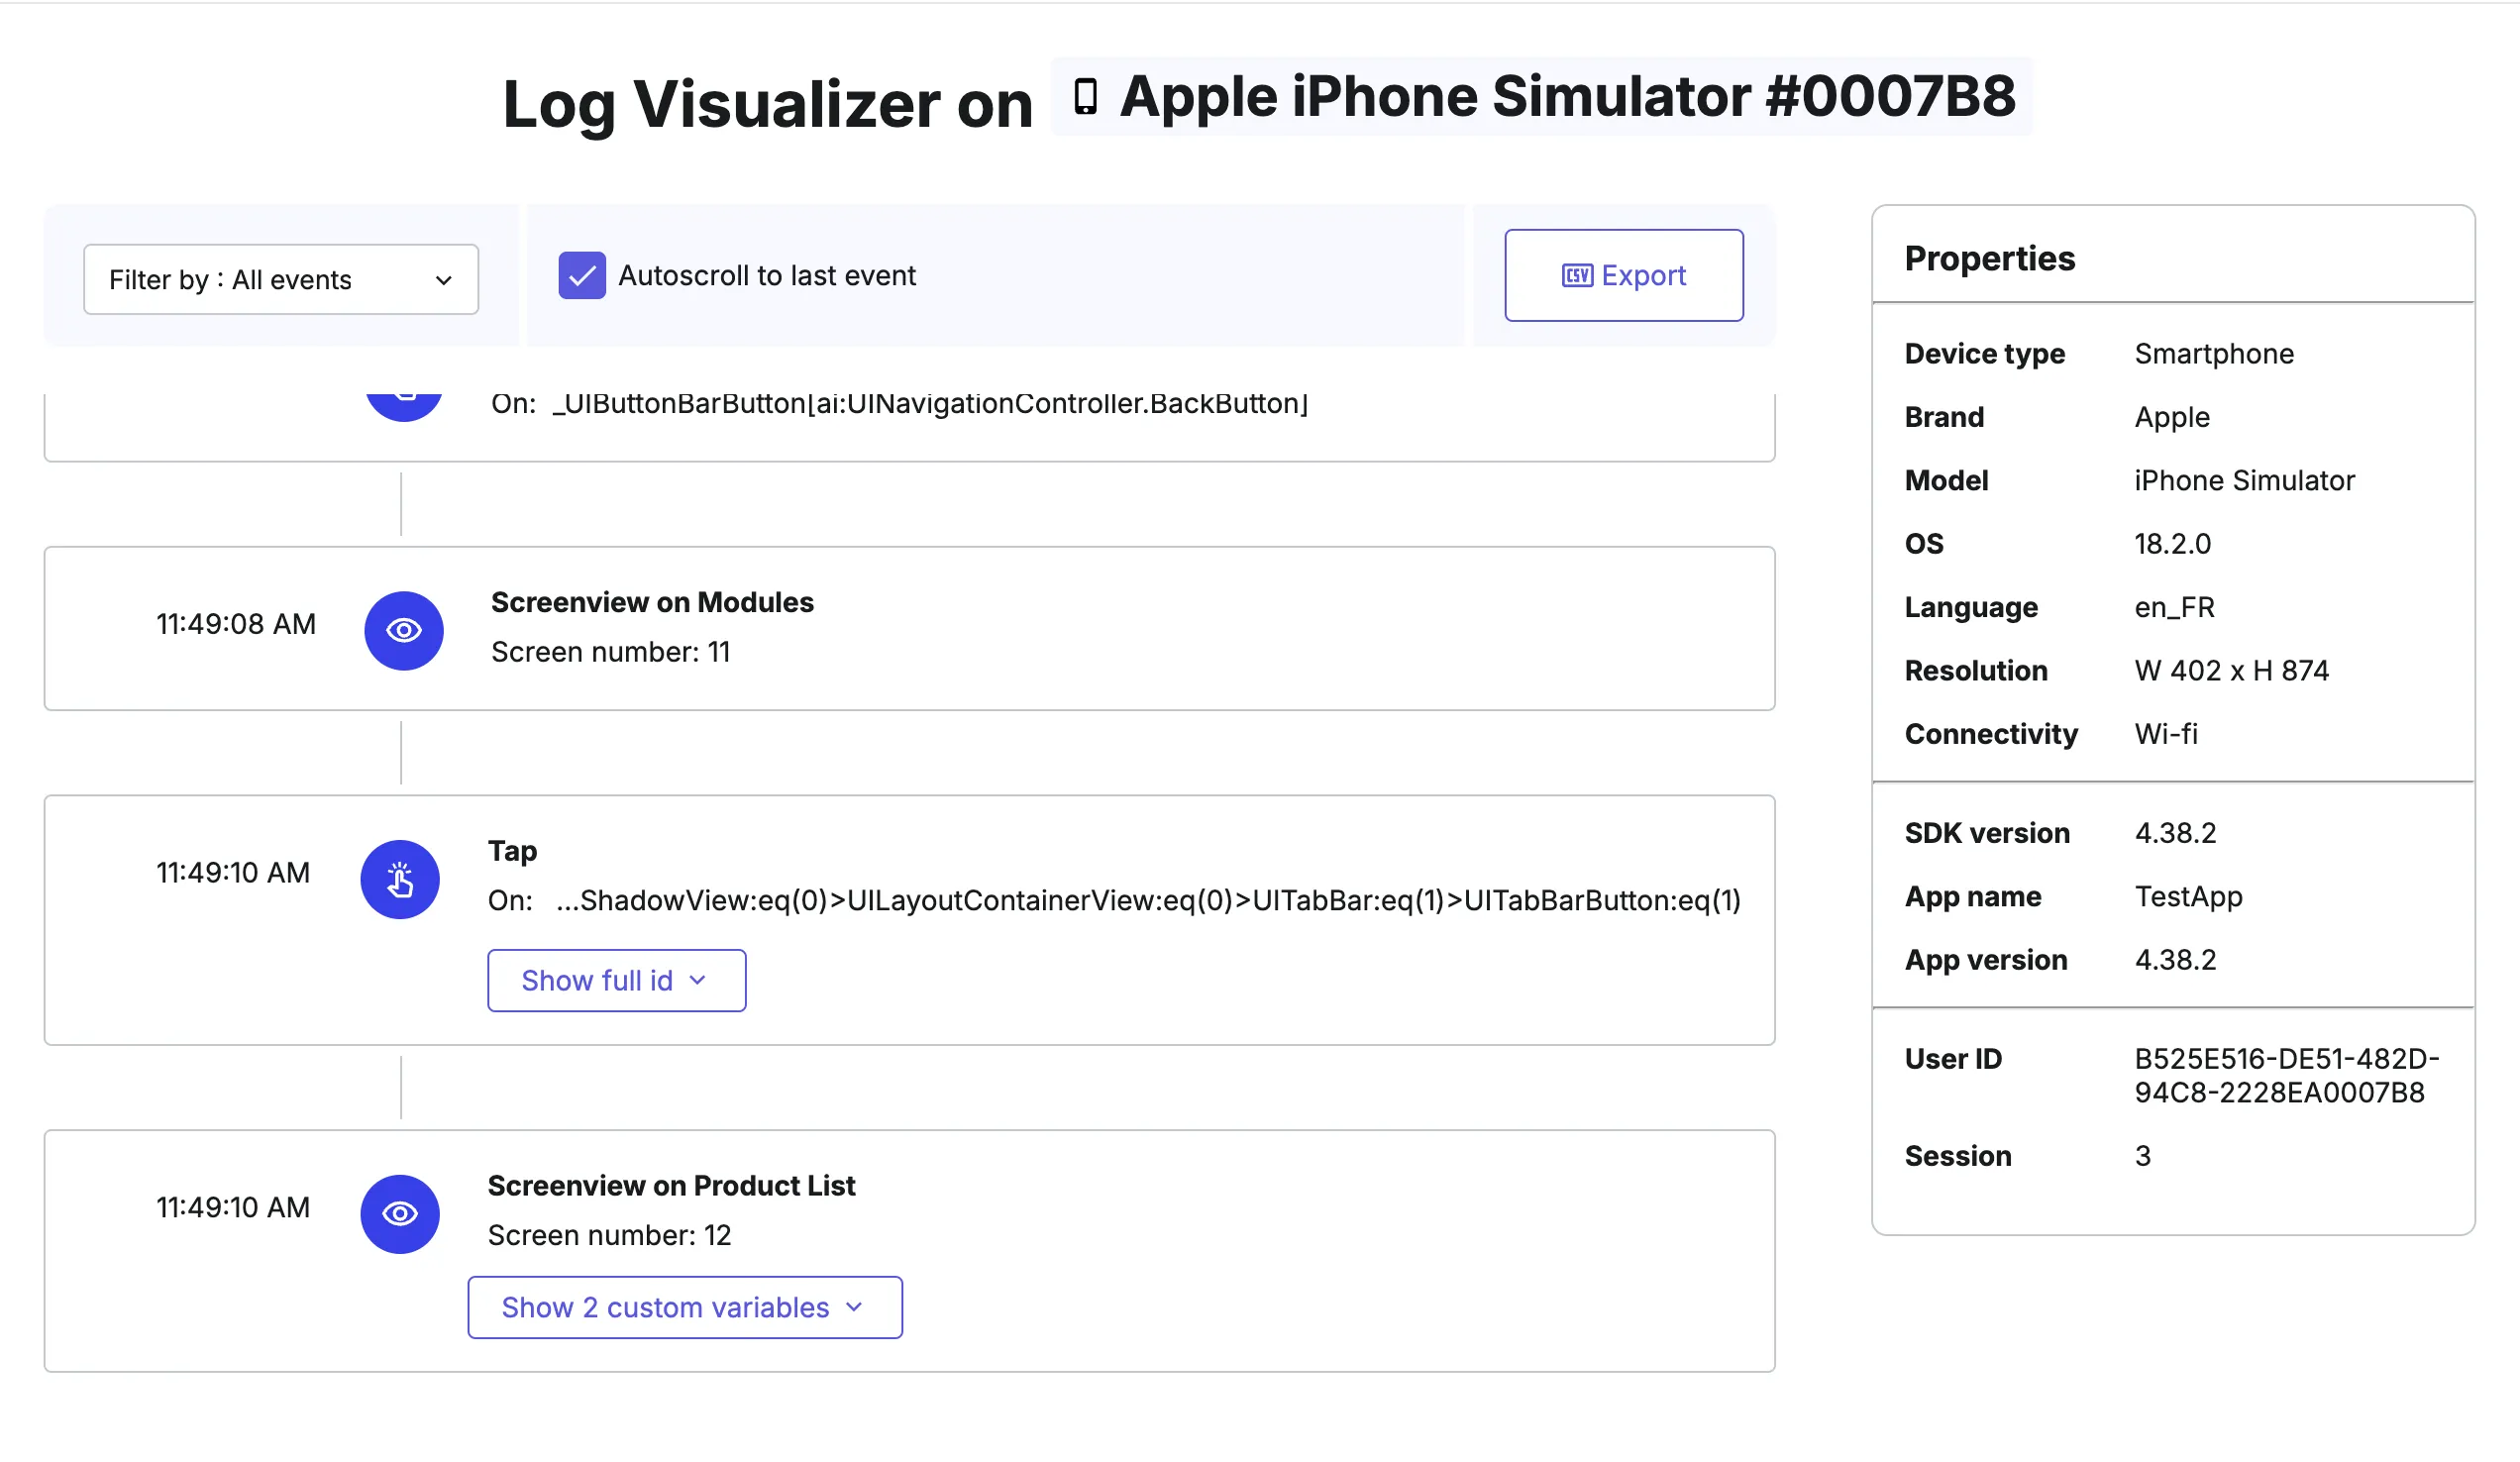
Section titled Contentsquare Log VisualizerLog Visualizer is a feature integrated into the Contentsquare SDK. As you navigate and interact with your app, it provides a live view of events detected by the SDK, visible directly on the Contentsquare platform ↗.
- Start your app.
- Select the Mobile icon in the menu top bar then select
Log Visualizer. - Select the device to inspect.
At this stage, you should see an 'App start' or 'App show' event being logged.
Get user consent
Section titled Get user consentContentsquare collects usage data from your app users. To start tracking, you need your users' consent for being tracked.
User opt-in
Section titled User opt-inThe SDK treats users as opted-out by default.
To start tracking, forward user consent with optIn().
Calling this method generates a user ID and initiates tracking.
Handle user consent by implementing a UI for privacy preferences.
Contentsquare.optIn()[Contentsquare optIn];Track your first screens
Section titled Track your first screensContentsquare aggregates the user behavior and engagement at the screen level. Start your SDK implementation by tracking key screens like the home screen, product list, product details, or conversion funnel.
Sending screenview events
Section titled Sending screenview eventsScreen tracking is achieved by sending a screenview event each time a new screen is displayed on the user's device.
As a general rule of thumb, you should send your screenviews in viewWillAppear(_ animate: Bool) when using UIKit, in .onAppear() when using SwiftUI.
import ContentsquareModule
Contentsquare.send(screenViewWithName: String, cvars: [CustomVar] = [])
@import ContentsquareModule;
[Contentsquare sendWithScreenViewWithName:(NSString * _Nonnull)];// or[Contentsquare sendWithScreenViewWithName:(NSString * _Nonnull) cvars:(NSArray<CustomVar *> * _Nonnull)]; // To add custom variables to screen trackingImplementation recommendations
Section titled Implementation recommendationsFrom a functional perspective, a screenview should be triggered in the following cases:
- When the screen appears on the device
- When a modal or pop-up is displayed
- When a modal or pop-up is closed, returning the user to the screen
- When the app is brought back to the foreground (after being minimized)
Tracking app launch
Section titled Tracking app launchMost events collected by the SDK require a screenview event to be sent first so they can be associated with that screen; otherwise, they will be discarded. If you need to collect events from the moment the app launches, you should trigger a screenview event immediately after the SDK has started.
Refer to our guide for implementation examples.
Screen name handling
Section titled Screen name handlingIt is necessary to provide a name for each screen when calling the screenview API.
As a general rule, keep distinct screen names under 100. As they are used to map your app in Contentsquare, you will want something comprehensive. The screen name length is not limited on the SDK side. However, the limit is 2083 characters on the server side.
More on screen name handling.
Test your setup
Section titled Test your setupTesting your SDK implementation is essential to make sure data is being accurately captured and reported.
To test your setup, simulate user interactions in your app and check that the events are logged correctly in our analytics platform.
You can also use debugging tools such as Xcode, macOS Console App, or Log Visualizer to monitor data transmission and ensure everything is running smoothly.
Visualize events in Contentsquare
Section titled Visualize events in ContentsquareUse Log Visualizer to view incoming events within the Contentsquare pipeline. This allows you to monitor the stream in real time.
By simulating user activity, you see incoming screenview and gesture events.
Visualize data in Contentsquare
Section titled Visualize data in ContentsquareIn Journey Analysis
Section titled In Journey AnalysisOpen Journey Analysis ↗ in Contentsquare and visualize the user journeys main steps across your app, screen by screen.
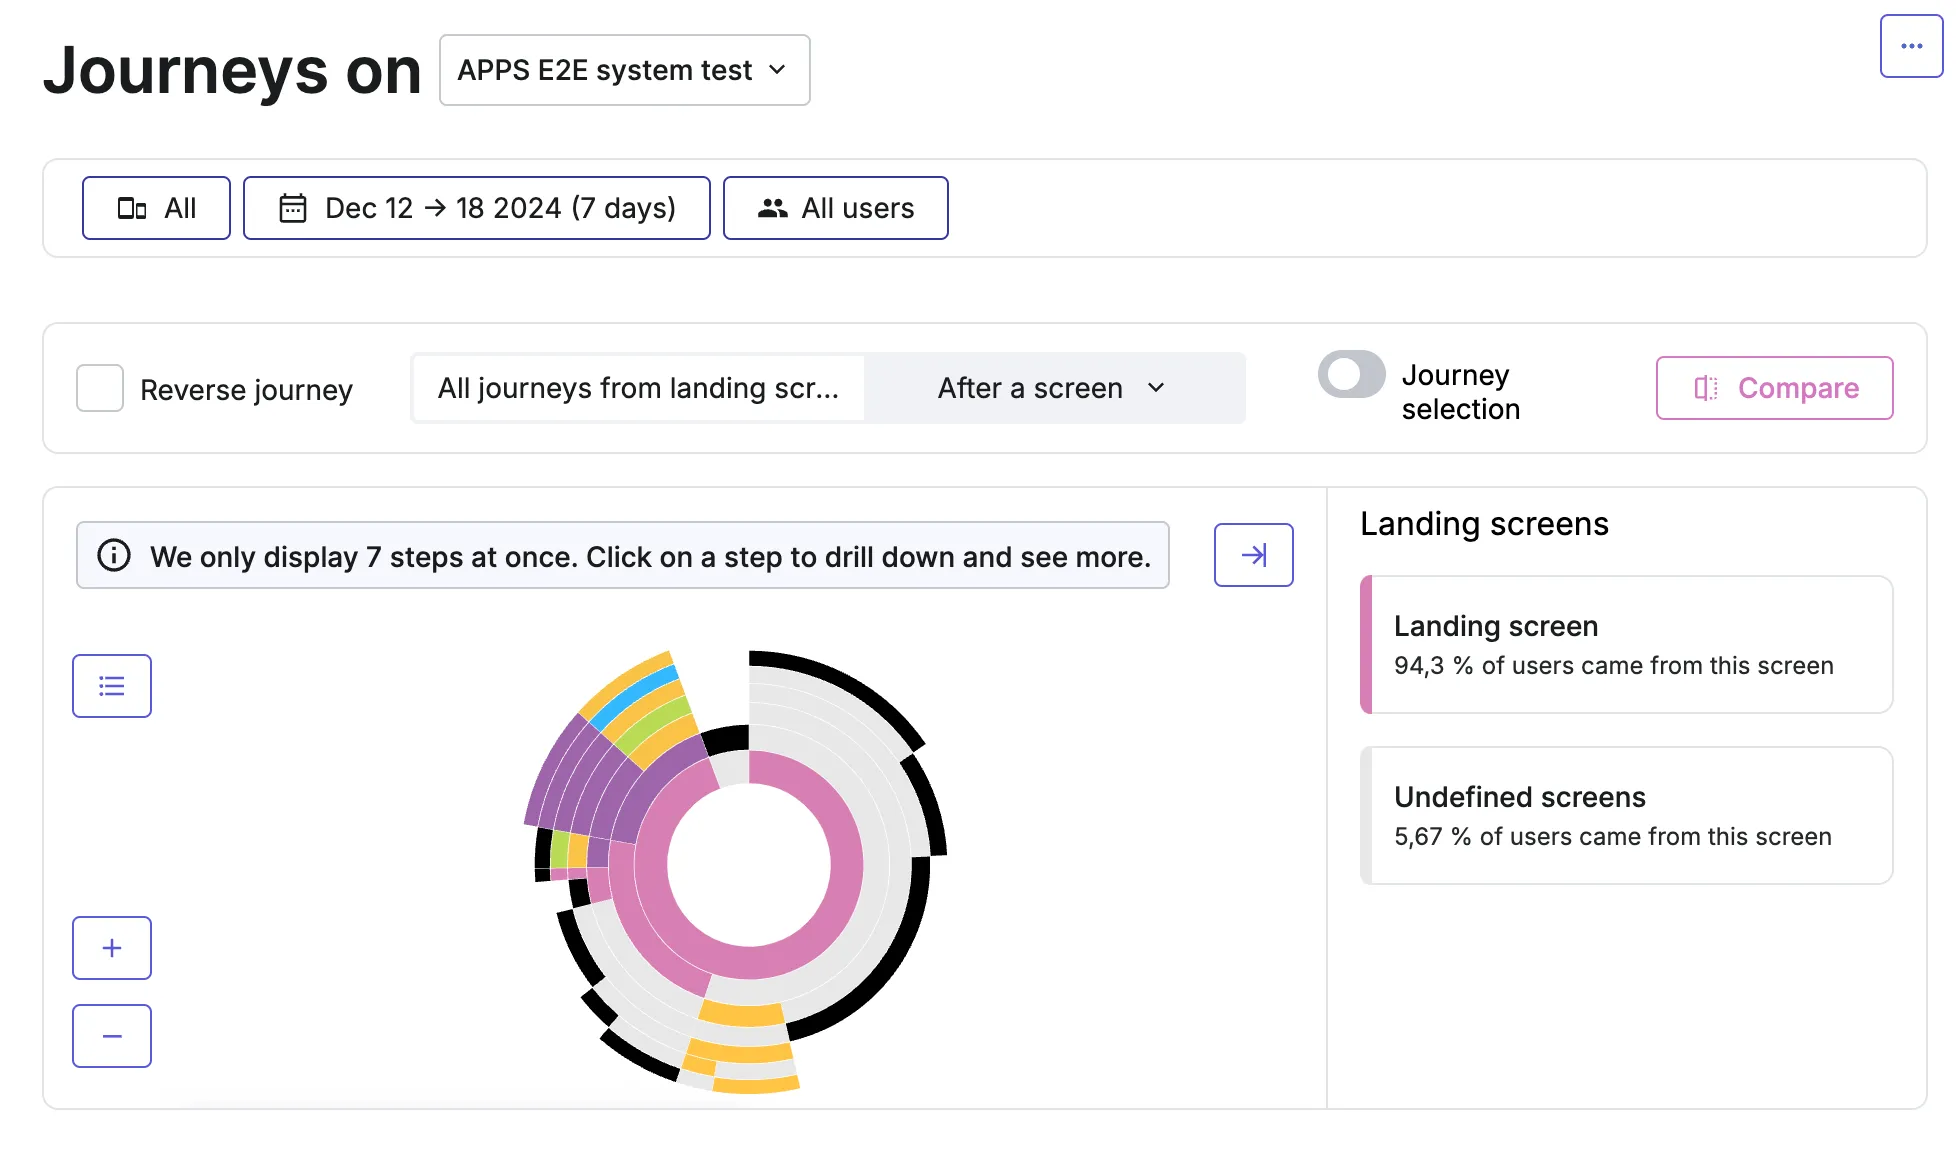
See how to use Journey Analysis on the Help Center ↗.
In Session Replay
Section titled In Session ReplayOpen Session Replay ↗ in Contentsquare and replay the full user session across your app.
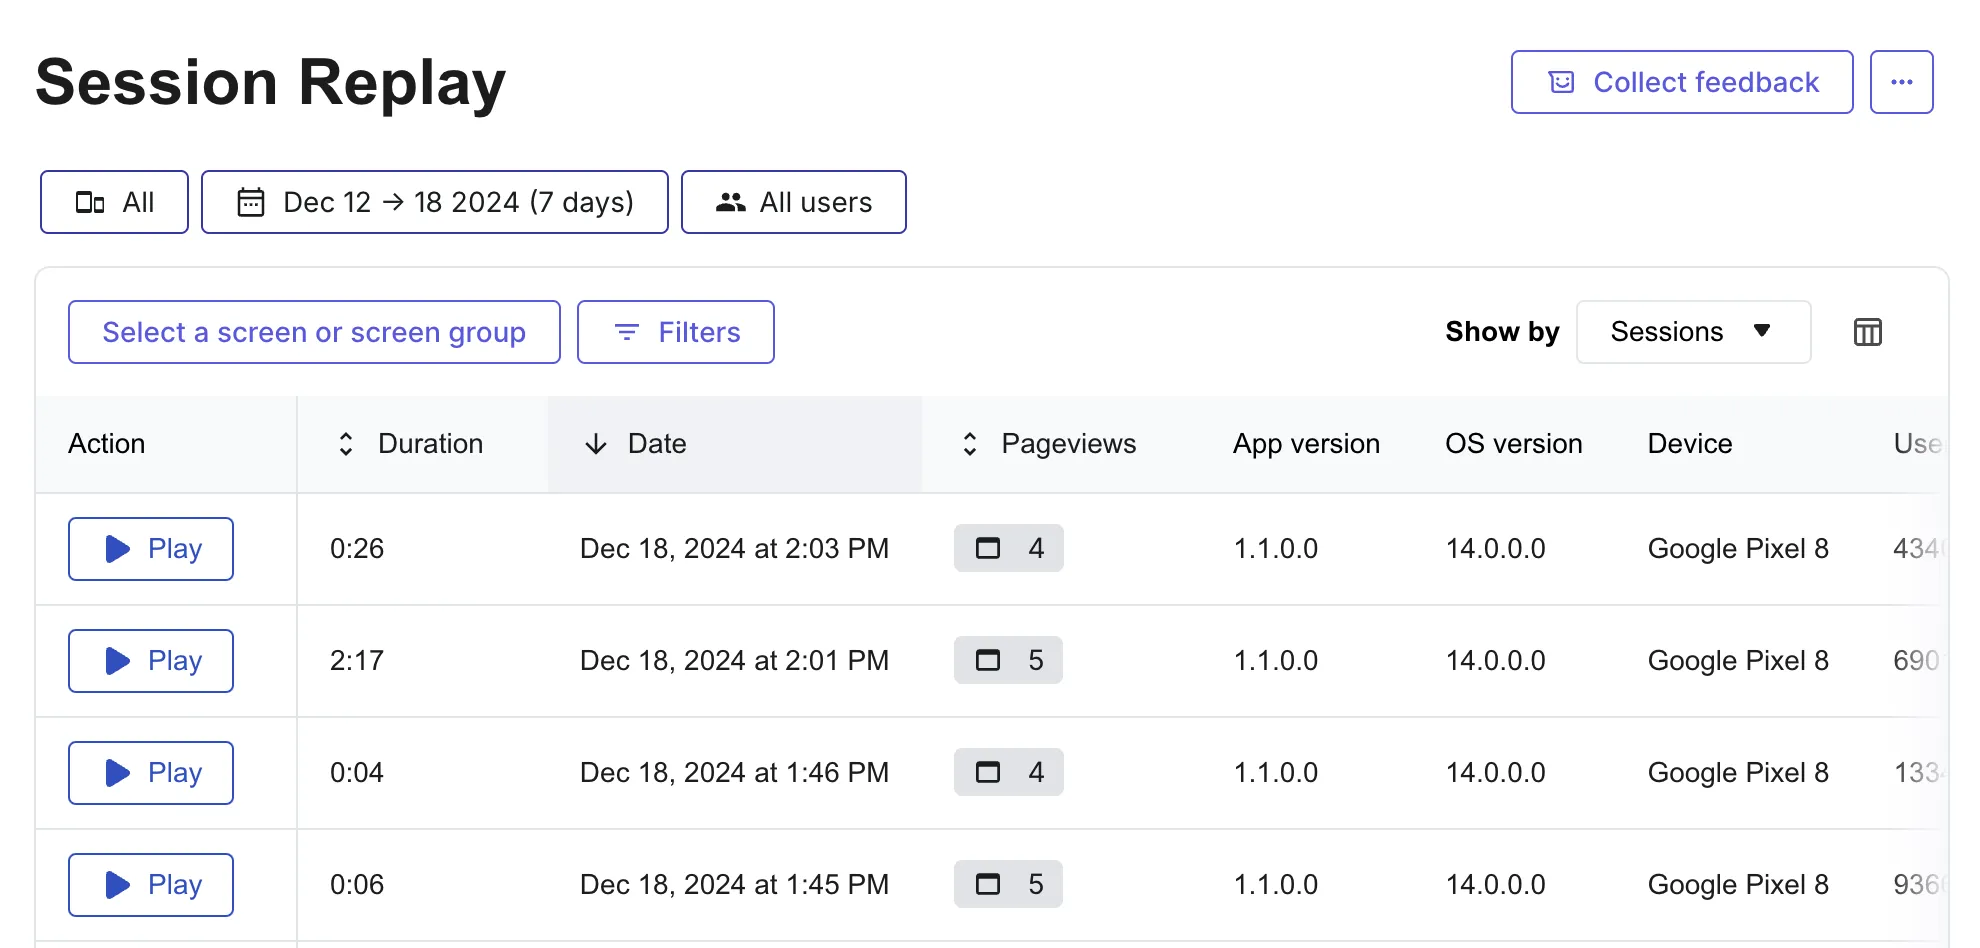
See how to use Session Replay on the Help Center ↗
Sample app
Section titled Sample appTo explore some of these features in context, check our iOS sample app.
iOS-sample-app
A sample app giving an example implementation of the Contentsquare SDK
Next Steps
Section titled Next StepsWhile screen tracking gives an overview of user navigation, capturing session, screen, or user metadata provides a deeper understanding of the context behind user behavior.
Our SDK offers a wide range of features to enhance your implementation, including Session Replay, Error Monitoring, extended tracking capabilities, and personal data masking.
Proceed with these how-to's to refine your implementation.