

Set up the extension
This page will guide you to set up Mobile Experience Analytics Extension for Contentsquare Product Analytics.
This will supercharge the Product Analytics platform with:
- Powerful Session Replay
- Analysis capabilities of Mobile API Errors and Crashes
This guide assumes that you have already implemented the CSQ SDK for Product Analytics.
Enable the extension in the Product Analytics UI
Section titled Enable the extension in the Product Analytics UI- In Product Analytics, navigate to Account > Manage > Replays & Heatmaps.
- If this is your first time setting up Session Replay, select the checkbox to accept the terms and conditions.
- Click Add web or mobile app to launch the setup wizard. There is one configuration per app.
- Select Mobile as platform.
- Give your app a name and choose a storage location (US or EU).
- Set a sampling rate for how many sessions to record.
- Configure replay settings:
- App ID: enter the bundle ID of your app (for example,
com.companyname.appname). - Quality Settings: choose the recording fidelity for Wi-Fi and Cellular connections. The default for both is Medium; keep Cellular equal to or lower than Wi-Fi.
- User Consent: enable this if your app requires explicit opt-in before recording. See Privacy docs for the opt-in API.
- App ID: enter the bundle ID of your app (for example,
- Click Save and Continue to finish the wizard.
Enable error and crash collection
Section titled Enable error and crash collectionError and crash collection is managed separately from the setup wizard. Navigate to Account > Manage > Replays & Heatmaps, click Edit next to your app configuration, then scroll to the relevant section under General Settings:
- Error Capture: toggles for API Errors and Custom Errors.
- Crashes Capture: toggle for Crashes.
Click Save when finished.
Session Replay masking
Section titled Session Replay maskingThe Session Replay feature replays every interaction of your users with your app. To respect the user's right to privacy, the CSQ SDK:
- Masks everything by default
- Allows you to control which part of the user interface is collected via our Masking rules
Masking mechanisms
Section titled Masking mechanismsAlthough the implementation is done once for both iOS and Android on React Native, the visual appearance of the masking itself will be different for each platform:
Every single UI element is converted into a highly pixelated image to reach a very low resolution. Text and images will appear very blurry so that the content cannot be identified.
Original vs Replay fully masked
Section titled Original vs Replay fully masked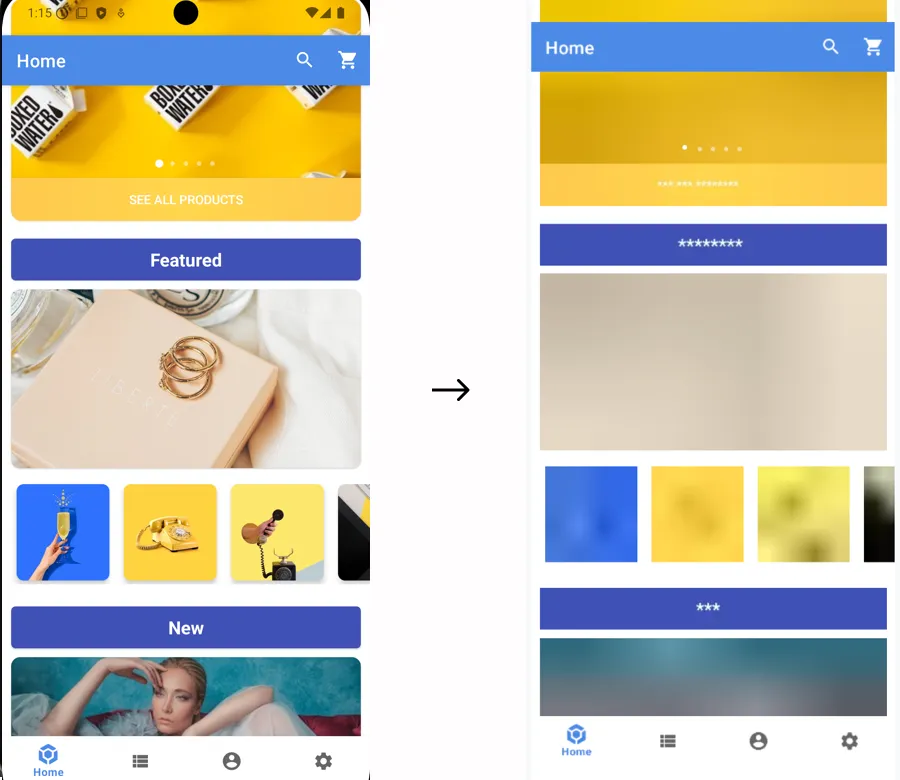
- Images are not collected, a placeholder is sent instead of the content; the "IMG" placeholder will be displayed in the frame of the element.
- Text: text is replaced by "la" repeated as many times as needed to equal the original character count. White characters are preserved. For instance
the lazy foxis collected aslal lala ala. All other visual properties are collected (text color, background color, alignment, etc.). - TextFields: same as Text
- For all other types: no specific data is collected but visual properties are collected. If you think a specific element can reveal personal data from one of these properties you have to mask it using one of the methods presented below. A good way to check how a view is rendered in replays is to navigate to the desired view with the CS SDK running then use the quick replay link.
Original vs Replay fully masked
Section titled Original vs Replay fully masked
Masking rules
Section titled Masking rulesMasking rules can be applied in two ways:
- Through remote masking configuration in the CSQ Console (for admin users): These configurations are managed directly in the Console and take effect for all sessions as soon as the app is restarted or brought to the foreground See How to customize masking rules from the Data Masking tab ↗ in the Help Center.
- Using public masking APIs in the SDK (for mobile application developers): These configurations require developer implementation and will be applied only after the mobile app has gone through its release cycle.
Masking rules set via the CSQ Console or the public APIs are applied according to different priorities, as described below. The SDK determines whether a view is masked by evaluating the rules in the order specified below. Once a rule is triggered, the state is set, and subsequent rules are not applied:
| Priority | Rule | Configured via |
|---|---|---|
| 1 | The app or SDK version is fully masked | Data Masking tab in the CSQ Console ↗ |
| 2 | A component is specifically masked or unmasked | API |
| 3 | A parent is specifically masked or unmasked | API |
| 4 | Otherwise the default masking state is applied | API |
Public masking APIs
Section titled Public masking APIsDefault masking
Section titled Default maskingAll components are initially masked by default. To modify this default masking state, use the setDefaultMasking API, preferably within a useEffect in the root file (such as App.js). This ensures proper initialization and handling when the component mounts.
If you choose to unmask the entire app using the setDefaultMasking API, be aware that you will need to individually mask all personal data within the app. Additionally, ensure that you consistently mask personal data on new screens in the future, if necessary.
import { CSQ } from '@contentsquare/react-native-bridge';
useEffect(() => { CSQ.setDefaultMasking(false); // Unmask all content}, []);Masking/Unmasking Specific Component
Section titled Masking/Unmasking Specific ComponentUse <CSQMask isSessionReplayMasked={true}> (default) to mask or {false} to unmask all children components.
In this example below, all children views inside <CSQMask> will follow the rule of the closest parent prop isSessionReplayMasked.
import { CSQMask } from '@contentsquare/react-native-bridge';
// Masks all child components<CSQMask isSessionReplayMasked={true}>  <View>    <Text style={styles.title}>Buy my amazing merch!</Text>    <Text>      Hurry up! This offer won't be available tomorrow. Only $99.98 to get your hands on a      wonderful, brand-new, life-changing item.    </Text>  </View></CSQMask>
Masking and Unmasking behaviors on a parent view
Section titled Masking and Unmasking behaviors on a parent viewThe masking state of a parent view propagates to all nested views unless explicitly overridden by a nested <CSQMask> component. This enables flexible masking and unmasking behaviors within complex component structures.
import { CSQMask } from '@contentsquare/react-native-bridge';
// Masks or unmasks all child components based on isSessionReplayMasked prop<CSQMask isSessionReplayMasked={true}>  <View>    <Text>This content is masked.</Text>
    <CSQMask isSessionReplayMasked={false}>      <Text>This specific content is unmasked, despite the parent mask.</Text>    </CSQMask>  </View></CSQMask>
In this example, the inner <CSQMask> explicitly overrides the parent view's masking behavior.
Implementation recommendations
Section titled Implementation recommendationsAvoid wrapping the Root Navigator
Section titled Avoid wrapping the Root Navigator<CSQMask> should not wrap the Root Navigator it could cause unwanted results. If you want to set the default masking behavior for the whole application you should use CSQ.setDefaultMasking(boolean masked). <CSQMask> should be used at component level.
Avoid dynamically changing isSessionReplayMasked prop
Section titled Avoid dynamically changing isSessionReplayMasked propWhile <CSQMask> supports toggling masking at the instance level, we do not recommend changing the isSessionReplayMasked prop dynamically based on conditions like this:
<CSQMask isSessionReplayMasked={someCondition ? true : false}>...</CSQMask>This approach may lead to unexpected behavior, such as personal data leaks. Instead, structure your layout in a way that ensures predictable masking behavior without frequently modifying the isSessionReplayMasked prop dynamically.
Keeping track of what is masked
Section titled Keeping track of what is maskedThe SDK doesn't provide a list of what is currently masked. If you need to keep track of it, you probably will have to write your specific wrapper.