

Set up the extension
This page will guide you to set up Mobile Experience Analytics Extension for Contentsquare Product Analytics.
This will supercharge the Product Analytics platform with:
- Powerful Session Replay
- Heatmaps
- Analysis capabilities of Mobile API Errors and Crashes
This guide assumes that you have already implemented the CSQ SDK for Product Analytics.
Enable the extension in the Product Analytics UI
Section titled Enable the extension in the Product Analytics UI- In Product Analytics, navigate to Account > Manage > Replays & Heatmaps.
- If this is your first time setting up Session Replay, select the checkbox to accept the terms and conditions.
- Click Add web or mobile app to launch the setup wizard. There is one configuration per app.
- Select Mobile as platform.
- Give your app a name and choose a storage location (US or EU).
- Set a sampling rate for how many sessions to record.
- Configure replay settings:
- App ID: enter the bundle ID of your app (for example,
com.companyname.appname). - Quality Settings: choose the recording fidelity for Wi-Fi and Cellular connections. The default for both is Medium; keep Cellular equal to or lower than Wi-Fi.
- User Consent: enable this if your app requires explicit opt-in before recording. See Privacy docs for the opt-in API.
- App ID: enter the bundle ID of your app (for example,
- Click Save and Continue to finish the wizard.
Add the Errors plugins
Section titled Add the Errors pluginsAdd the Contentsquare Network Gradle plugin to the plugins block in both your root-level and app-level Gradle files:
plugins { id("com.contentsquare.error.analysis.network") version "1.7.0" apply false}plugins { id("com.contentsquare.error.analysis.network")}plugins { id "com.contentsquare.error.analysis.network" version "1.7.0" apply false}plugins { id "com.contentsquare.error.analysis.network"}Once this is done, the SDK running on your app will immediately start collecting the required data to provide Session Replay and Errors / Crashes (if enabled) into the Product Analytics platform.
Enable error and crash collection
Section titled Enable error and crash collectionError and crash collection is managed separately from the setup wizard. Navigate to Account > Manage > Replays & Heatmaps, click Edit next to your app configuration, then scroll to the relevant section under General Settings:
- Error Capture: toggles for API Errors and Custom Errors.
- Crashes Capture: toggle for Crashes.
Click Save when finished.
Session Replay masking
Section titled Session Replay maskingThe Session Replay feature replays every interaction of your users with your app. To respect the user's right to privacy, the Contentsquare SDK:
- Masks everything by default
- Allows you to control which part of the user interface is collected via our Masking rules
Masking mechanisms
Section titled Masking mechanismsEvery single UI element is converted into a highly pixelated image to reach a very low resolution. Text and images will appear very blurry so that the content cannot be identified.
Original vs Replay fully masked
Section titled Original vs Replay fully masked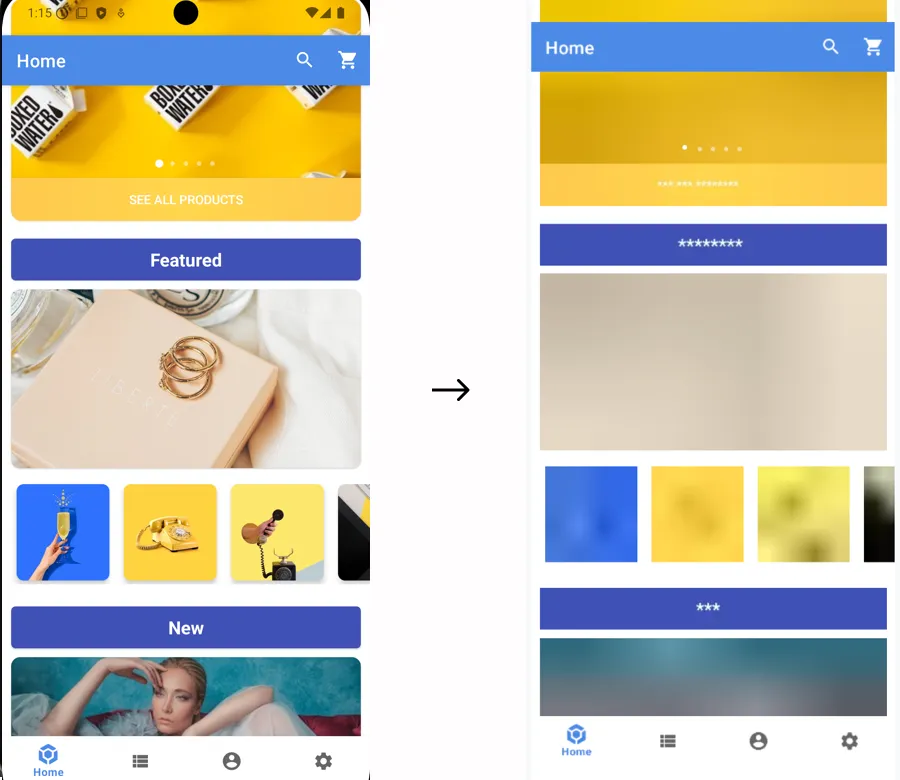
Masking rules
Section titled Masking rulesMasking rules can be applied in two ways:
- Through remote masking configuration in the CSQ Console (for admin users): These configurations are managed directly in the Console and take effect for all sessions as soon as the app is restarted or brought to the foreground See How to customize masking rules from the Data Masking tab ↗ in the Help Center.
- Using public masking APIs in the SDK (for mobile application developers): These configurations require developer implementation and will be applied only after the mobile app has gone through its release cycle.
Masking rules set via the CSQ Console or the public APIs are applied according to different priorities, as described below. The SDK determines whether a view is masked by evaluating the rules in the order specified below. Once a rule is triggered, the state is set, and subsequent rules are not applied:
General case
Section titled General case| Rule | Configured via |
|---|---|
| 1. The app or SDK version is fully masked | Data Masking tab in the CSQ Console ↗ |
| 2. Remote Text or Image masking is defined | Data Masking tab in the CSQ Console ↗ |
| 3. An instance is specifically masked or unmasked | API |
| 4. A type is masked or unmasked | API |
| 5. A parent is specifically masked or unmasked | API |
| 6. A parent type is masked or unmasked | API |
| 7. Remote Text or Image unmasking is defined | Data Masking tab in the CSQ Console ↗ |
| 8. Otherwise the default masking state is applied | API |
Exception: Text input fields
Section titled Exception: Text input fieldsSpecial consideration is needed for text inputs, as the risk of leaking personal data is higher with these elements. As a result, the SDK applies slightly different rules to EditText and Jetpack Compose TextField:
| Rule | Configured via |
|---|---|
| 1. The app or SDK version is fully masked | Data Masking tab in the CSQ Console ↗ |
| 2. Remote Text input masking is defined | Data Masking tab in the CSQ Console ↗ |
3. An EditText instance is specifically unmasked | API |
4. The EditText type is unmasked | API |
| 5. Otherwise a text input field remains masked | default |
Specifically, default masking and parent masking won't change the masking state of text inputs.
Public masking APIs
Section titled Public masking APIsDefault masking
Section titled Default maskingAll Android View elements, their subclasses, and Jetpack Compose components are fully masked by default.
Change the default masking state with:
/*** Sets the default masking state for the Contentsquare's Session Replay features.** @param masked A boolean value indicating whether masking should be enabled (true) or disabled (false).*/@JvmStaticfun setDefaultMasking(masked: Boolean)Masking/Un-masking by instance
Section titled Masking/Un-masking by instanceUse mask(view: View) and unmask(view: View) methods to mask or unmask a specific view instance.
/*** Masks the contents of a specific view.** @param view an instance of [View] to mask.*/@JvmStaticfun mask(view: View)/*** Unmasks the contents of a specific view.** @param view an instance of [View] to unmask.*/@JvmStaticfun unmask(view: View)Alternatively, you can also apply the masking rule to a specific view instance directly with View.csqMaskContents(enable: Boolean) extension function.
/** * [View] extension function to mask the contents of a view. * This extension function can be used as alternative to [CSQ.mask] and [CSQ.unmask]. * * @param enable A boolean value indicating whether masking should be enabled (true) or disabled (false) for this view. */fun View.csqMaskContents(enable: Boolean)Following the previous example, we have the views hierarchy in which all instances of TextView type are unmasked with the default masking state of all the views are masked by default.
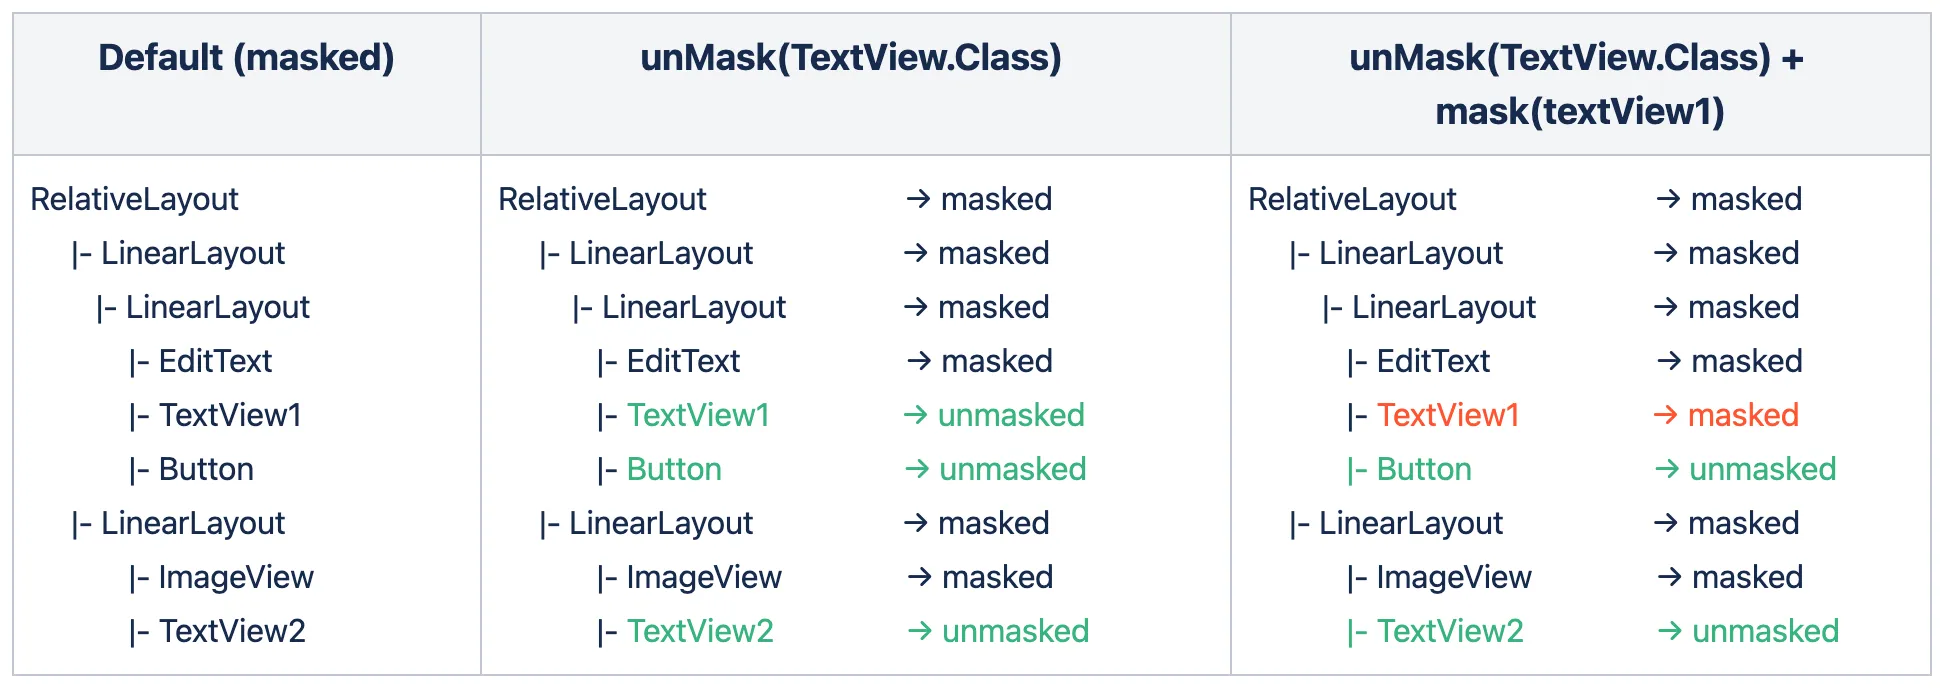
In this example, if you want to mask a specific text view TextView1, call mask(textView1). The view instance rule overrides the type rule and the default rule.
Use the CsqMask(enable: Boolean, block: @Composable () -> Unit) composable function to mask or unmask a composable.
/** * A composable function that applies masking to Compose UI content. * * @param enable A boolean value indicating whether masking should be enabled (true) or disabled (false). * @param block A composable lambda function representing the content to apply masking condition. */@Composablefun CsqMask(enable: Boolean, block: @Composable () -> Unit)For example:
CsqMask(true) { Text( text = "Text" )}Masking/Un-masking by type
Section titled Masking/Un-masking by typeAlthough the SDK allows masking elements by type for convenience but it isn't the recommended masking mechanism because it impacts all screens of your application.
Use this when you have a specific class for presenting user information or for displaying the user profile picture to make sure it always stays masked, for instance.
Use mask(type: Class<*>) and unmask(type: Class<*>) methods to mask or unmask a specific type.
/*** Masks the contents of the view for all instances of a specific [Class] and subclass of a [View].* This will be applied only for Session Replay feature.** @param type a [Class] object representing the type to be masked.*/@JvmStaticfun mask(type: Class<*>)/*** Unmasks the contents of the view for all instances of a specific [Class] and subclass of a [View] for* Session Replay feature.** @param type a [Class] object representing the type to be unmasked.*/@JvmStaticfun unmask(type: Class<*>)For example, given the views hierarchy:
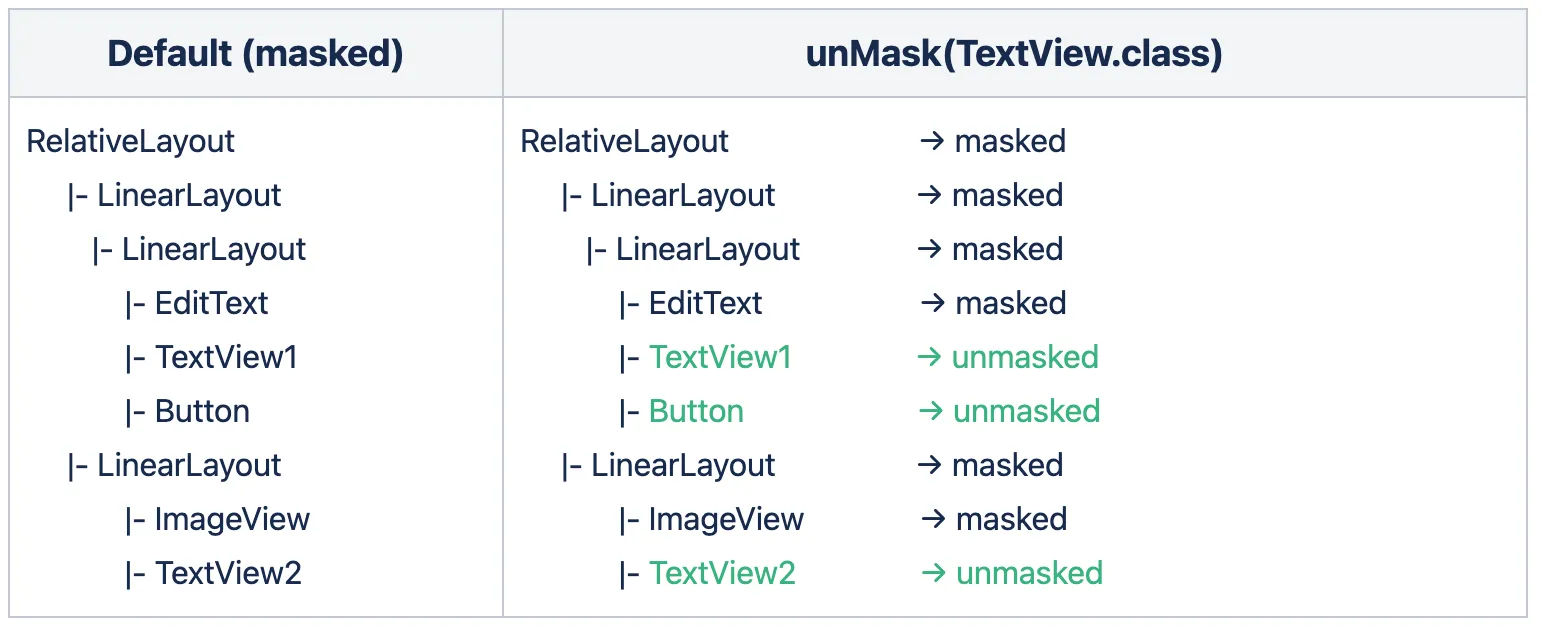
The default masking state of all the views is masked and, for example, to unmask all TextView types, you can call unmask(TextView.class) then all instances of TextView type will be unmasked.
In this example, the button is also impacted by the unmask() call because the button is also a TextView type (a subclass of TextView). The EditText is also a TextView type but isn't impacted by unmask(TextView.class) call because the EditText type is masked by default.
It is not possible to mask or unmask composables by type.
Alternatively, you can mask or unmask a group of composables by wrapping multiple composables within the same parent, then applying the CsqMask(enable: Boolean, block: @Composable () -> Unit) on the parent.
Masking and Unmasking behaviors on a parent view
Section titled Masking and Unmasking behaviors on a parent viewYou can mask ViewGroups (and subclasses such as RelativeLayout, LinearLayout, ConstraintLayout, and so on). When a parent view is masked all of its children inherit the masking state. The children's view masking state can be overridden by using a specific API to mask or unmask by instance or by type.
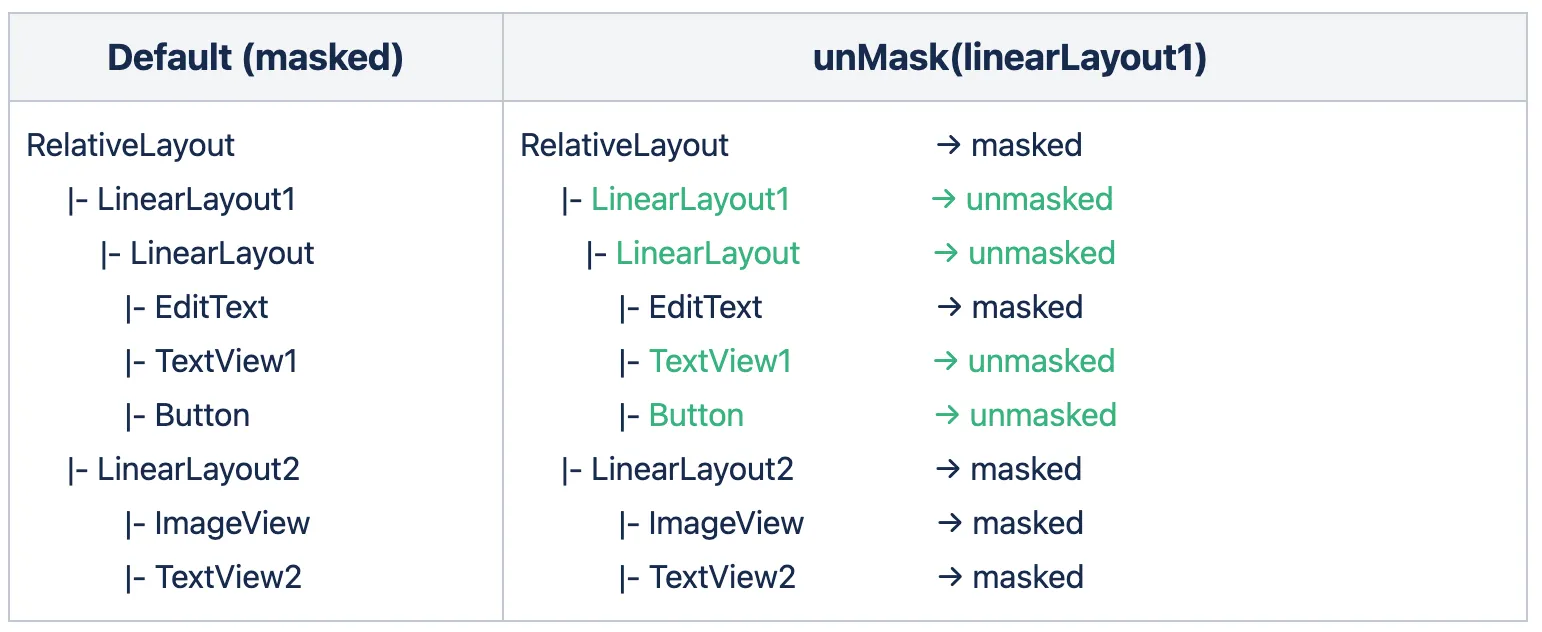
For example, given the view hierarchy with the default masking state. All the views are masked by default in the initial state and in this case, you may want to unmask all children's views of the parent view LinearLayout1, you can call unmask(linearLayout1) then all children views of the parent view LinearLayout1 will be unmasked. As noticed here the EditText is not impacted from the parent call because the EditText type is masked by default.
You can mask a parent layout (such as Column, Row, or Box). If a parent composable is masked, then all of its children inherit the masking state from the parent. The children's masking state can be overridden by using the dedicated CsqMask(enable: Boolean, block: @Composable () -> Unit) function:
CsqMask(true) { Column { Row { CsqMask(false) { // unmask this `Text` composable Text( text = "Text", ) } } Row { Text( // this `Text` composable will be masked, as it inherits the masking state from the parent text = "Text 2", ) } }}Masking and Unmasking of Bottom Sheets, Dialogs, and Menus
Section titled Masking and Unmasking of Bottom Sheets, Dialogs, and MenusBottom Sheets
Bottom sheets can be masked or unmasked using the same APIs available for any other view, whether you're working with Android Views or Jetpack Compose. To apply the masking behavior, ensure that you call the appropriate API after the bottom sheet has been created.
AlertDialogs
Dialogs, such as AlertDialog, TimePickerDialog, and DatePickerDialog, can be masked or unmasked using the APIs provided below. In addition, the masking behavior of individual components within these dialogs can be customized using the provided Kotlin extension functions.
For instance, if an AlertDialog is fully masked by default, you can selectively unmask specific elements—such as the title or action buttons—using the extension functions provided below for more granular control.
For example, given an AlertDialog with the default masking state, all views in the dialog are masked by default in the initial state. In this case, you may want to unmask the title and buttons of the dialog. To do that, we provide Kotlin extension functions to the Dialog API to make it easy.
/** * Masks the entire [AlertDialog]. */fun AlertDialog.csqMask()
/** * Masks the title of the [AlertDialog]. */fun AlertDialog.csqMaskTitle()
/** * Masks the message of the [AlertDialog]. */fun AlertDialog.csqMaskMessage()
/** * Masks the positive button of the [AlertDialog]. */fun AlertDialog.csqMaskPositiveButton()
/** * Masks the negative button of the [AlertDialog]. */fun AlertDialog.csqMaskNegativeButton()
/** * Unmasks the entire [AlertDialog]. */fun AlertDialog.csqUnMask()
/** * Unmasks the title of the [AlertDialog]. */fun AlertDialog.csqUnMaskTitle()
/** * Unmasks the message of the [AlertDialog]. */fun AlertDialog.csqUnMaskMessage()
/** * Unmasks the positive button of the [AlertDialog]. */fun AlertDialog.csqUnMaskPositiveButton()
/** * Unmasks the negative button of the [AlertDialog]. */fun AlertDialog.csqUnMaskNegativeButton()The AlertDialog composable in Jetpack Compose can be masked or unmasked using the same APIs applied to other composables.
Simply use the appropriate CsqMask composables function on the elements you want to mask or unmask within the dialog.
Example:
AlertDialog( icon = { Icon(icon, contentDescription = "Example Icon") }, title = { Text(text = dialogTitle) }, text = { // Mask the dialog text CsqMask(true) { Text( text = dialogText ) } }, onDismissRequest = { onDismissRequest() }, confirmButton = { TextButton( onClick = { onConfirmation() } ) { // Unmask the dialog confirm button CsqMask(false) { Text( "Confirm" ) } } })TimePickerDialog and DatePickerDialog
Time and date pickers function similarly to AlertDialogs but contain their own distinct UI components. These sections can be selectively masked or unmasked using the APIs provided below.
To support masking on this dialogs we added the following APIs:
/** * Masks the entire [DatePickerDialog]. */fun DatePickerDialog.csqMask()
/** * Masks the header of the DatePicker, which typically displays the selected date. * This affects the [DatePickerDialog]. */fun DatePickerDialog.csqMaskHeader()
/** * Masks the calendar view (day picker) of the [DatePickerDialog]. */fun DatePickerDialog.csqMaskCalendar()
/** * Masks the button panel of the [DatePickerDialog], typically containing "OK" and "Cancel" buttons. */fun DatePickerDialog.csqMaskButtonPanel()
/** * Unmasks the entire [DatePickerDialog]. */fun DatePickerDialog.csqUnMask()
/** * Unmasks the header of the DatePicker. * This affects the [DatePickerDialog]. */fun DatePickerDialog.csqUnMaskHeader()
/** * Unmasks the calendar view (day picker) of the DatePicker. * This affects the [DatePickerDialog]. */fun DatePickerDialog.csqUnMaskCalendar()
/** * Unmasks the button panel of the [DatePickerDialog]. */fun DatePickerDialog.csqUnMaskButtonPanel()
/** * Masks the entire TimePicker view within the [TimePickerDialog]. */fun TimePickerDialog.csqMask()
/** * Masks the header of the TimePicker, including the time display and input mode header. * This affects the [TimePickerDialog]. */fun TimePickerDialog.csqMaskHeader()
/** * Masks the radial picker (clock face) of the TimePicker. * This affects the [TimePickerDialog]. */fun TimePickerDialog.csqMaskRadialPicker()
/** * Masks the input mode view of the TimePicker (keyboard input for time). * This affects the [TimePickerDialog]. */fun TimePickerDialog.csqMaskInputMode()
/** * Masks the button panel of the [TimePickerDialog], including positive, negative, and toggle mode buttons. */fun TimePickerDialog.csqMaskButtonPanel()
/** * Unmasks the entire TimePicker view within the [TimePickerDialog]. */fun TimePickerDialog.csqUnMask()
/** * Unmasks the header of the TimePicker, including the time display and input mode header. * This affects the [TimePickerDialog]. */fun TimePickerDialog.csqUnMaskHeader()
/** * Unmasks the radial picker (clock face) of the TimePicker. * This affects the [TimePickerDialog]. */fun TimePickerDialog.csqUnMaskRadialPicker()
/** * Unmasks the input mode view of the TimePicker (keyboard input for time). * This affects the [TimePickerDialog]. */fun TimePickerDialog.csqUnMaskInputMode()
/** * Unmasks the button panel of the [TimePickerDialog], including positive, negative, and toggle mode buttons. */fun TimePickerDialog.csqUnMaskButtonPanel()
The Time and Picker composables in Jetpack Compose can be masked or unmasked using the same APIs applied to other composables.
Simply use the appropriate CsqMask composables function on the elements you want to mask or unmask within the dialog.
Custom Dialogs
If you're creating a custom dialog by extending the Dialog base class and inflating a layout using the setContentView method, you can mask or unmask individual views within your custom view hierarchy, using the masking APIs.
The custom dialogs in Jetpack Compose can be masked or unmasked using the same APIs applied to other composables.
Simply use the appropriate CsqMask composables function on the elements you want to mask or unmask within the dialog.
Menu Items
Menu items captured by Session Replay can be selectively masked or unmasked.
For example, consider a context menu, including an action item and another item displaying the user's name (see XML example below). If masking is disabled by default, you may want to mask sensitive menu items to prevent personal data from appearing in Session Replays. Conversely, if masking is enabled by default, you may choose to unmask certain non-sensitive items to keep them visible.
To achieve this, simply apply masking or unmasking to individual menu items as needed.
<?xml version="1.0" encoding="utf-8"?><menu xmlns:android="http://schemas.android.com/apk/res/android" xmlns:app="http://schemas.android.com/apk/res-auto"> <item android:id="@+id/action_settings" android:orderInCategory="10" android:title="@string/action_settings" app:showAsAction="never" /> <item android:id="@+id/profile_settings" android:orderInCategory="100" android:title="Name Placeholder" app:showAsAction="never" /></menu>The Menu components in Jetpack Compose can be masked or unmasked using the same APIs applied to other composables.
Use the appropriate CsqMask composable function on the elements you want to mask or unmask within the menu.
Handling Transparent Views
Section titled Handling Transparent ViewsThe SDK processes masked views first, ensuring that if a view has transparency and is not masked, it will not expose any personal data since masked views have already been processed.
This approach ensures the protection of sensitive information, even in UIs with transparent views.
Implementation recommendations
Section titled Implementation recommendationsWhere to perform masking operations
Section titled Where to perform masking operationsMasking operation should be performed before the first draw of the view and it should always be called on the UI thread.
At the Activity level, call the masking API methods on the onCreate lifecycle method.
At the Fragment level, call the masking API methods on the onViewCreated lifecycle method.
Keeping track of what is masked
Section titled Keeping track of what is maskedThe SDK doesn't provide a list of what is currently masked, if you need to keep track, you probably will have to write your specific wrapper.
Masking operations performance impact
Section titled Masking operations performance impactYou can call unmask(View view) multiple times without impacting the SDK performance or your app.
Masking limitations
Section titled Masking limitationsYou can mask or unmask a Map, that will then be captured as an image in the replay. However, you won't be able to mask or unmask specific elements within the Map.
Navigate between fragments using animations
Section titled Navigate between fragments using animationsMasking rules don't apply on Fragments using animations. So to mask this type of Fragment, mask the container view where the Fragment is inserted, rather than masking its content. This ensures that the Fragment content remains masked during transitions.
Additionally, you can unmask some specific views within the Fragment content, by using CSQ.unmask(view: View).
Rotated or Scaled Views
Section titled Rotated or Scaled ViewsThe masking solution relies on the bounding box reported by a view to determine the area that should be masked. In most cases, this approach is sufficient, as the bounding box accurately reflects the view's position and dimensions on the screen.
However, when a view is rotated or scaled, the bounding box no longer represents the view's actual position or size after the transformation.
To prevent any personal data from being leaked, we advise adopting one of the following approaches:
-
Mask the Parent View: Apply masking to the parent container of the transformed view. This ensures that the entire area encompassing the rotated or scaled view is covered, regardless of transformations.
-
Mask the Entire Window: In case of complex layouts, transformations, or critical scenarios where absolute certainty is required, mask the entire window to guarantee that no personal data is exposed.
These approaches provide the highest level of confidence in preventing personal data leakage while working within the constraints of the current implementation.