Session Replay
Prerequisites
Section titled PrerequisitesScreen tracking implemented
Section titled Screen tracking implementedAs session data collection will start at the 1st screenview event, it is required to have screen tracking implemented. Make sure to follow the Track screens sections.
Updating to latest SDK version
Section titled Updating to latest SDK versionIn order to enable Session Replay in your app and get the most stable version, it is required to upgrade the SDK to its latest version.
Reminder about User consent
Section titled Reminder about User consentIf you are in the process of implementing the SDK for the 1st time (or choose to take this update as an opportunity to review your Privacy related implementation), make sure to follow the Privacy section.
Jetpack Compose support
Section titled Jetpack Compose supportTo enable Jetpack Compose support in Session Replay, it is necessary to add a new Gradle dependency to your Gradle build file. Make sure to follow the Track screens section.
WebView
Section titled WebViewWebView events can be collected as part Session Replay under the following conditions:
- The WebView is injected
- The web page implements the Tag in WebView mode
For the full guide to implementation of WebView Tracking, see 📚 Mobile Apps Webview Tracking.
WebView personal data masking is entirely handled on the web side — see 📚 Personal Data handling in WebView.
Testing and Debugging
Section titled Testing and DebuggingEnable Session Replay on your device
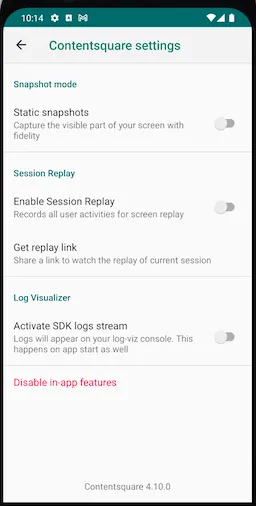
Section titled Enable Session Replay on your deviceSince not all sessions are collected (depending on the percentage set in the Contentsquare back office), we have implemented an option to force data collection for Session Replay on your device for testing and debugging purposes. This option can be enabled from the in-app features settings:
- Enable in-app features
- Open in-app features settings with a long press on the snapshot button
- Under “Session Replay”, toggle “Enable Session Replay” on
- Kill the app
- Start app, a new session is starting with Session Replay enabled
How do I know if Session Replay is enabled?
Section titled How do I know if Session Replay is enabled?There are 2 places where you can check if Session Replay is enabled:
In the logs: The log I/CSLIB|SessionReplay: Session Replay is starting. will confirm that Session Replay is enabled.
In in-app features settings: Below the “Enable “will start at next app start” (see below Access the replay), you will either see:
No replay link availablewhich means Session Replay is not running for the current sessionGet Replay linkwhich means Session Replay is running for the current session
Access the Replay
Section titled Access the ReplayThe replay will be available within 5 minutes. Only the “ended screen views” are processed (we know a screenview is ended when we start receiving data for the next screenview). This means that you will be able to replay your session up to the previous screenview if the session is still running.
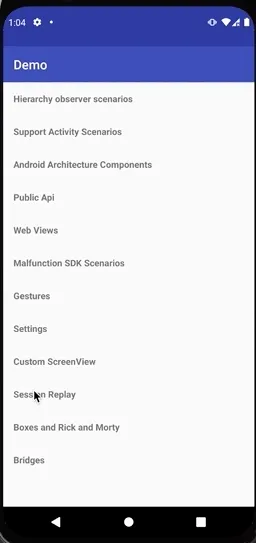
Since 4.6.0, the Session can be accessed by tapping on Get replay link button from the in-app features settings:
Personal Data Masking
Section titled Personal Data MaskingThe Session Replay feature collects every user interaction within your app. In order to respect the user’s right to privacy, the Contentsquare SDK:
- Masks everything by default
- Allows you to control which part of the user interface is collected via our masking and un-masking APIs.
Masking mechanisms
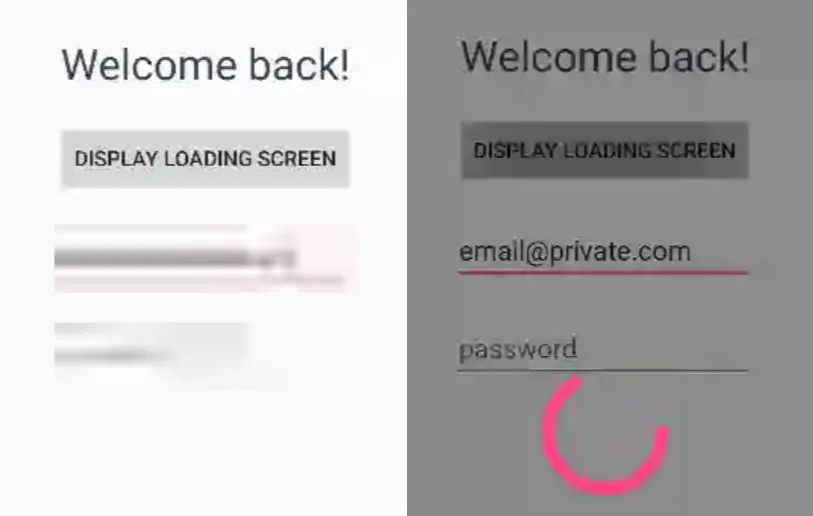
Section titled Masking mechanismsEvery single UI element is converted into a highly pixelated image to reach a very low resolution. Text and images will appear very blurry so that the content cannot be identified.
Original VS Replay fully masked
Section titled Original VS Replay fully masked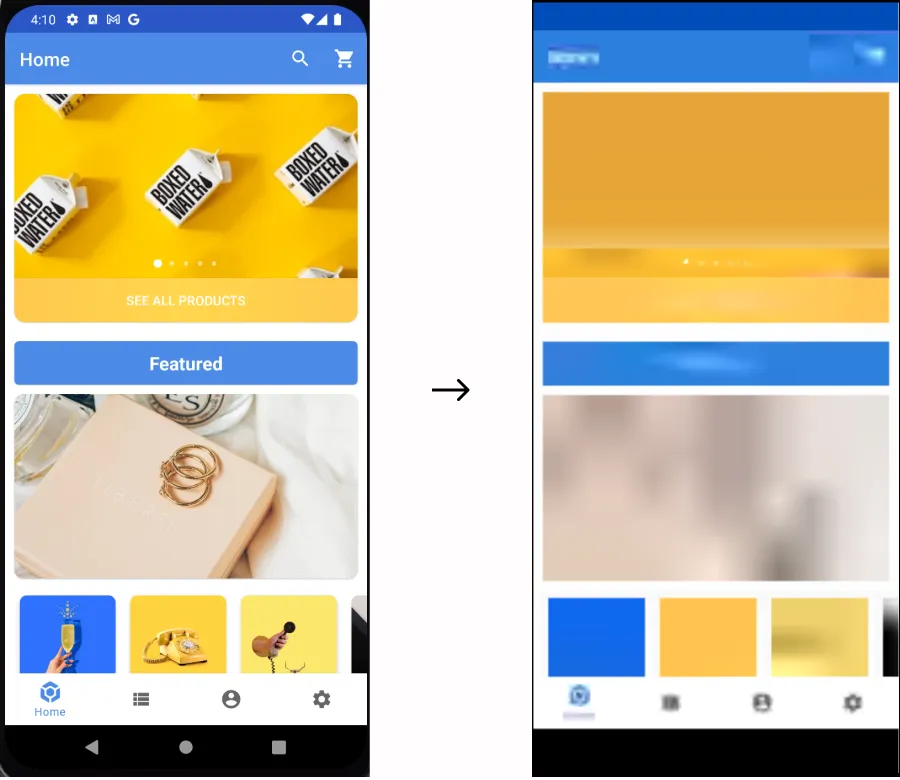
Default masking
Section titled Default maskingAll Android View elements, their subclasses and Jetpack Compose components are fully masked by default. The SDK provides an API to change the default masking state:
/*** Set the default masking of all the views.* @param masked true mask all views by default.* false unmask all views by default.* The default value is true.*/setDefaultMasking(boolean masked)Masking/Un-masking by instance
Section titled Masking/Un-masking by instanceViews
Section titled ViewsUse mask(View view) and unmask(View view) methods to mask or unmask a specific view instance.
/*** Masks a specific {@link View} during data collection for Session Replay.** @param view an instance of {@link View} to be masked.*/public static void mask(@NonNull View view)/*** Unmasks a specific {@link View} during data collection for Session Replay.** @param view an instance of {@link View} to be unmasked.*/public static void unMask(@NonNull View view)Following the previous example, we have the views hierarchy in which all instances of TextView type are unmasked with the default masking state of all the views are masked by default.
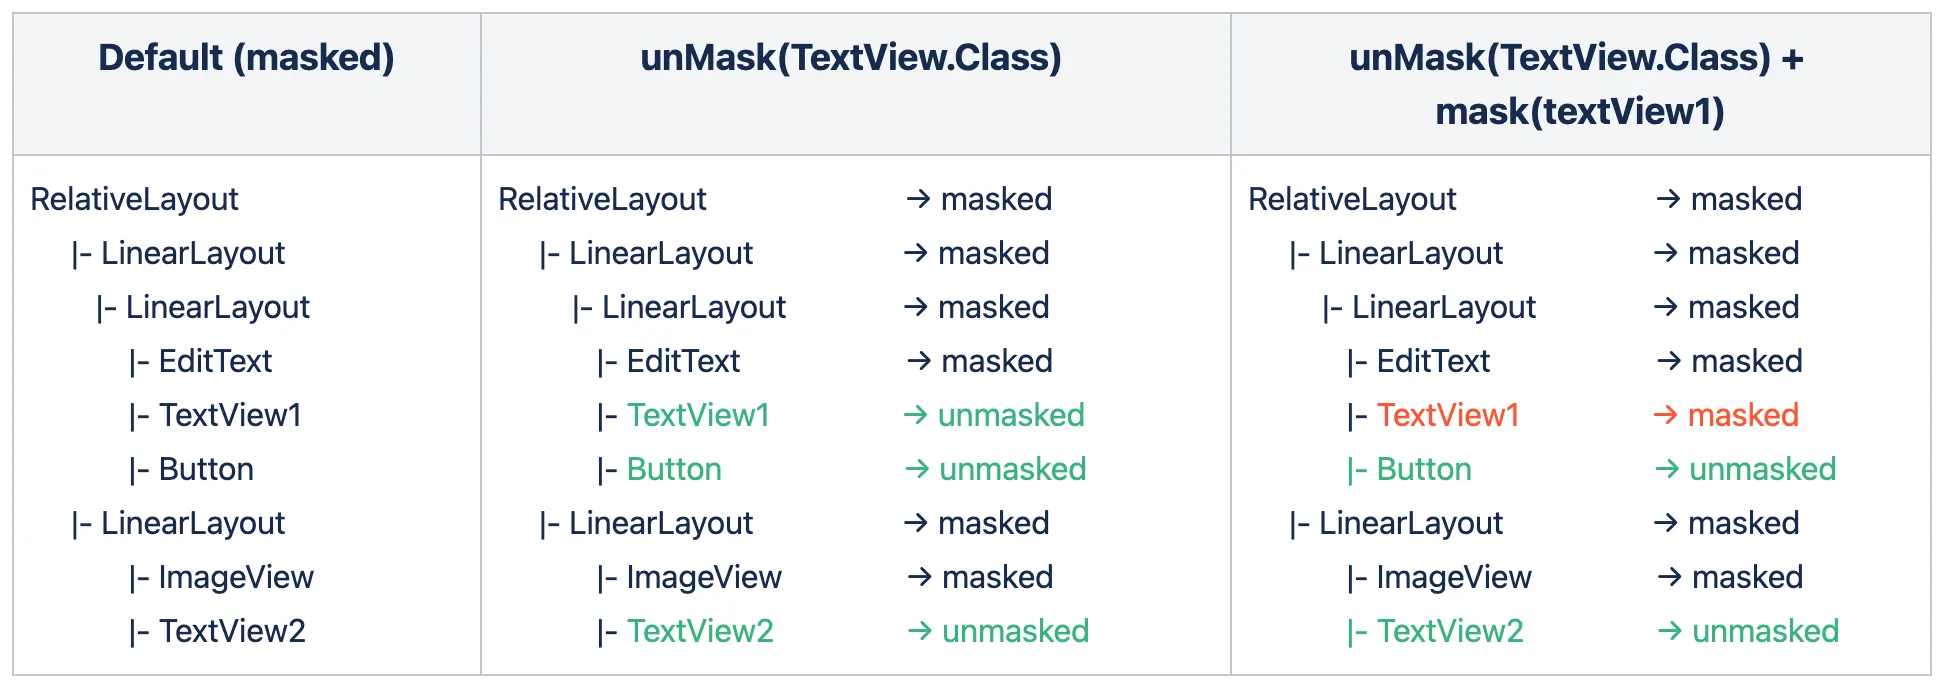
In this example you may want to mask a specific text view TextView1, call mask(textView1) then this instance of TextView1 will be masked. As you can see in this example the view instance rule overrides the type rule and the default rule.
Compose
Section titled ComposeUse the Modifier.sessionReplayMask(enableMasking: Boolean) extension function to mask or unmask a composable.
/** * [Modifier] extension function that provides the facility to mask or unmask a composable in * Session Replay. * * @param enableMasking `true` when the target composable has to be masked; `false` otherwise. */fun Modifier.sessionReplayMask(enableMasking: Boolean): ModifierFor example:
Text( text = "Text", modifier = Modifier.sessionReplayMask(true) // mask this `Text` composable)Masking/Un-masking by type
Section titled Masking/Un-masking by typeThe Contentsquare SDK allows masking elements by type for convenience but it isn’t the recommended masking mechanism because it will impact all screens of your application. For instance, use this when you have a specific class for presenting user information or for displaying the user profile picture to make sure it always stays mask.
Views
Section titled ViewsUse mask(Class type) and unmask(Class type) methods to mask or unmask a specific type.
/** Masks all instances of a specific {@link Class}* and subclass of a view during data collection for Session Replay.** @param type {@link Class} to be masked.*/public static void mask(@NonNull Class<?> type)/*** Unmasks all instances of a specific {@link Class}* and subclass of a view during data collection for Session Replay.** @param type {@link Class} to be unmasked.*/public static void unMask(@NonNull Class<?> type)For example, given the views hierarchy:
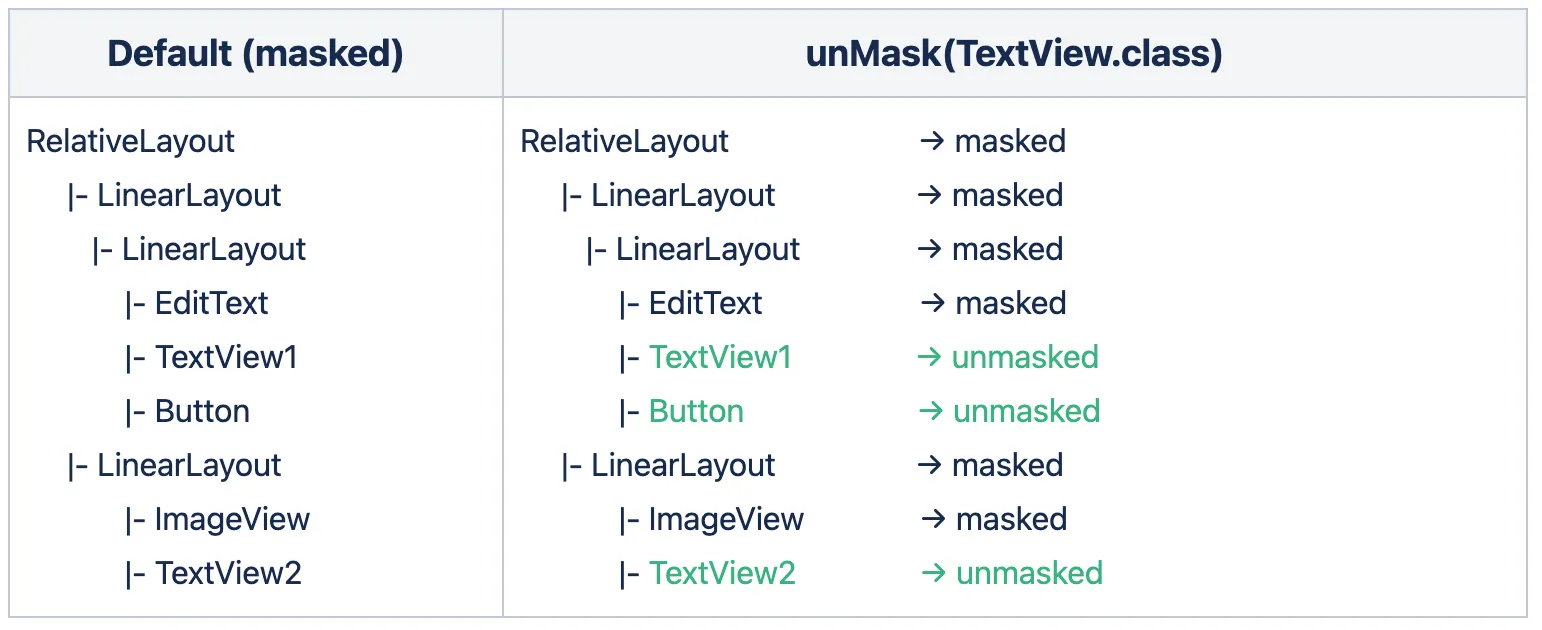
The default masking state of all the views is masked by default and for example, you may want to unmask all TextView types, you can call unMask(TextView.class) then all instances of TextView type will be unmasked. In this example, the button is also impacted by the unmask API because the button is also a TextView type (a subclass of TextView). You can also notice that the EditText is also a TextView type but it is not impacted by unMask(TextView.class) call because the EditText type is masked by default see Masking rules priority.
Compose
Section titled ComposeAs of now, it is not possible to mask or unmask composables by type.
Alternatively, you can mask or unmask a group of composables by wrapping multiple composables within the same parent, then applying the Modifier.sessionReplayMask(enableMasking: Boolean) modifier on the parent.
Masking rules priority
Section titled Masking rules priorityThe SDK determines if a view is masked or unmasked by applying the rules in the following order:
| Priority | Rule | Default rule | Effect |
|---|---|---|---|
| 1 | View instance rule | The initial instance rule is empty | If a view is part of the instance rule this rule will be applied |
| 2 | Type rule | The initial type rule contains EditText type as masked by default | If a view is not part of the instance rule but it is part of type rule, the type rule will be applied for this view |
| 3 | Default masking rule | The default value is true, all views are masked by default | If no other rules exist for this view the default rule will be applied for this view |
The default masking rule will be overridden by the type rule if there is a specific call to mask(Class type) or unMask(Class type) on a specific type and if there is a call to mask(View view) or unMask(View view) on a specific view instance, the view instance rule will be applied instead of the type rule and the default rule.
Masking and Unmasking behaviors on a parent view
Section titled Masking and Unmasking behaviors on a parent viewViews
Section titled ViewsThe masking of the ViewGroup (RelativeLayout, LinearLayout, ConstraintLayout, etc..) is supported. If a parent view is masked all of its children will inherit the masking state from the parent. The children’s view masking state can be overridden by using a specific API to mask or unmask by instance or by type.
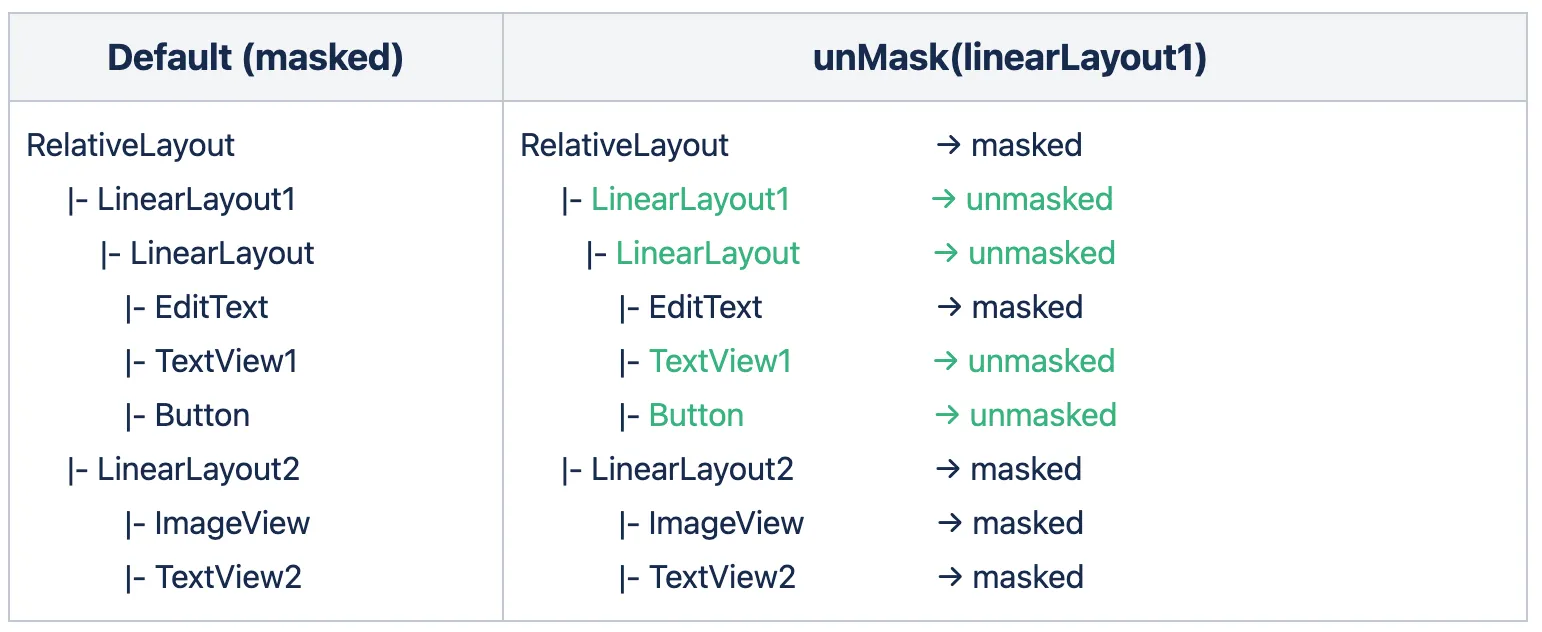
For example, given the view hierarchy with the default masking state. All the views are masked by default in the initial state and in this case, you may want to unmask all children’s views of the parent view LinearLayout1, you can call unMask(linearLayout1) then all children views of the parent view LinearLayout1 will be unmasked. As noticed here the EditText is not impacted from the parent call because the EditText type is masked by default Masking rules priority.
Compose
Section titled ComposeThe masking of a parent layout (for example Column, Row, or Box) is supported. If a parent composable is masked, then all of its children will inherit the masking state from the parent. The children’s masking state can be overridden by using the dedicated Modifier.sessionReplayMask(enableMasking: Boolean) function.
For example:
Column( modifier = Modifier.sessionReplayMask(true) // mask every children) { Row { Text( text = "Text", modifier = Modifier.sessionReplayMask(false) // unmask this `Text` composable ) } Row { Text( text = "Text 2", // this `Text` composable will be masked, as it inherits the masking state from the parent ) }}Implementation recommendations
Section titled Implementation recommendationsWhere to perform masking operations
Section titled Where to perform masking operationsMasking operation should be performed before the first draw of the view and it should always be called on the UI thread.
At the Activity level, call the masking API methods on the onCreated lifecycle method.
At the Fragment level, call the masking API methods on the onViewCreated lifecycle method.
Keeping track of what is masked
Section titled Keeping track of what is maskedThe SDK doesn’t provide a list of what is currently masked, if you need to keep track, you probably will have to write your specific wrapper.
Masking operations performance impact
Section titled Masking operations performance impactYou can call unmask(View view) multiple times without impacting the SDK performance or your app.
Masking limitations
Section titled Masking limitationsYou can mask or unmask a Map, that will then be captured as an image in the replay. However, you won’t be able to mask or unmask specific elements within the Map.
Views embedded into composables
Section titled Views embedded into composablesIn case a classic view is embedded in a composable container, the masking (or unmasking) of the composable container is not propagated to the embedded view.
As presented in the following code example, masking of the parent Column container is propagated
to the child composable, but not to the embedded views.
If you also want to mask embedded views, you need to mask them additionally,
with Contentsquare.mask(View). If the embedded and additionally masked view
is a ViewGroup, masking of it will be correctly propagated to its child views.
// Masked Compose containerColumn(Modifier.sessionReplayMask(true)) { // Parent Column masking is propagated to embedded composables Text(text = "Masked by Column") // Parent Column masking is not propagated to embedded view AndroidView(factory = { context -> TextView(context).apply { text = "Not masked by Column" } }) // Workaround: apply additional masking to embedded view AndroidView(factory = { context -> TextView(context).apply { Contentsquare.mask(this) text = "Masked" } })}Transparent views
Section titled Transparent viewsAn unmasked transparent view on top of other masked views will act as an unmask layer.
Fragment Animation
Section titled Fragment AnimationMasking rules don’t apply on Fragments that define enter/exit transitions. So to mask this type of Fragment, mask the container view where the Fragment is inserted, rather than masking its content. This ensures that the Fragment content remains masked during transitions.
Additionally, you can unmask some specific views within the Fragment content, by using Contentsquare.unmask(View) or Modifier.sessionReplayMask(false).
Advanced features for Experience Monitoring
Section titled Advanced features for Experience MonitoringSend user identifier
Section titled Send user identifierContentsquare provides the ability to search for session(s) associated with a specific visitor, based on an identifier: email, phone number, customer ID… As these values are typically personal data, from the moment the SDK is collecting the User Identifier, we immediately encode the value using a hashing algorithm so that the information is hidden and can never be accessed.
Use the following code to send a user identifier:
Contentsquare.sendUserIdentifier("any_identifier")When called, the SDK will log:
I/CSLIB: User identifier hashed sent {value}Sending a user identifier for each session
Section titled Sending a user identifier for each sessionYou may want to send the user identifier for each session. While triggering the user identifier at app launch will cover most cases, it will not be enough. A session can start when the app is put in foreground, after staying in background for more than 30 minutes. See Session definition section for more information.
That is why we also recommend sending the user identifier every time the app enters foreground.
You can use the ProcessLifecycleOwner Class ↗ to detect foreground and trigger a sendUserIdentifier().
Limitations
Section titled Limitations- User identifier max length is 100 characters (if the limit is exceeded, the user identifier will not be handled and you will see an error message in the Console/Logcat)
- Only the first 15 user identifiers per view will be processed on server side
- The SDK will trim and lowercase user identifier
- User identifier event are not visible in Log visualizer
Integrations
Section titled IntegrationsContentsquare provides the ability to retrieve the link of the replay to be attached to other vendors such as Voice of Customer or Crash reporting tools.
Get current replay Link
Section titled Get current replay LinkGenerate a link to the replay of the current session. This link can be pushed to any internal or 3rd-party tool as a custom property/variable. For instance, you can add the replay link to:
- Each user request sent to your customer service tool
- Each user voting in your Voice of Customer tool
- Each user session in your App Performance, Observability tool
- …
Use the following code to retrieve a Session Replay link each time it changes:
Contentsquare.onSessionReplayLinkChange { link -> // Send link to your customer service tool}To unregister the current callback, pass null as the argument:
Contentsquare.onSessionReplayLinkChange(null)To avoid memory leaks, you can use the ProcessLifecycleOwner Class ↗ to detect foreground and background events and register or unregister the callback.
When a new link is available, the SDK will also log:
I/CSLIB: SessionReplay link: https://app.contentsquare.com/quick-playback/index.html?pid={projectId}&uu={userId}&sn={sessionNumber}&recordingType=csThe replay will be available within 5 minutes. Only the “ended screen views” are processed (we know a screenview is ended when we start receiving data for the next screenview). This means that you will be able to replay the session up to the previous screenview if the session is still running.
How Session Replay works
Section titled How Session Replay worksInitialization
Section titled InitializationSessions can be collected for Session Replay if the Session Replay feature has been enabled for your project and the session matches the collection criteria.
The following conditions will have an impact on which sessions will be collected:
- User consent: The users have given their consent (if required)
- Collection rate: The session is being drawn for collection (see Collection rate below)
- Compatibility: The OS version is supported.
- App version: The app version is not part of the block list (see App version block list below)
Note that, when Session Replay is turned off, no content specific to Session Replay is collected whatsoever. Also note that the standard Contentsquare analytics tracking remains unaffected by this.
Collection rate
Section titled Collection rateData collection for Session Replay is based on a percentage of the total sessions. By default data collection for Session Replay is disabled.
During the early access phase, the percentage or collected sessions will be set to 1% at the beginning. It will then be adjusted according to:
- The traffic on your app
- The volume of collected sessions set in the contract
Compatibility
Section titled CompatibilitySee compatibility.
App version block list
Section titled App version block listContentsquare team can add versions of your app in the block list to make sure Session Replay does not start on these versions. This is done when a problem is discovered on a specific version of your app, such as a Personal Data for which the masking was forgotten. This allows to keep Session Replay to work on the other app versions (especially the new ones with the fix).
Data collection
Section titled Data collectionThe SDK monitors the application lifecycle events and the view hierarchy, and generates Session Replay data from the behavior of the app, the content of the screen and the interaction of the user. These events are then locally stored, and eventually sent to our servers in batches. We then aggregate that data to create usable visual information into our Web Application, which you use to gather insights.
Quality levels
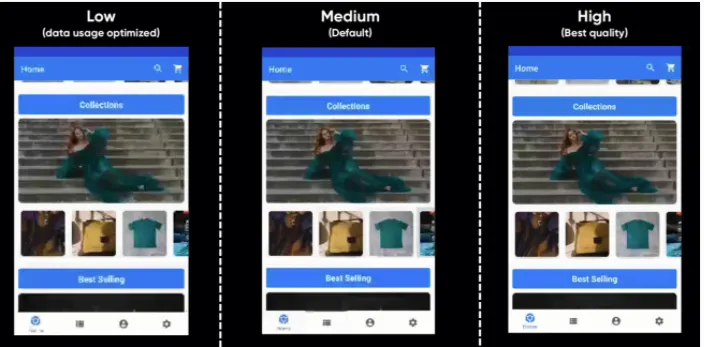
Section titled Quality levelsSession Replay has three quality levels available: High, Medium, Low. Quality level is defined by the frame rate and the image quality. The quality level is defined independently for Wi-Fi and Cellular Network. The default level for both is Medium. For more information on network data consumption see: Performance Impact section.
Quality level examples
Section titled Quality level examplesSelect the image to open it in full size and GIF format.
Network and Storage
Section titled Network and StorageBy default, Session Replay data can be sent over cellular network. If the particular context of your app or users requires a very limited impact on cellular data consumption, sending data over cellular network can be completely disabled. Once disabled, data will be sent when the device is using Wi-Fi.
Reach out to your Contentsquare contact that will make the adjustment in the project configuration.
Storage
Section titled StorageBefore being sent, data is stored in local files on disk up to 20MB on Android. When the limit is reached, all collected data is dropped, and data collection continues. Then, every time the limit is reached again, the same process is applied.
Requests
Section titled RequestsThe maximum request size is 1Mbyte.
Requests are sent:
- On screen change
- When Replay Link API is called
Performance impact
Section titled Performance impactPerformance impact mitigation
Section titled Performance impact mitigationMost operations related to Session Replay are performed on dedicated background threads, for a minimal impact on the main thread. If CPU usage is too high for background tasks, some expensive calculations will be discarded. To make sure of this, we run performance tests on testing applications, along with the Android profiler.
If too much time is spent on the main thread, the quality level will decrease automatically: from high to medium to low to a complete stop if required. Once conditions are back to normal, quality level will be changed back to the default value set in the configuration.
We defined our network strategy to have the lesser impact on CPU, memory and data consumption of the users devices. We measure these impacts, using the Android profiler and dedicated logging system, for each release of our SDK.
You can reduce the quality level if you want to favor performance impact over quality.
Performance test results
Section titled Performance test resultsWe always strive to be non-intrusive, and transparent to the developers of the client app. We apply this rule on the performance as well. These are the technical specifics we can share on performance, if you have any questions feel free to reach out to us.
The performance results were obtained under the following conditions:
| Condition | Value |
|---|---|
| Device model | Pixel 5 |
| Android version | 34 (Android 14) |
| Quality level | High |
| Default Masking State | Disabled |
| Property | Value |
|---|---|
| Total % on main thread (CPU Profiling) | <15 % |
| Memory overhead | 10 MB |
| Session Replay data transmitted over network during 1 minute of use: | |
| - with “High quality” level | <710 KB |
| - with “Medium quality” level | <560 KB |
| - with “Low quality” level | <310 KB |
Additional info on performance test procedure
Section titled Additional info on performance test procedureCPU Usage Test We are profiling our Demo app with and without the SDK dependency by following the same use case. We are measuring the CPU peak for both versions of the app and we are computing the difference.
RAM Usage Test We are profiling our Demo app with and without the SDK dependency by following the same use case. We are measuring the RAM usage peak for both versions of the app and we are computing the difference.
Memory Leak Test We are profiling our demo app and we are using the ADB Monkey tool to create random user input events. During this time we are monitoring the RAM behavior for any anomaly. We are using the Memory Profiler to identify leaks.
Data consumption We replay a predefined, repeatable and automated user scenario on our demo app and all data sent is measured in kB/min.
JankStats If you use the alpha library from Google to monitor the jank frames and you already have some jank frames in your application (main thread overwhelmed), you can expect an increase of 1% or 2% with data collection for Session Replay activated. Data collection for Session Replay requires to perform tasks on the main thread (screen capture and view hierarchy inspection).
Known limitations
Section titled Known limitationsSurfaceView
Section titled SurfaceViewSurfaceView ↗ are not supported for now. They will be displayed as white views. This includes views used for video streaming and camera previews, ensuring that no such content is captured.
Dialogs
Section titled DialogsDialogs ↗ and Compose Dialogs ↗ are not supported. They are not visible in replays.
Views on top of the application views
Section titled Views on top of the application viewsIf your application uses some library that displays views on top of your application views hierarchy, like a MaterialShowcaseView ↗, these views may not be visible in replays.
Animations are unsupported when masking by instance or type
Section titled Animations are unsupported when masking by instance or typeWhen views are masked by instance or type, personal data may leak during animations in the collected session.
To prevent this, there are two possible options: masking the entire screen or masking around the animation.
Mask the entire Screen
Apply default masking to the entire screen with setDefaultMasking(true), without using any instance-based or type-based masking/unmasking.
After the user navigates to another screen, you can deactivate the default masking with setDefaultMasking(false) and use any view masking APIs.
Mask around the animation
Mask the entire screen just before the animation, following the Masking rules priority.
This involves reversing any instance-based or type-based masking/unmasking for views and then calling setDefaultMasking(true).
After the animation, you can restore the previous masking settings by instance or type.
Troubleshooting
Section titled TroubleshootingRequests are not sent from an Android emulator
Section titled Requests are not sent from an Android emulatorIf you struggle to watch a replay created on an emulator/simulator, it may be due to some network constraints applied on your computer (VPN, company network restrictions, etc.). Check your configuration or use a real device.
See Requests are failing for more information about our endpoints and requests.
Very long session on an Android emulator
Section titled Very long session on an Android emulatorIt is important to remember that an app kill does not end a session. See Session definition for more information. If you leave the simulator/emulator running with the app in foreground, the session will not end, even if you are inactive. To better reflect actual end user behavior and avoid unusually long sessions (last hours), put the app in background or kill it.
Unmasking with CS InApp features is broken
Section titled Unmasking with CS InApp features is brokenWhen activating the toggle in CS InApp to unmask elements in Session Replay,it can sometimes give a strange result with some elements still masked. This is due to the fact that unmasking with InApp features acts differently than when done in the code by the app developer. To ensure a session is fully unmasked as it would be if it was done in the code of the app, follow these steps:
- Toggle the “Unmask …” switch
- Navigate to a different screen
- Go back to the previous screen
- Put the app in background
- Wait for the session timeout
- Re-open the app
From this point on, you will have a fully unmasked session.